# Getting Started
Learn the basic Tahr workflow from organization setup to your first reviewed findings.
Use this page to prepare a first useful run. Give Tahr enough scope, access, and context to produce findings your team can review.
## The basic workflow
:::warning
Use Tahr against a staging, test, preproduction, or other dedicated non-production environment. Assessing production systems is strongly discouraged. Review the [Security Notices](/security-notices) before continuing.
:::
1. Open Administration and verify the domains Tahr may assess.
2. [Add an application](/applications) with the target URLs and scope.
3. Complete the [application setup checklist](/application-setup), including any login, repository, API, or mobile inputs needed by the assessment.
4. Run an assessment manually, through a routine, on a schedule, or from CI/CD.
5. Review findings, authorization issues, attack paths, source observations, and reports, then triage or export the results.
The setup checklist is conditional: a public web run may need only a verified target, while authenticated, API, source, mobile, or authorization work needs its corresponding inputs. Start with the smallest useful scope, confirm the evidence is relevant, and expand only after the first result is understandable.
## Before you begin
Prepare:
- The application URL and, when applicable, API URL.
- Permission to verify the application domain.
- A dedicated non-production target.
- Dedicated test accounts, with role, tenant, and object-ownership details.
- The login URL and an Authentication Check URL that proves a session is logged in.
- Repository access if source review is in scope.
- IP allowlist or WAF requirements, if the target restricts assessment traffic.
## Choose your first assessment type
For a first useful run, choose based on the question you need answered:
- **Reconnaissance (Recon)**: discover and understand the external attack surface before broader testing.
- **Source Code Analysis (Code Review)**: review a repository for code-backed security risks and remediation context.
- **Full Assessment**: perform broad web application security testing, including dynamic authorization testing when configured.
- **Full Assessment (No Authorization)**: perform broad testing while skipping dynamic authorization testing when authorization is out of scope.
- **Threat Modeling (Threat Model)**: identify threats, attack paths, assets, trust boundaries, and recommended mitigations.
- **Android Pentest (APK)**: test an uploaded Android application package.
This onboarding shortlist is not exhaustive. See [Choose the right assessment](/running-assessments#choose-the-right-assessment) for every production assessment type and its prerequisites.
## Recommended first run
The Dashboard may recommend a first assessment based on a verified APK, usable authenticated setup, repository setup, or a public target. Always review the launch form before starting; the recommendation does not start an assessment automatically.
Start with one target your team controls and understands. Keep scope narrow, use dedicated test users, and review the setup checklist before launching. If a WAF or IP allowlist restricts traffic, configure the needed [reserved IP](/organization-settings#reserved-ips) first. Treat the first run as a setup-quality check: correct the target URLs, login flow, roles, and scope before expanding coverage.
A guided routine is an optional reusable, multi-step path. Selecting **Start routine** opens routine review and application selection; it never auto-starts a run.
## What good setup looks like
Use the real login URL, an Authentication Check URL that returns user-specific data, and test users for important roles. Describe tenant and ownership boundaries, mark out-of-scope areas, and add only the application context or repository details needed for the chosen workflow. Never put passwords, API keys, recovery codes, or other secrets in free-text fields.
## What Tahr produces
Depending on the assessment, Tahr may produce evidence-backed or potential findings, authorization issues, source observations, attack paths, and reports for review and remediation planning.
## Where to go next
- [Review the security notices](/security-notices)
- [Secure your account and manage notifications](/profile)
- [Add an application](/applications)
- [Complete application setup](/application-setup)
- [Configure authenticated testing](/authenticated-testing)
- [Run an assessment](/running-assessments)
Source: https://docs.tahr.one/getting-started
---
# Security Notices
Review the environment, account, secret, scope, and integration safeguards required before running a Tahr assessment.
Before running an assessment, review these security requirements. They reduce the risk of data exposure, unintended actions, unreliable results, and unauthorized access.
## Use a non-production environment
Run Tahr against a staging, test, preproduction, or other dedicated non-production environment.
:::warning Important security notice
Assessing production systems is strongly discouraged.
Automated security testing may create or modify data, trigger notifications, or affect application availability.
:::
## Use dedicated test accounts and data
Use dedicated test identities with only the permissions required for the assessment. Use disposable test data that can be changed or removed without affecting active users.
Do not use:
- Personal employee accounts.
- Real customer accounts or data.
- Production administrator accounts.
- Accounts shared with active users or concurrent assessments.
For authorization testing, provide separate users across the relevant roles, tenants, workspaces, or ownership boundaries.
## Keep secrets out of free-text fields
Never enter passwords, API keys, access tokens, client secrets, recovery codes, TOTP secrets, private customer data, or other sensitive information in free-text fields.
Use the dedicated credential, authentication, header, repository, or integration fields provided by Tahr.
This applies to application context, testing instructions, authentication guidance, comments, findings, tickets, and Assistant questions.
## Verify the target and scope
Before launching an assessment, confirm that every configured target belongs to the intended application and environment.
Review:
- URLs and domains.
- API definitions.
- Repository and branch.
- Authentication settings.
- Test identities.
- Uploaded files.
- Custom headers.
- Assessment type and scope.
Incorrect or outdated inputs may cause Tahr to test the wrong target or produce incomplete or misleading results.
## Limit third-party access
Repository, OAuth, ticketing, CI/CD, and integration credentials must use the least privileges required.
Restrict connections to the intended repositories, projects, teams, and applications. Remove unused connections and rotate credentials when they are no longer required or may have been exposed.
Before enabling ticket creation or external workflows, verify the selected destination to prevent assessment data from being sent to the wrong project or organization.
Source: https://docs.tahr.one/security-notices
---
# Profile and Notifications
Manage your personal account settings, account security, and organization notification preferences.
Open the user menu and select **Profile** to manage settings for your own account. Profile settings are personal to you. Organization-wide users, roles, and shared settings are managed separately in [Administration](/organization-settings).
Before changing notifications or MCP access, verify the active organization. Permissions and data are organization-specific.
## Personal account settings
Use the profile details to keep your personal information current and select your preferred language when available. These settings affect your account and do not change organization details or other members' access.
### Change your password
Use the password settings to choose a unique, strong password that you do not reuse. If you cannot sign in or need help changing a password, see [Troubleshooting](/troubleshooting).
### Passkeys and multi-factor authentication
Profile currently shows passkey availability information only; passkey enrollment is not available from the current Profile workflow. Use the available password controls or set up multi-factor authentication with an authenticator app by following the displayed setup flow. Store recovery material somewhere only you can access. Resetting multi-factor authentication removes the existing factor, so set up a new one promptly.
## Notifications
Open the **Notifications** tab in Profile to manage notification preferences for the selected organization. Preferences are organization-specific: a change applies only to the organization currently selected, not to every organization you can access.
The table shows event categories with separate **In-app** and **Email** columns. Enable the channels you want for the events relevant to your work. Categories currently visible can include:
- Assessment completion
- Automated assessment starts
- False-positive changes when permitted
- Risk-accepted changes
- Finding closure changes
- Comments
The **New High or Critical findings** row may be visible, but this notification is currently unavailable.
Some rows or channels may be disabled or available only when your permissions allow them. This is expected when an event does not apply to your access level.
Select **Save** after changing notification preferences. When you switch organizations, return to the Notifications tab to review and save preferences for that organization separately.
### Notification inbox
Select the bell in the app header to open the notification inbox for the selected organization. The bell shows an unread count when you have unread notifications. Opening a notification marks it as read and takes you to its destination. You can dismiss one notification or select **Mark all read**. Available notifications depend on your permissions.
## MCP access
To connect an approved MCP client, open the **MCP** tab in Profile. See [MCP Access](/mcp-access) for the connection steps and token safety guidance.
## Where to go next
- [Add an application](/applications)
- [Review findings](/findings)
- [Connect an MCP client](/mcp-access)
- [Manage Administration](/organization-settings)
Source: https://docs.tahr.one/profile
---
# MCP Access
Connect an approved MCP client to Tahr using OAuth or a personal access token.
Use MCP Access to connect an approved MCP client to Tahr. Open the user menu, select **Profile**, then select **MCP**. Each connection is scoped to one organization, so verify the organization before you connect.
## Check access
If the page says access requires a grant, ask an administrator to grant access. Users with MCP management permission can use **Administration** -> **MCP**. If the organization has disabled MCP or no organization is active, follow the guidance shown in the app.
If your MCP client reports **“Ask your administrator to enable MCP access.”**, login succeeded but your account has no individual MCP access and the organization has not enabled access for everyone. This applies to OAuth and valid personal tokens. Ask your administrator to allow access; signing in again will not resolve it. Expired or revoked credentials must still be replaced or reauthorized.
### Organization-wide access
Administrators with MCP management permission can turn on **Enable MCP for everyone** in **Administration** -> **MCP**. This allows all active current and future members, including members previously disabled individually. Individual switches lock and show **Enabled by organization** while this setting is on.
Turning the setting off restores saved individual access settings. Members without individual access lose MCP access immediately; their credentials are suspended, not deleted. Turning it back on resumes valid, non-revoked credentials. Platform MCP restrictions and each member's role permissions still apply. Members must connect their own OAuth client or create a personal token.
## Connect a client
### OAuth
When OAuth is enabled, copy the endpoint from **Profile** -> **MCP** into your OAuth-capable client or Cloudflare MCP Portal. Start the client's sign-in flow, then select your organization. Your administrator must allow MCP access individually or for everyone first. The client handles token refresh automatically.
For Cloudflare MCP Portal, select **OAuth** for the upstream server and keep **Require user auth** enabled so each person connects with their own Tahr account.
### Personal token
1. In **Profile** -> **MCP**, copy the endpoint shown for the active organization.
2. Review the available tools so you understand what the client can access.
3. Create a personal token. Add a recognizable label and select a 90, 180, or 365-day lifetime.
4. Copy the token immediately. It is shown only once.
5. Use the client configuration provided in Tahr. Store the token as a bearer credential in your client, without publishing it.
## Manage connected apps
**Connected apps** shows your OAuth connections for the current organization, their status, and last use. **Disconnect** blocks that connection in the current organization immediately, including refreshed tokens.
To reconnect a disconnected app, select **Disconnect everywhere**, confirm, then sign in again from your MCP client. This disconnects the app from all your Tahr connections, not only the current organization. If it can't complete, the app stays disconnected locally and you can try again.
## Manage tokens
The token list shows each token's status: active, suspended, expired, or revoked. Check its expiry date and last-used time before keeping it. The active-token limit is shown in the app.
Revoke a token you no longer need, suspect is exposed, or need to replace. Create a replacement token and update the client before revoking a token that is still in use.
## Keep tokens safe
Never share, commit, or log a token. Use environment variables or your MCP client's secret storage. Revoke a token immediately if it is exposed. After switching organizations, verify the active organization before using or creating a token.
## Where to go next
- [Add an application](/applications)
- [Review findings](/findings)
Source: https://docs.tahr.one/mcp-access
---
# Applications
Create and manage the application records Tahr uses for security assessments.
Applications are the targets Tahr can assess. Each record stores target URLs, setup status, authentication details, repository settings, and testing context.
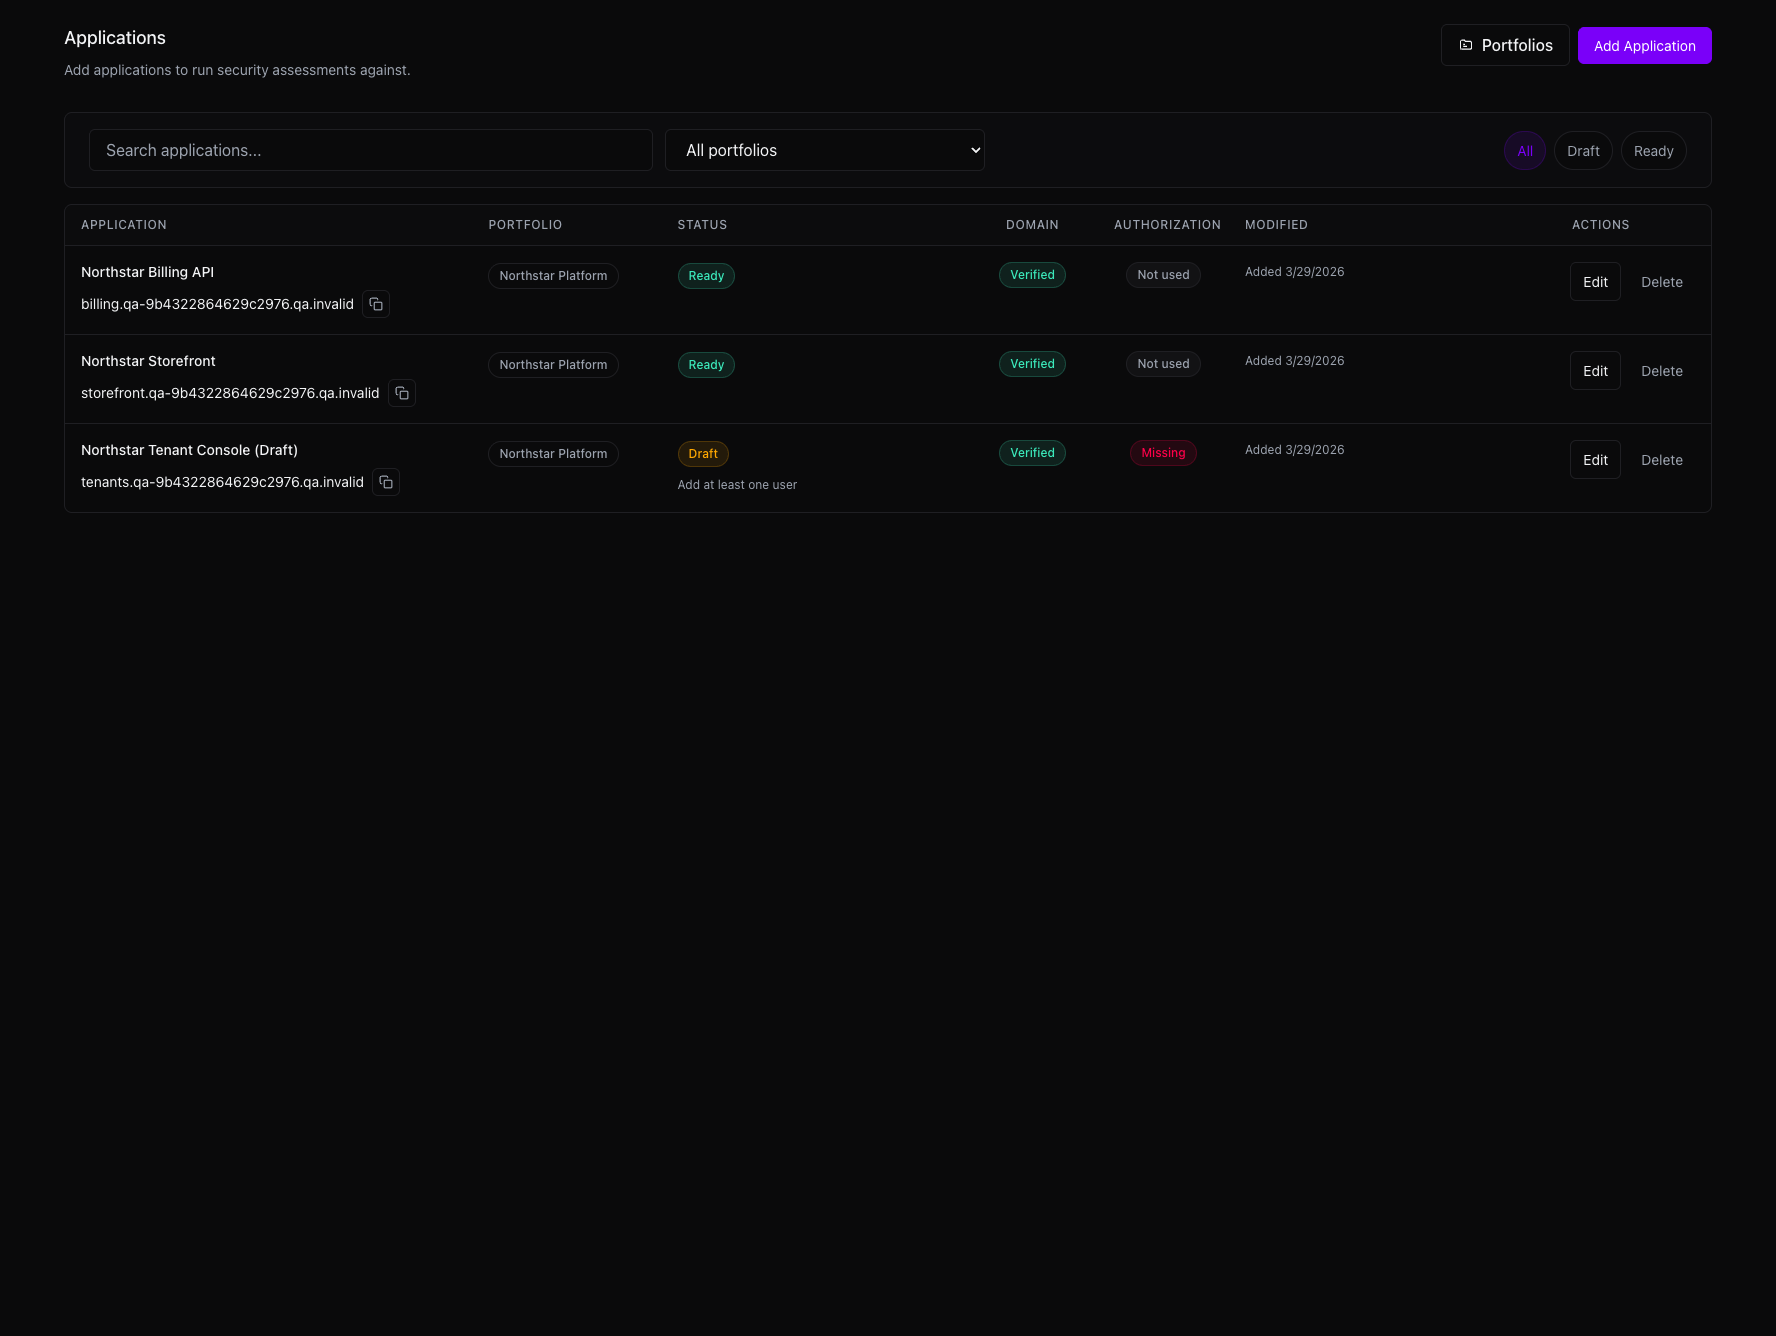
## Applications list
Use **Search** to find applications. When portfolio grouping is enabled, an optional portfolio filter and a **Portfolios** button appear above the list. Use **All**, **Ready**, and **Draft** to filter by setup status.
The list shows **Application**, optional **Portfolio**, **Status**, **Domain**, **Authorization**, **Modified**, and **Actions** columns. Available actions depend on your access.
API, sign-in automation, and other setup details are available in the application editor and readiness blockers.
## Add an application
:::warning
Use Tahr against a staging, test, preproduction, or other dedicated non-production environment. Assessing production systems is strongly discouraged. Review the [Security Notices](/security-notices) before continuing.
:::
From **Applications**, choose **Add Application**. Enter the basic target details first:
- **Application name**: the product or service name your team uses.
- **App URL**: the main web application URL, when a browser target is in scope.
- **API URL**: optional. If it is blank, Tahr uses the App URL when an assessment needs an API target. Add an API URL when the API is hosted at a different origin.
Use URLs that represent the real assessment scope. Tahr then shows the setup checks that apply to those choices.
## Target and assessment context
### WAF and reserved IPs
Answer **Do you have a WAF?** when the target sits behind a WAF, firewall, or IP allowlist. If assessment traffic must be allowlisted, configure a reserved IP before launch; see [Reserved IPs](/organization-settings#reserved-ips). The WAF choice and target-specific context belong in the application, while provider connection steps belong in [Integrations](/integrations).
### Android APK
Enable the APK option when the application includes an Android app and you want **Android Pentest**. The workflow requires APK support, a non-empty uploaded APK, and an application URL. Leave it off for web, API, or source-only assessments; the full readiness guidance is in [Application Setup](/application-setup#basics).
iOS application testing is not currently supported.
### Application documents
After saving the draft, choose **Upload** when the document area is available. Supported formats include PDF, Markdown, text, DOCX, JSON, YAML, and PNG or JPEG. Documents are optional context for eligible workflows, especially Threat Modeling; they do not automatically affect every assessment. See [Application Setup](/application-setup#application-documents).
### Testing instructions
Use **Testing instructions** for direct, assessment-specific guidance: workflows to exercise, out-of-scope areas, actions to avoid, role or tenant boundaries, and unusual behavior that should not be reported. Do not put passwords, API keys, recovery codes, or other secrets in this field.
## Readiness and authenticated access
### Domain readiness
When verification is required, Tahr checks the application domain and API domain before assessment. If a domain is missing or pending, follow the blocker and see [Where to verify a domain](/organization-settings#where-to-verify-a-domain). Correct the hostname, scope, DNS verification, and any WAF or reserved IP requirement. Conditional inputs and readiness blockers are documented in [Application Setup](/application-setup#readiness-blockers).
### Authenticated testing
Enable authenticated testing when important workflows require a session. Add the full public HTTP(S) **Login URL** where sign-in starts and configure dedicated test identities. The Login URL can be the application, a custom tenant identity provider, or another public authentication provider; it does not need to be a verified application domain. [Authenticated Testing](/authenticated-testing) is the canonical guide for login, Authentication Check URL, roles, tenants, second factors, SSO, and sign-in automation.
### Login URL and Authentication Check URL
The **Authentication Check URL** must be a full URL on the configured application or API origin and return user-specific authenticated data, commonly `/me`, `/profile`, `/account`, `/api/me`, `/api/user`, or `/api/profile`. Do not use a public page, health check, static asset, or route that always returns `200`; Tahr must be able to distinguish an authenticated response from an anonymous one. Public third-party or custom identity-provider redirects are allowed during sign-in, but the final check is on the application or API origin. See [Login URL and Authentication Check URL](/authenticated-testing#login-url-and-authentication-check-url).
### Extra context for authentication
Use **Extra context for authentication** for application-specific login guidance such as SSO redirects, tenant selection, fixed test CAPTCHA behavior, post-login confirmation, protected areas to avoid, or unusual session behavior. Keep it concise and free of secrets.
### Test identities
Use dedicated test identities with the least privilege needed. Describe each role, tenant, workspace, and ownership boundary, and provide intentionally different users when authorization testing compares access. Second-factor methods and managed email identities are covered in [Authenticated Testing](/authenticated-testing#test-users). Never reuse personal or production administrator accounts.
### Test users
Add each account that Tahr should use and map it to the correct role and tenant. Confirm that the account can reach the workflows in scope without granting unnecessary administrative access. For email codes or magic links, use the dedicated test inbox or managed address required by the configured flow.
## Optional inputs
### Repository access
Enable **Repository access** for source-code analysis or workflows that need application context. Select the connected provider integration, then provide the **Repository URL** and **Branch**; keep the default branch unless another branch is in scope. If the application and API use separate repositories, choose the repository relevant to the assessment. Connect GitHub, Bitbucket, or GitLab through [Integrations](/integrations), rather than adding provider setup details here.
### Ticketing destinations
Ticketing is separate from repository access. Connect Jira, GitLab, Azure DevOps, Linear, or any other ticketing integration available to your organization through [Integrations](/integrations#ticketing-destinations). Scope the destination to **All apps** or **Specific apps** before creating tickets from findings.
### API file
Add an API file when Tahr should understand API structure before testing. Use an OpenAPI definition for REST or a GraphQL schema or introspection artifact for GraphQL. These inputs are optional but useful for API-heavy and authorization assessments.
### Custom HTTP headers
Use **Custom HTTP headers** only for approved assessment traffic, such as an environment or tracking header required by staging. Avoid long-lived secrets in headers unless that is the agreed access method.
### Sign-in automation
Use **Sign-in automation** for multi-step login, SSO redirects, tenant selection, or post-login prompts that credentials alone cannot represent. Add the Login URL, choose **Record sign-in**, complete the approved flow, and choose **Finish recording**. Allow pop-ups or use **Open live view** if the local recorder is blocked by a WAF or does not open. Wait for the recording to save, review its status and timestamp, and never capture unrelated secrets. Use **Record again**, **Upload recording**, **Change file**, or remove the recording when needed. For the detailed workflow, see [Sign-in automation](/authenticated-testing#sign-in-automation).
## Draft and ready states
An application remains a draft while required inputs are missing, such as domain verification, login details, repository access, or test users. It becomes ready when Tahr has enough information to run at least one supported assessment safely. Readiness is conditional on the chosen workflow; follow the blockers shown in [Application Setup](/application-setup#readiness-blockers).
## Application context
Use **Application context** for reusable background: important workflows, out-of-scope areas, unusual behavior, business-critical roles, tenant boundaries, or testing limitations. Keep guidance specific and put credentials only in dedicated credential fields.
## Editing an application
Edit an application when target details change or when adding authentication, source access, API files, recordings, or other setup information after the draft. Avoid major target or credential changes while an assessment is running.
## Portfolios
When available, portfolios group applications by product, team, business unit, or environment. Open **Applications**, then choose **Portfolios**. Assign a portfolio during **Basics** when creating an application, or assign it later. Application editors can create a portfolio inline during creation when that option is shown. Portfolio availability and actions depend on your organization's enabled options and your permissions. Portfolios organize applications but do not replace application-level setup; see [Portfolios](/portfolios).
Source: https://docs.tahr.one/applications
---
# Portfolios
Group applications by product, team, environment, or business unit.
Portfolios group applications inside an organization. Use them when your team manages many applications and needs a cleaner way to organize scope.
Good portfolio examples:
- Product lines.
- Business units.
- Engineering teams.
- Customer environments.
- Production versus staging groups.
- Compliance or audit scopes.
Portfolios are organizational labels. They do not change application permissions, assessment scope, authentication setup, or finding severity.
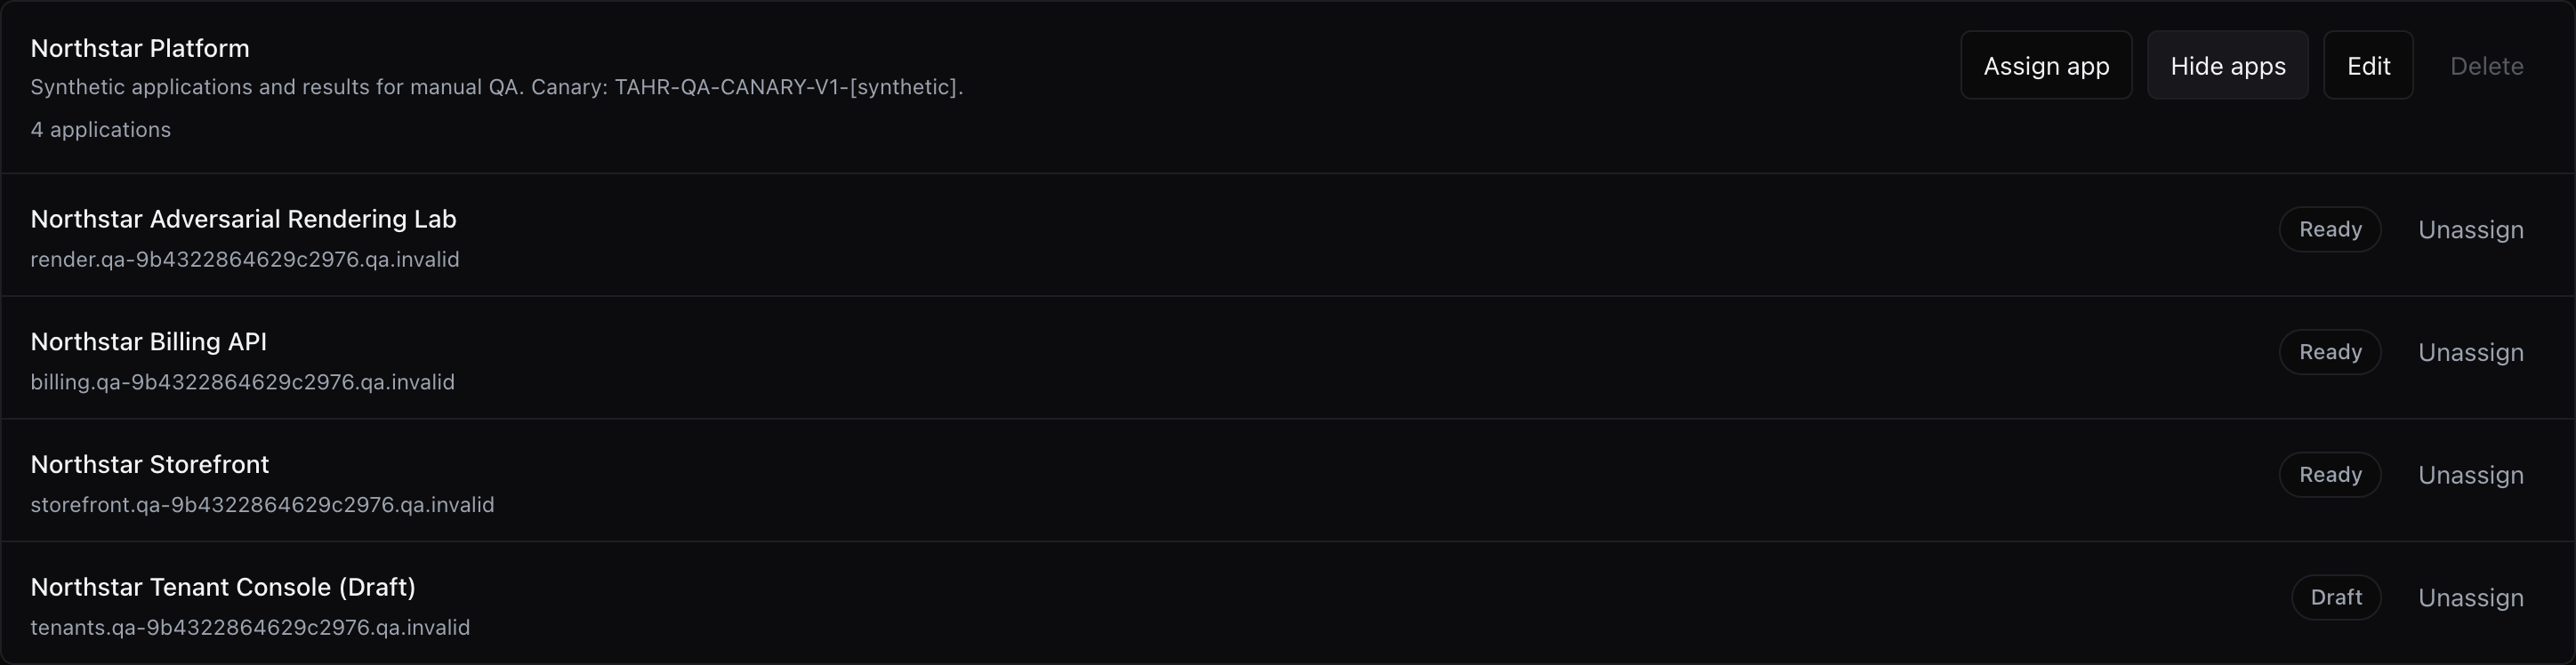
The Portfolios page lists each portfolio with its description, application count, and management actions.

## Availability and permissions
The **Portfolios** entry appears under **Applications** only when portfolio grouping is enabled and you have application read permission. You need application edit permission to create portfolios, edit portfolio details, assign applications, unassign applications, or delete portfolios.
If the **Portfolios** entry is not shown under **Applications**, continue managing targets from **Applications**. Ask your organization owner to review your application access, or contact Tahr Support if your team expects portfolio grouping.
## Create a portfolio
Open **Applications**, then choose **Portfolios** and **Add Portfolio**.
Add:
- **Name**: the portfolio name your team will recognize.
- **Description**: optional context, such as the team, environment, or business unit the portfolio represents.
Portfolio names must be unique within the organization. Tahr normalizes names before saving, so avoid names that differ only by spacing or letter case.
## Edit a portfolio
Use **Edit** from the portfolio list to update the name or description.
Changing a portfolio name does not change the applications assigned to it. It only changes the label shown in portfolio lists and filters.
## Assign applications
Applications can be assigned from the portfolio page or during application creation when the **Assign to portfolio** option is shown. Application editors can assign or create a portfolio during creation when those options are shown.
From the portfolio page:
1. Open **Applications**, then choose **Portfolios**.
2. Find the portfolio.
3. Choose **Assign app**.
4. Select the application.
5. Save the assignment.
If the application already belongs to another portfolio, assigning it moves it to the selected portfolio.
## Unassign applications
Use **Show apps** on a portfolio to view assigned applications. Choose **Unassign** beside an application to remove it from the portfolio.
Unassigning keeps the application record, setup, credentials, assessments, and findings intact. It only removes the portfolio association.
## Delete a portfolio
You can delete a portfolio only after all applications have been moved or unassigned.
If a portfolio still contains applications, Tahr blocks deletion and asks you to move or unassign those applications first. This prevents accidental loss of organization structure.
Deleting a portfolio does not delete applications or assessment history.
## Filter by portfolio
When portfolios are available, portfolio filters appear on the **Applications** page and in **Findings** -> **Applications**.
Use portfolio filters to narrow large views to the applications owned by one team, product, or environment. Filters apply only to records you can already access; they are not authorization boundaries.
## What portfolios do not do
Portfolios are not an authorization boundary.
They do not:
- Grant access to applications.
- Hide applications from users who already have permission to view them.
- Change what Tahr is allowed to test.
- Replace domain verification.
- Replace application setup.
- Change which test users or credentials apply.
Use organization roles and permissions for access control. Use portfolios for organization and filtering.
## Recommended structure
Choose a portfolio structure that matches how your team owns remediation.
If engineering teams own fixes, group by team. If product managers own releases, group by product. If the security team reports by environment, group by production, staging, and demo.
Avoid creating too many small portfolios. A portfolio should make views easier to review, not create another layer of maintenance.
## Troubleshooting portfolios
If the **Portfolios** entry is not shown under **Applications**, use **Applications** to manage targets and ask your organization owner to review your application access. Contact Tahr Support if your team expects portfolio grouping.
If the page is visible but you cannot create or edit a portfolio:
- Confirm that your role has application edit permission.
- Check that the name is not empty.
- Check that another portfolio does not already use the same name.
If you cannot delete a portfolio:
- Open the portfolio.
- Show the assigned applications.
- Unassign or move each application.
- Try deleting the portfolio again.
Source: https://docs.tahr.one/portfolios
---
# Application Setup
Complete the target, access, authentication, and readiness steps for a Tahr application.
New applications use a multi-step setup wizard. Existing applications reopen in the application editor, where you can maintain the same setup. Completed, continued, and saved steps persist so you can return later when a blocker needs another team. **Cancel** exits without saving unsaved edits on the current step.
The wizard shows the steps that apply to the application and selected testing. Its visible order is:
1. **Basics**
2. **AI provider**, when your organization AI or BYOK setup requires it
3. **Access & login**
4. **Test identities**, only when authenticated testing is enabled
5. **Optional inputs**
6. **Review**
Steps are conditional. Follow the steps and fields shown in the UI; not every application sees every step.
## Basics
Enter the application name and **App URL**. **API URL** is optional: if it is blank, Tahr uses the App URL when an assessment needs an API target. Add an API URL when the API is hosted at a different origin. Use URLs that represent the real assessment scope. Tahr checks that each hostname is allowed by your organization before an assessment can run.
If the target sits behind a WAF, firewall, or IP allowlist, answer **Do you have a WAF?**. Configure or prepare a reserved IP only if assessment traffic must be allowlisted or Tahr requires one. See [Reserved IPs](/organization-settings#reserved-ips) for the organization-level operation. Use a staging, test, preproduction, or other dedicated non-production target; review the [Security Notices](/security-notices) before continuing.
Add testing context only when it helps the selected assessment: important workflows, out-of-scope areas, role or tenant boundaries, unusual behavior, and actions to avoid. Never put passwords, API keys, recovery codes, or other secrets in free-text fields.
## Access & login
Enable authenticated testing only when protected functionality is in scope. Add the full public HTTP(S) Login URL and an Authentication Check URL on the configured application or API origin that returns user-specific data. [Authenticated Testing](/authenticated-testing) is canonical for login flows, roles, tenants, ownership boundaries, second factors, SSO accounts, and sign-in automation; do not duplicate those procedures here.
## Test identities
When authenticated testing is enabled, add the required test identities. Use the identities, roles, tenants, and ownership boundaries that the assessment is authorized to exercise.
## Optional inputs
Configure only the optional inputs required by the assessment. For private source review, choose **Repository access**, select the connected provider integration, then enter the **Repository URL** and **Branch**. Leave the default branch unless another branch is in scope. Provider connection and repository browsing are documented in [Integrations](/integrations).
For API-focused testing, add an API file: use an OpenAPI definition for REST or a GraphQL schema or introspection artifact for GraphQL. **Custom HTTP headers** may supply an approved staging or tracking header; do not use free-text fields for long-lived secrets. GitLab targets may also require provider-specific custom headers in the integration setup.
### Android Pentest prerequisites
Select the APK option only when **Android Pentest** is in scope. Readiness requires APK support, an uploaded non-empty APK, and an application URL. Upload the artifact in the application flow and resolve the blocker shown by Tahr before launch.
iOS application testing is not currently supported.
### Application documents
When the document area is available, save the application draft and choose **Upload**. Supported formats include PDF, Markdown, text, DOCX, JSON, YAML, and PNG or JPEG images. Documents are optional context for eligible workflows, especially Threat Modeling; do not imply that every assessment reads them or that an upload changes all assessment types.
If a workflow needs a repository, ticketing destination, or another provider, connect it through [Integrations](/integrations). Application setup should contain the application-level URL, branch, file, header, and context choices, not provider connection procedures.
For every optional input, check that it belongs to the intended application and environment. A repository from the wrong product or a schema from another API can make otherwise valid results misleading. Use the same branch, API definition, headers, and test identities that the assessment is authorized to exercise, and remove stale artifacts when the target changes.
## Readiness blockers
Tahr lists the blockers that apply to the selected setup. Common examples are:
- The application or API domain is missing, pending, or outside the verified scope.
- Private repository access, the repository URL, or the selected branch is missing.
- An API definition required by the selected workflow is missing or invalid.
- Authenticated testing is enabled without a login URL, user-specific Authentication Check URL, or required test identity.
- Roles, tenants, ownership details, or second-factor setup are incomplete for authorization testing.
- Android Pentest is selected without APK support, a non-empty uploaded APK, or an application URL.
- Threat Modeling is selected without the repository access it needs.
Resolve blockers from top to bottom because later checks can depend on earlier choices. For a domain blocker, verify the hostname, organization domain entry, DNS status, and any WAF or reserved IP requirement. For a conditional input, configure it only when the chosen assessment needs it.
Some blockers are deliberately conditional. A public unauthenticated assessment may not need login users, while an authenticated authorization assessment may need several roles and tenants. Similarly, an API file, repository, APK, or document is relevant only when its selected workflow supports or requires it. Do not bypass a blocker by adding unrelated data; correct the input or change the assessment scope intentionally.
## Review
The review step summarizes the target, access, authentication, and conditional inputs. If blockers remain, Tahr saves the application as a draft. If none remain, Tahr marks it ready for eligible assessments; readiness does not mean every assessment type is configured.
Before finishing, confirm the scope, credentials, repository branch, API artifact, and test-user boundaries. Tahr's readiness status is the source of truth: follow the blockers it lists instead of assuming that every setup item applies to every workflow.
Source: https://docs.tahr.one/application-setup
---
# Authenticated Testing
Configure login details, test users, roles, tenants, and second-factor handling for authenticated testing.
Authenticated testing lets Tahr test functionality that requires login. Use dedicated test users and a controlled non-production target, never employee or production administrator accounts. Review the [Security Notices](/security-notices) before configuring identities.
## When to enable authenticated testing
Enable authenticated testing when important functionality is behind login, including dashboards, account settings, admin areas, tenant data, or API actions that require a session. Leave it off for public-only targets, recon, or source-code-only work. Configure the setting and related readiness inputs in [Application Setup](/application-setup#access-login).
## Login URL and Authentication Check URL
The **Login URL** is the full public HTTP(S) URL where sign-in begins. It can be an application login page, a custom tenant identity provider, or another public authentication provider, and must be publicly reachable.
The **Authentication Check URL** is one or more full URLs on the configured application or API origin that prove the resulting session belongs to a user. It should return user-specific data, for example:
- `/me`
- `/profile`
- `/account`
- `/api/me`
- `/api/user`
Choose the endpoint that best represents your application. A generic page, health check, public homepage, static asset, or route that always returns `200` is not sufficient: if anonymous and authenticated requests receive the same response, Tahr cannot confirm that login succeeded.
Use **Extra context for authentication** in the application to explain SSO redirects, tenant or workspace selection, fixed test CAPTCHA behavior, post-login confirmation, protected areas to avoid, and unusual session or timeout behavior. Keep this guidance concise and free of passwords, API keys, recovery codes, and other secrets.
Test the Authentication Check URL with the same account and environment that the assessment will use. It should identify the current user or return another response that changes when the session is absent. Third-party or custom identity-provider redirects can be public intermediate steps; the final check must be on the configured application or API origin.
For recorded Google or Microsoft flows, use the configured provider account, complete the provider's approved HTTPS authorization flow, and continue back to the application, API, or a verified organization domain.
## Test users
Create dedicated test users before setup and document each user's:
- Role, such as viewer, member, manager, or admin.
- Tenant, workspace, or organization, if the application is multi-tenant.
- Permissions needed to exercise important workflows.
- Object ownership or other data boundaries relevant to authorization.
Use the least privilege needed for each test. For authorization testing, provide intentionally different roles, tenants, and object owners so Tahr can compare what each user may view or change. Do not use real customer data or personal employee accounts. A Tahr-managed email address may be used when the selected email flow needs Tahr to receive a code or magic link.
Record which account owns representative objects when object-level authorization is in scope. Include a permitted user and a deliberately different user where the workflow must distinguish ownership. Run authenticated assessments only against a dedicated non-production target. Keep test data disposable and avoid actions that send real notifications or delete shared data.
## Second-factor authentication
Customer-visible test flows may use email or magic-link codes, SMS codes, authenticator-app (TOTP) codes, or a fixed code in a controlled test environment. Enable second-factor handling for the users that need it and provide the per-user method requested by the form. Mixed setups are valid: some test users may require a second factor while others do not.
For email or magic-link testing, use a dedicated managed inbox and follow the login flow shown by the application. For SMS, use an organization-controlled test number. For TOTP, use a test account's authenticator setup. Fixed codes should be limited to non-production test accounts and rotated according to your team's policy. See [SSO accounts](/organization-settings#sso-accounts) and [SMS numbers](/organization-settings#sms-numbers) when those capabilities require organization configuration.
### Managed email and SMS
For a dedicated test identity, generate and copy the managed email address before using it in the application. Save the application and test identity first, then use **Check latest email** for email or magic-link messages and **Check latest SMS** for text messages. Messages can take time to arrive, and SMS availability is limited. Use these only with dedicated test identities.
## SSO accounts
If your organization supports managed SSO test accounts, choose a configured Google or Microsoft account rather than putting full account details in the application. During login, choose **Sign in with Google** or **Sign in with Microsoft**, select the assigned test account, and complete the provider prompts shown by Tahr.
Do not use the same SSO test account for concurrent active assessments. Choose another account or wait for the first assessment to finish; shared login state can make results unreliable. Keep provider credentials in the managed SSO flow, not in free-text application fields.
## Sign-in automation
Use **Sign-in automation** when credentials alone cannot represent a multi-step flow, such as SSO redirects, tenant selection, or post-login prompts. Add the Login URL first, then choose **Record sign-in**, allow browser pop-ups if asked, and complete only the approved login journey. If the local recorder is blocked by a WAF or does not open, use **Open live view**. Choose **Finish recording** when the journey is complete.
Wait for the recording to save, then check its saved status and recorded timestamp. Review it before use. Choose **Record again** to replace it, **Upload recording** to provide an approved recording file, **Change file** to replace an uploaded file, or remove it when it is no longer needed. Do not capture unrelated secrets, personal accounts, recovery codes, or activity outside the approved identity-provider redirects. See [Sign-in automation](/applications#sign-in-automation) for the application workflow.
Source: https://docs.tahr.one/authenticated-testing
---
# Running Assessments
Start assessments manually, organize repeatable routines, use schedules, and connect CI/CD triggers.
Assessments execute Tahr testing workflows against a ready application. The types shown depend on the application setup and what is available for your organization.
:::warning
Use a dedicated non-production environment. Assessing production systems is strongly discouraged. Review the [Security Notices](/security-notices) before launching an assessment.
:::
## Choose the right assessment
Use the assessment type that matches your goal:
| Type | Purpose | Principal prerequisite |
| --- | --- | --- |
| **Full Assessment** | Broad web application security testing. | Ready application; authenticated setup when protected areas are in scope. |
| **Full Assessment (No Authorization)** | Broad testing without authorization checks. | Ready application. |
| **AI/LLM Pentest** | Testing AI-specific attack vectors. | Ready application with the AI feature in scope. |
| **Vulnerability Retest** | Recheck selected previously reported vulnerabilities. | A completed assessment with findings for the application. |
| **Reconnaissance** | Discover and understand the external attack surface. | Ready application and target scope. |
| **Source Code Analysis** | Review a repository for code-backed security risks. | Repository access. |
| **Source Code Diff Review** | Review repository changes since a selected source analysis. | Repository access and a completed source analysis with a captured commit. |
| **Threat Modeling** | Identify threats, attack paths, assets, boundaries, and mitigations. | Repository access; application documents when useful. |
| **Android Pentest** | Test an Android application package. iOS application testing is not currently supported. | APK support, uploaded APK, and application URL. |
The exact **Assessment type** names above are the production labels. CI/CD is available for the assessment types that show a CI/CD option; Threat Modeling is started from the Tahr interface.
If a type is unavailable, check the readiness message and the prerequisite in this table. Assessment launches use credits when Tahr shows a credit requirement; the required amount can vary by type and plan.
New manual, CI/CD, and routine launches may be temporarily unavailable. Existing assessments can continue. Scheduled occurrences may be skipped or advanced while new launches are unavailable; check the schedule or run history before trying again.
## Manual runs
Manual runs are best for one-off assessments and validation after setup changes.
Before starting, review:
- The [Security Notices](/security-notices).
- Target URLs and scope.
- Authentication settings.
- WAF or reserved IP requirements.
- Any wait-for-deployment option shown by Tahr.
- The selected assessment type.
Tahr shows credit use before a launch when applicable. Do not start a run until the selected type, scope, and credit requirement are correct.
### Choose an IP
When Tahr shows the IP selector, choose **None (use dynamic IP)** or an eligible reserved IP before launch. You must make this choice even when using a dynamic IP. Use a reserved IP only when you need a stable source IP for an allowlist or similar requirement. If an option is unavailable or occupied, wait or choose another eligible IP.
## Routines
Routines let you define a repeatable sequence of assessment steps. They are useful when your team wants the same process every time, such as recon before source-code analysis and runtime testing.
When a routine runs, later steps may reuse output from earlier steps when supported. This can reduce duplicate setup and improve context across the workflow.
For the full routine workflow, see [Routines](/routines).
## Source Code Diff Review
Use **Source Code Diff Review** when you want to review changes made after an earlier **Source Code Analysis**, such as before a release or after a focused remediation change. The application must have repository access, and a completed **Source Code Analysis** must have captured a commit before a diff review can be started.
When you start the assessment, select the eligible completed **Source Code Analysis** shown by Tahr as the baseline. If no baseline is available, run or complete a **Source Code Analysis** first and confirm that repository access and the selected branch are ready. If Tahr shows a credit requirement or availability message for the selected review, confirm it before launching.
After the review completes, use **Source Code** to examine the source-backed results and **Findings** for any related finding workflow. See [Source Code](/findings#source-code) for result review and [Source-code analysis is unavailable](/troubleshooting#source-code-analysis-is-unavailable) if repository access blocks the assessment.
## Schedules
Use **Schedule** for recurring assessments and release-cycle testing. Open **Assessments**, then **Schedule**. Schedule availability and reserved IP capacity can depend on your plan and permissions.
1. Select the application and an available assessment type.
2. For a target-based assessment, select an available reserved IP. Repository-only schedules do not use one.
3. Choose the recurring frequency: hourly, daily, weekly, or monthly.
4. Set the run time using your organization's timezone.
5. Resolve any readiness message before saving. Confirm that test-account arrangements will still be available at each occurrence.
6. When Tahr shows them for the selected assessment, configure run-level authentication, context, or other assessment settings.
7. Create the schedule. When **Run first now** is shown, you can use it to validate the setup before waiting for the next occurrence.
Target-based schedules require a reserved IP. If the target uses a WAF, firewall, or IP allowlist, that IP may also need to be allowlisted. Threat Modeling, Source Code Analysis, and Source Code Diff Review schedules are repository-only and do not show the reserved IP field.
Open an existing **Schedule** to edit it, enable or disable it, or delete it when it is no longer needed. A scheduled occurrence can be skipped or blocked when the application is not ready, a required resource is unavailable, new launches are temporarily unavailable, or another active assessment conflicts with it. Check the schedule or run history, resolve the displayed issue, and see [Assessment cannot start](/troubleshooting#assessment-cannot-start) before retrying.
## CI/CD triggers
Use **CI/CD** to let a pipeline start an approved assessment without opening the Tahr UI. Open the application's **CI/CD** section, then generate a trigger token. Copy and store the token once in your CI/CD secret storage; do not place it in repository files, build logs, or shared configuration.
Configure the pipeline using only the endpoint, header, and body shown by Tahr. Select an assessment type supported by that application and visible in **CI/CD**. When Tahr shows a reserved IP option, select it only when the target's WAF, firewall, or allowlist requires it.
Use the application's **CI/CD** section to generate, regenerate, or disable a token. Regenerate the token if it is exposed or when personnel or CI/CD tooling changes, then update the stored secret before the next pipeline run. Application readiness, permissions, credits, and launch availability still apply to CI/CD-triggered assessments. If a trigger fails, confirm the current secret and selected type, then see [CI/CD trigger does not work](/troubleshooting#ci-cd-trigger-does-not-work).
## During a run
Check the visible status and message first. Avoid starting duplicate active or queued launches. When offered, pause or resume the run; cancel it if the work must stop. Cancelling queued routine steps does not cancel an assessment that is currently active.
If the assessment finished but cleanup failed, use **Retry cleanup** when shown. Before retrying a failed or blocked launch, resolve the visible readiness, credits, authentication, launch availability, or WAF/IP blocker. See [Troubleshooting](/troubleshooting) for next steps.
Source: https://docs.tahr.one/running-assessments
---
# Routines
Create repeatable multi-step assessment workflows for an application.
Routines let you save an ordered assessment workflow and run it against an application later. Use them when your team wants the same sequence each time instead of rebuilding the launch plan manually.
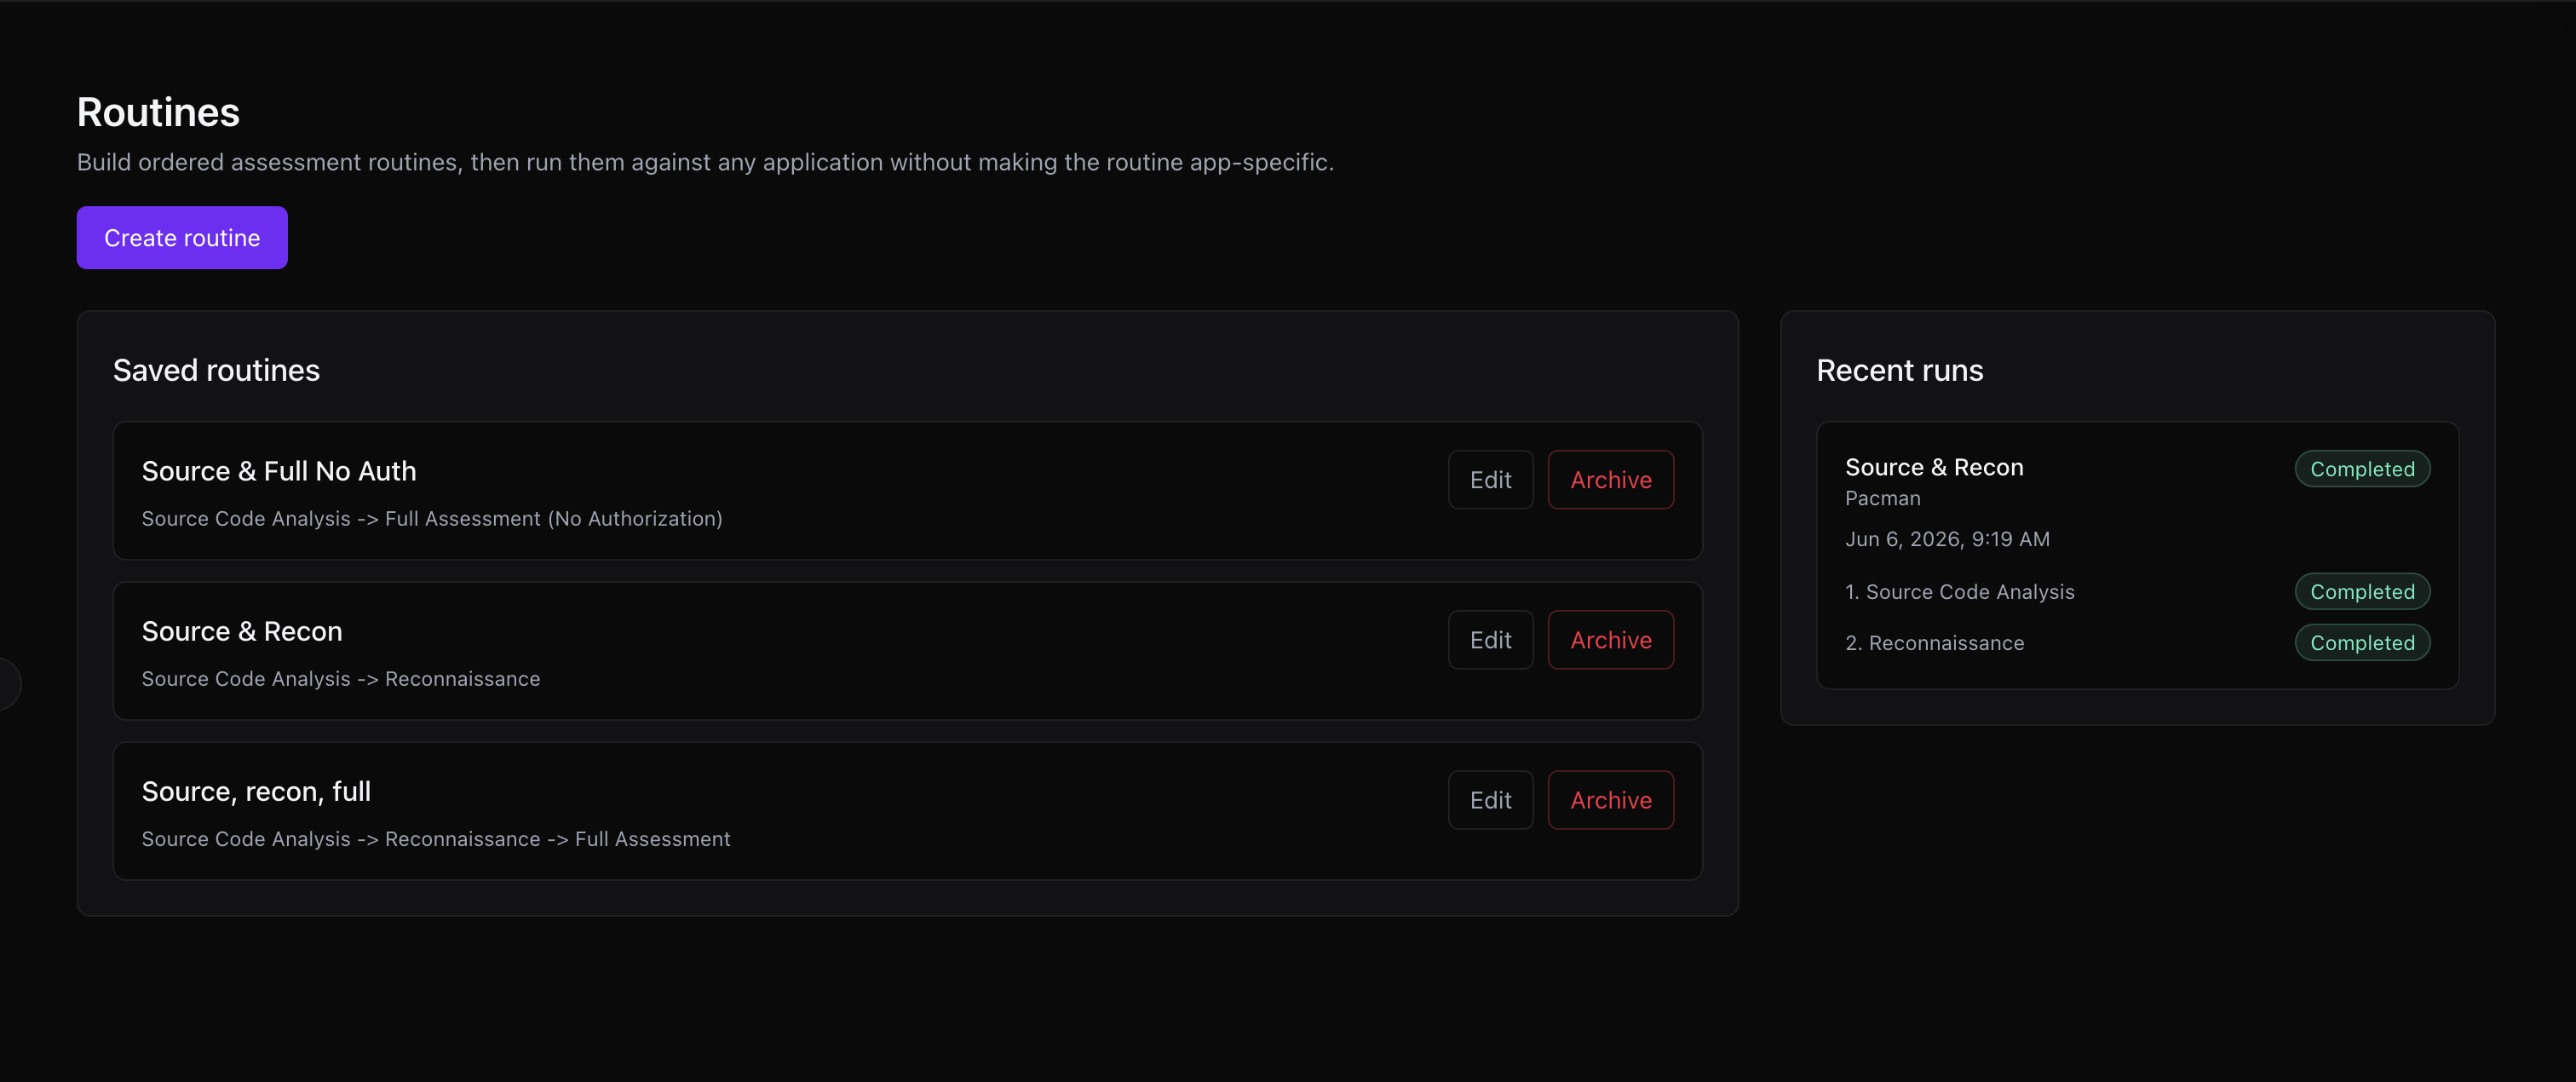
Common examples include recon before a full assessment, source-code analysis before runtime testing, or a repeatable release-candidate workflow. The Routines page shows saved routines and recent runs together.
## Provided templates
When provided routine templates are available, they appear in the Routines workflow. A template appears only when its assessment types are available for the selected application and organization. Choose **Copy** on a template to create a routine you can review and adjust, then save it before launching.
Before an application's first launch, recommended templates may appear under **Recommended for your first assessment**. To avoid duplication, they may not also appear in **Provided routines**, and they disappear after the first launch.
If no templates appear, create a routine manually or check [Troubleshooting](/troubleshooting#provided-routine-templates-are-missing).
## Create a routine
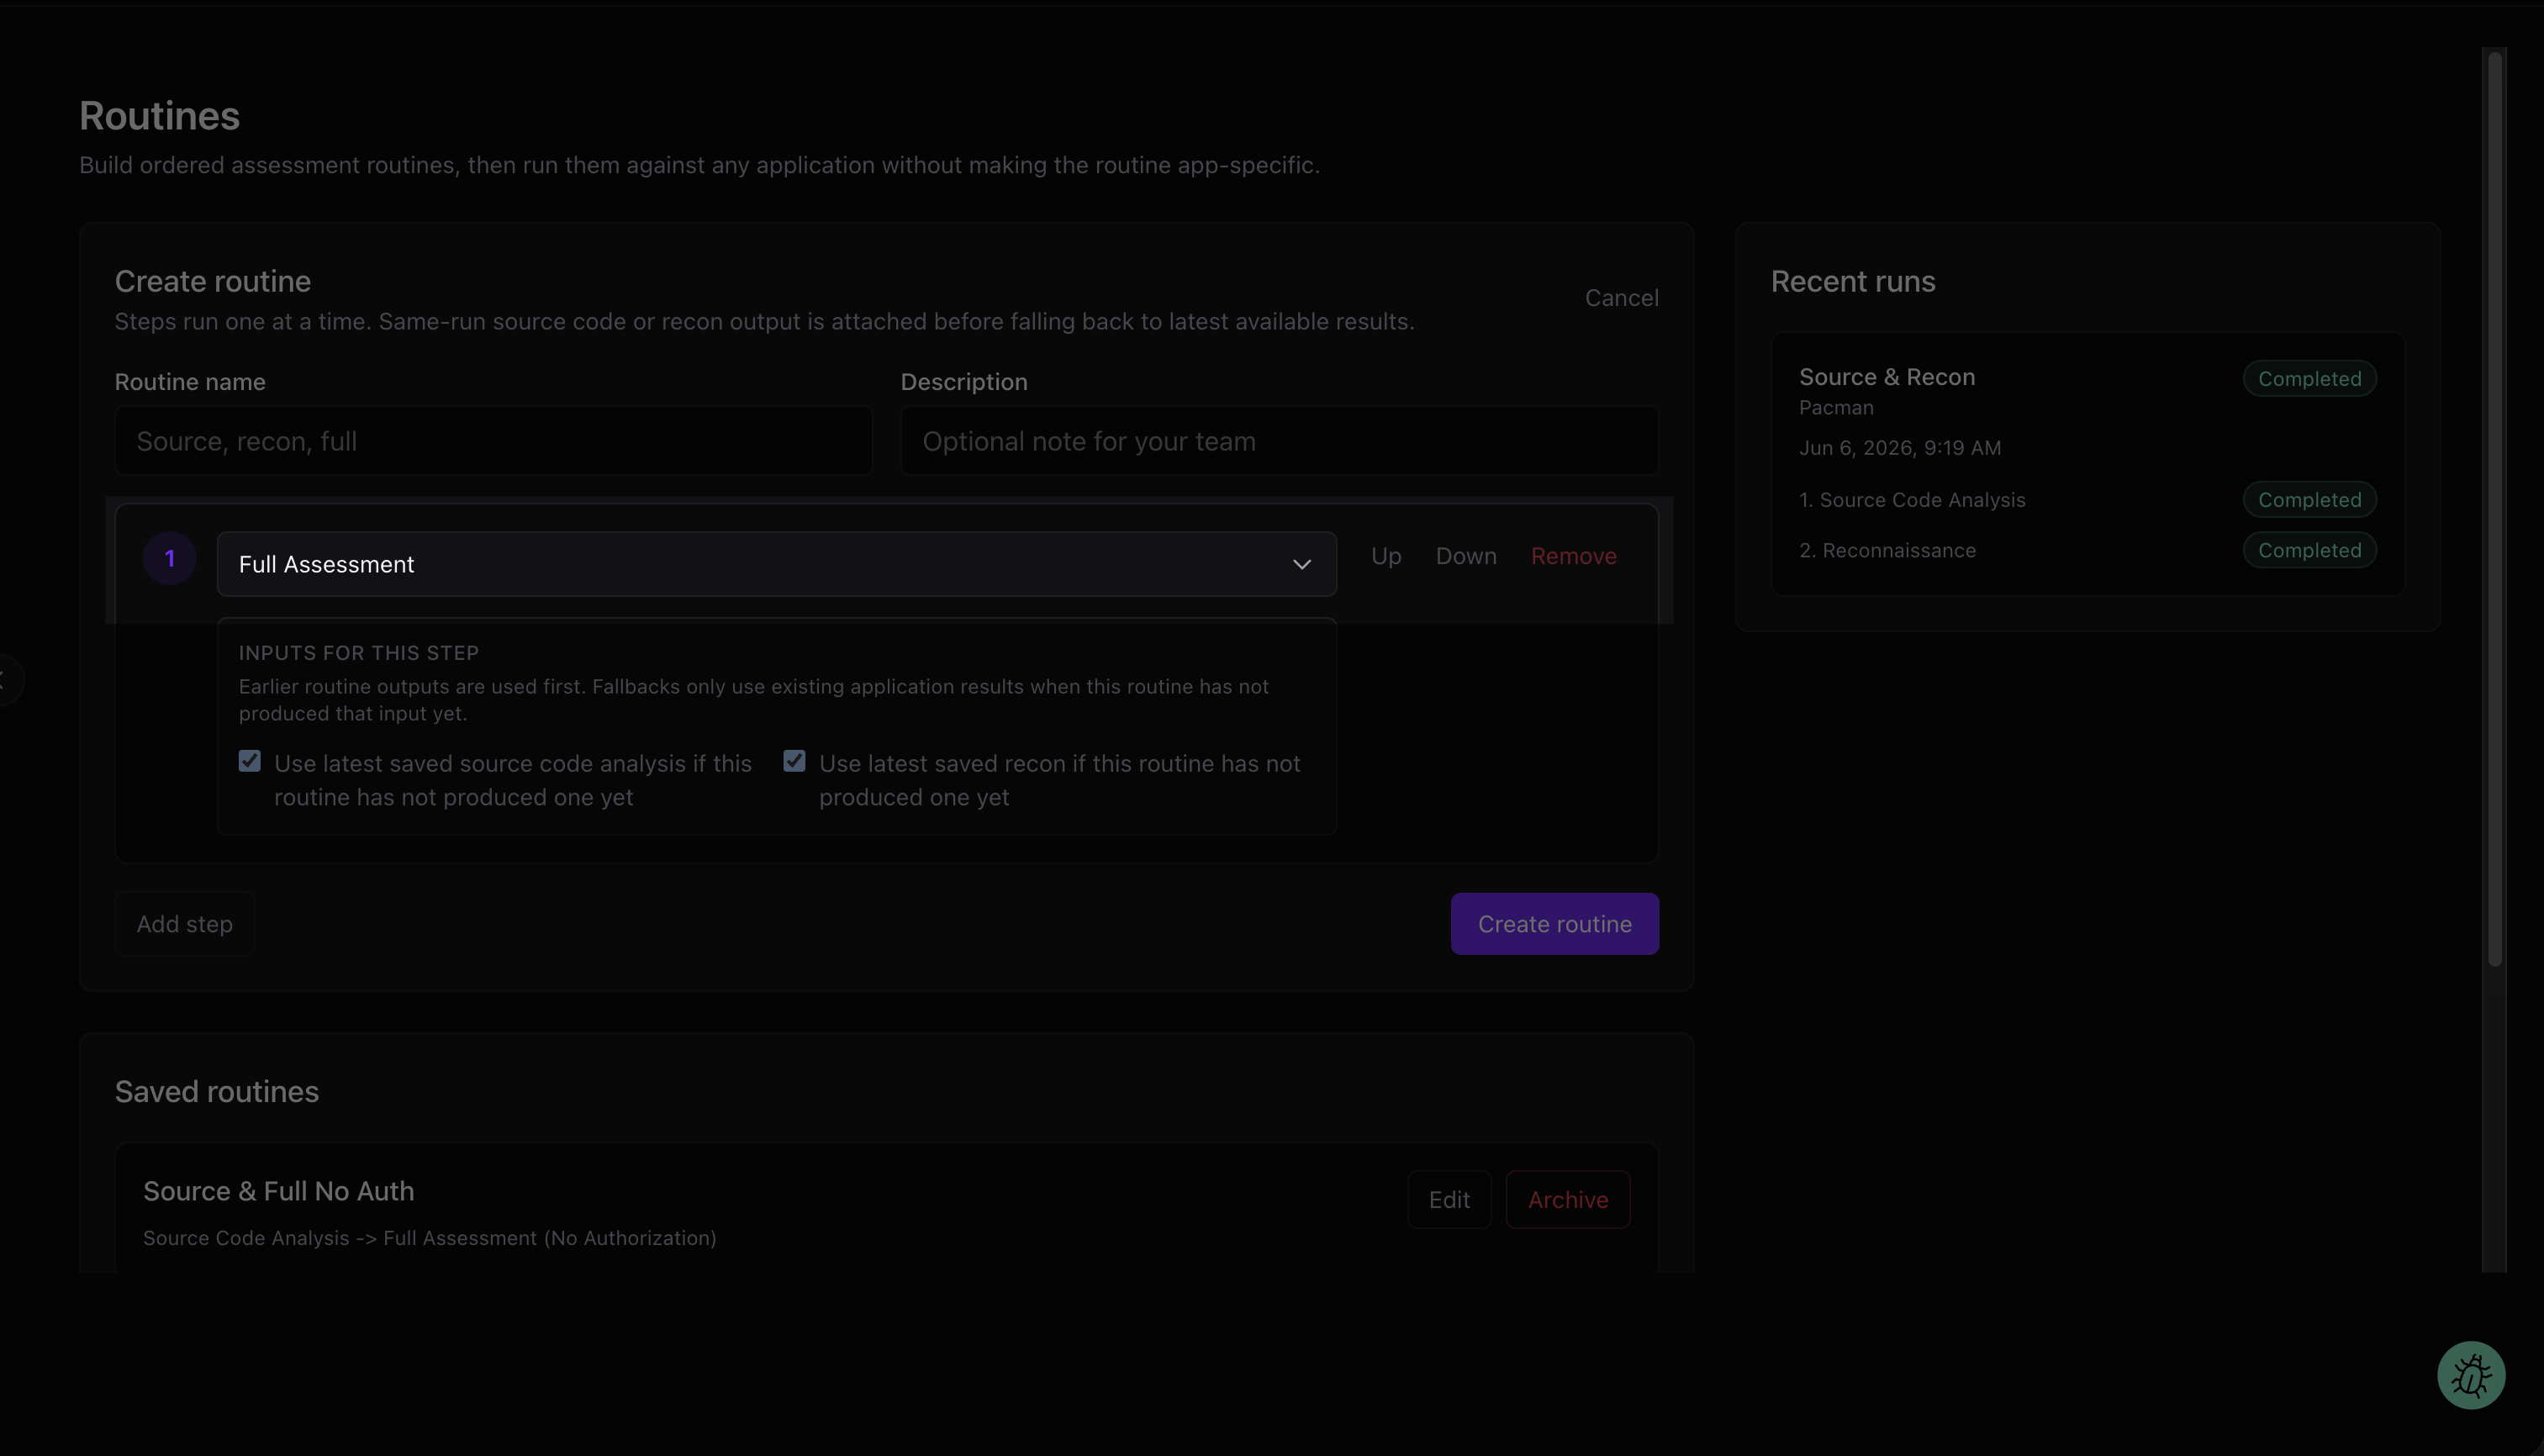
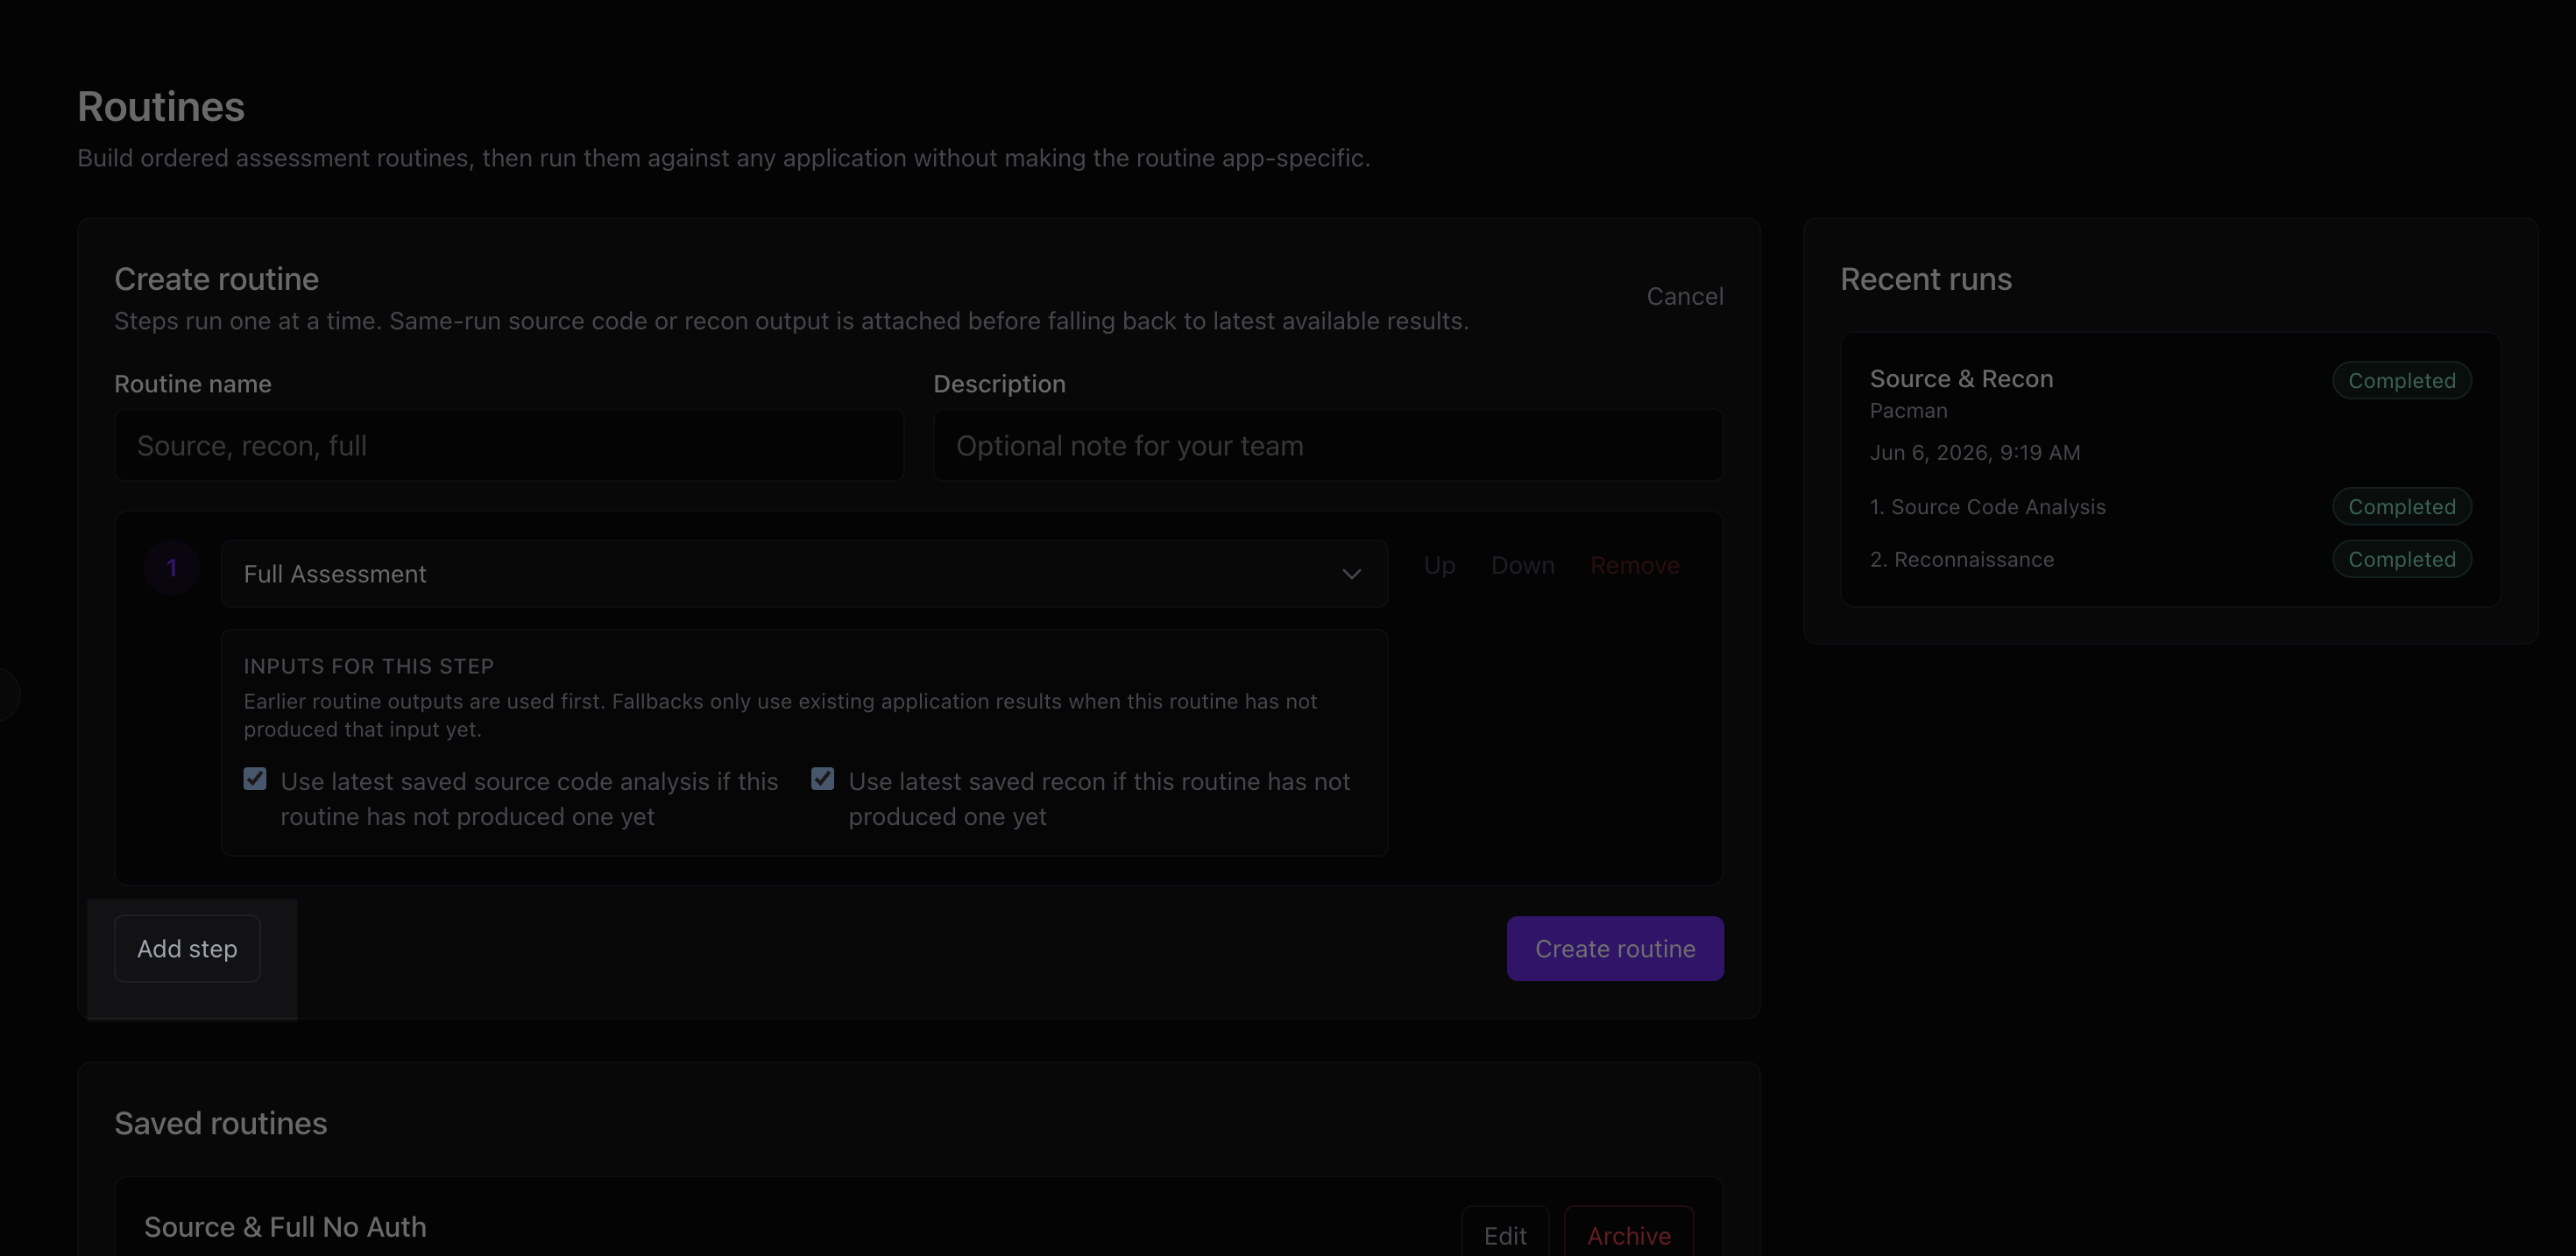
Open **Routines**, then choose **Create routine**.
Add:
- **Routine name**: use a short name that describes the workflow, such as `Recon + source + full`.
- **Description**: optional context for your team.
- **Steps**: the ordered assessment types Tahr should run.
Each step runs after the previous step completes. Move, remove, or add steps while building the routine.
Routines currently support up to 10 steps.
### Choose routine steps
Pick each assessment type based on the evidence later steps should use.
Good routine shapes:
- **Recon → Full assessment**: use recon to map the target surface in a dedicated non-production environment before broader testing.
- **Source-code analysis → Full assessment**: use repository findings and source context before runtime testing.
- **Recon → Source Code Analysis → Full Assessment**: use external and code context before broad runtime testing.
Retest assessments are not supported inside routines yet. Run retests separately from the finding or assessment workflow.
Use **Add step**, choose the assessment type, and move it into order.
### Reusing recon and source outputs
Routines can pass useful output forward.
When a later step supports source-code or recon input, Tahr first uses output from the same routine run. If that input has not been produced, it can fall back to the application's latest saved result when enabled in the step settings.
Put recon before a runtime step when the runtime assessment should use fresh recon.
### Automatic reports
When Reports is enabled and configured, use the per-step toggle to generate a report automatically. Select the report type, format, and sections; available options depend on the organization and assessment. After a supported step completes, its generated report appears in [Reports](/reports) report history.
### Edit or archive a routine
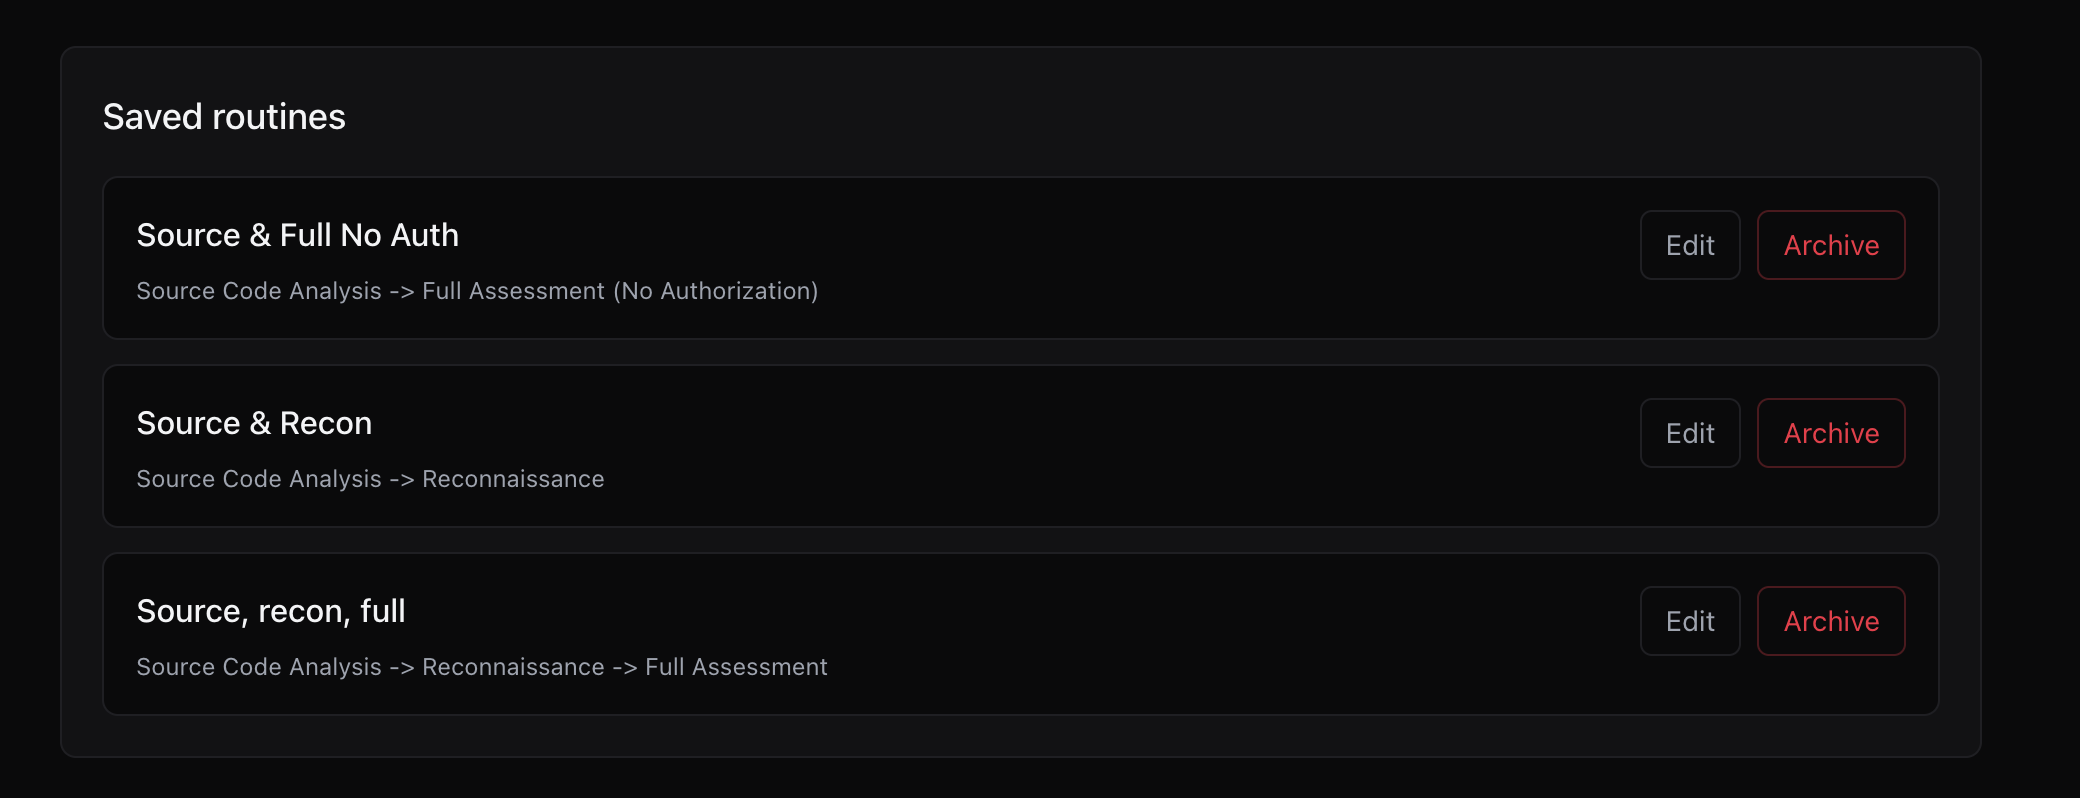
Saved routines appear in the **Saved routines** list.
Use **Edit** to change the name, description, order, assessment types, input settings, or automatic report options.
Use **Archive** when a routine should no longer be used. Archiving removes it from the active routine list; it does not delete historical routine runs.
## Start a routine
Routine runs start from the assessment launch flow.
1. Open **Assessments**.
2. Choose the routine start mode when it is available.
3. Select the application.
4. Select the routine.
5. Review blockers and warnings.
6. Choose a reserved IP if the routine includes target-based testing, the selected application is behind a WAF, and Tahr requires one.
7. Start the routine.
Tahr previews blockers before launch and checks again before each step. Fix blockers before starting.
New routine launches may be temporarily unavailable. Existing runs can continue, and scheduled occurrences may be skipped or advanced; check the visible schedule or run status before retrying.
Warnings can appear when a run may work but quality may be lower, such as authenticated testing without Sign-in automation.
### Reserved IP behavior
If the application is marked as behind a WAF, a routine containing any target-based assessment requires a reserved IP. A routine made entirely of repository-only steps, such as Threat Modeling, Source Code Analysis, or Source Code Diff Review, does not use a reserved IP. The selected reserved IP must be running and allowed for the application.
If no suitable reserved IP is available, reserve one in Administration before launching the routine. See [Reserved IPs](/organization-settings#reserved-ips).
An active routine can prevent a reserved IP from being released. Wait for it to finish or choose another IP.
## Recent routine runs
Recent runs show:
- Routine name.
- Application name.
- Overall run status.
- Run timestamp.
- Per-step status.
- Step-level assessment type.
- Any error attached to the run or step.
Routine statuses include:
- **Queued**: the step is waiting for earlier work.
- **Running**: the run or step is active.
- **Completed**: the step finished successfully.
- **Failed**: the step failed and later queued steps are skipped.
- **Skipped**: the step did not run because an earlier step failed.
- **Cancelled**: queued steps were cancelled by a user.
### Cancel queued steps
You can cancel queued steps for a running routine. This stops future steps from starting.
The currently running assessment is not automatically cancelled by the routine cancel action. If you need to stop the active assessment itself, handle that from the assessment run workflow.
## Routine design guidance
Keep routines focused. A routine should represent one repeatable testing workflow, not every possible assessment type.
Use separate routines when the intent is different:
- One routine for release validation.
- One routine for source-first review.
- One routine for authorization-focused testing.
- One routine for external recon.
Put context-producing steps first. Recon and source-code analysis are most useful when later steps can consume their results.
Avoid routines that depend on unstable test users, pending domain verification, or one-off manual setup. Fix the application setup first, then save the routine.
## Troubleshooting routines
If a routine cannot start, confirm that the application is ready, its assessment types are available, and its repository, API, authorization, authenticated-user, and reserved IP setup is complete. Also check that another assessment is not already active for the application. For a failed run, inspect the failed step first; later queued steps are skipped. See [Troubleshooting](/troubleshooting#routine-uses-the-wrong-source-or-recon-output) for routine input issues.
Source: https://docs.tahr.one/routines
---
# Findings
Review vulnerabilities, authorization issues, attack paths, recon observations, and source-code findings in Tahr.
Findings are the main review output from Tahr assessments. Use this area to triage issues, inspect evidence, mark review decisions, create tickets, and decide what needs a retest.
The Findings section is not only a flat vulnerability list. It separates assessment output into views that match how security teams review work: applications, attack paths, vulnerabilities, source-code risks, threat modeling, recon findings, and authorization evidence.
## Findings area map
The Findings page has these main areas:
| Area | Use it for |
| --- | --- |
| **Applications** | Start from an application and open the relevant finding type for that target. |
| **Attack Paths** | Review chains where multiple weaknesses combine into a higher-impact path. |
| **Vulnerabilities** | Review standard web, API, and application security findings. |
| **Source Code** | Review source-code risks from source-code assessments. |
| **Threat Modeling** | Review threats, assumptions, evidence, attack paths, and recommendations. |
| **Recon Findings** | Review recon observations and discovered attack-surface issues. |
| **Authorization** | Review access-control findings and the authorization matrix. |
Start with **Applications** when you are reviewing one target. Start with **Vulnerabilities**, **Authorization**, **Source Code**, **Recon Findings**, or **Threat Modeling** when you are reviewing by finding type or workspace across the organization.
## Applications view
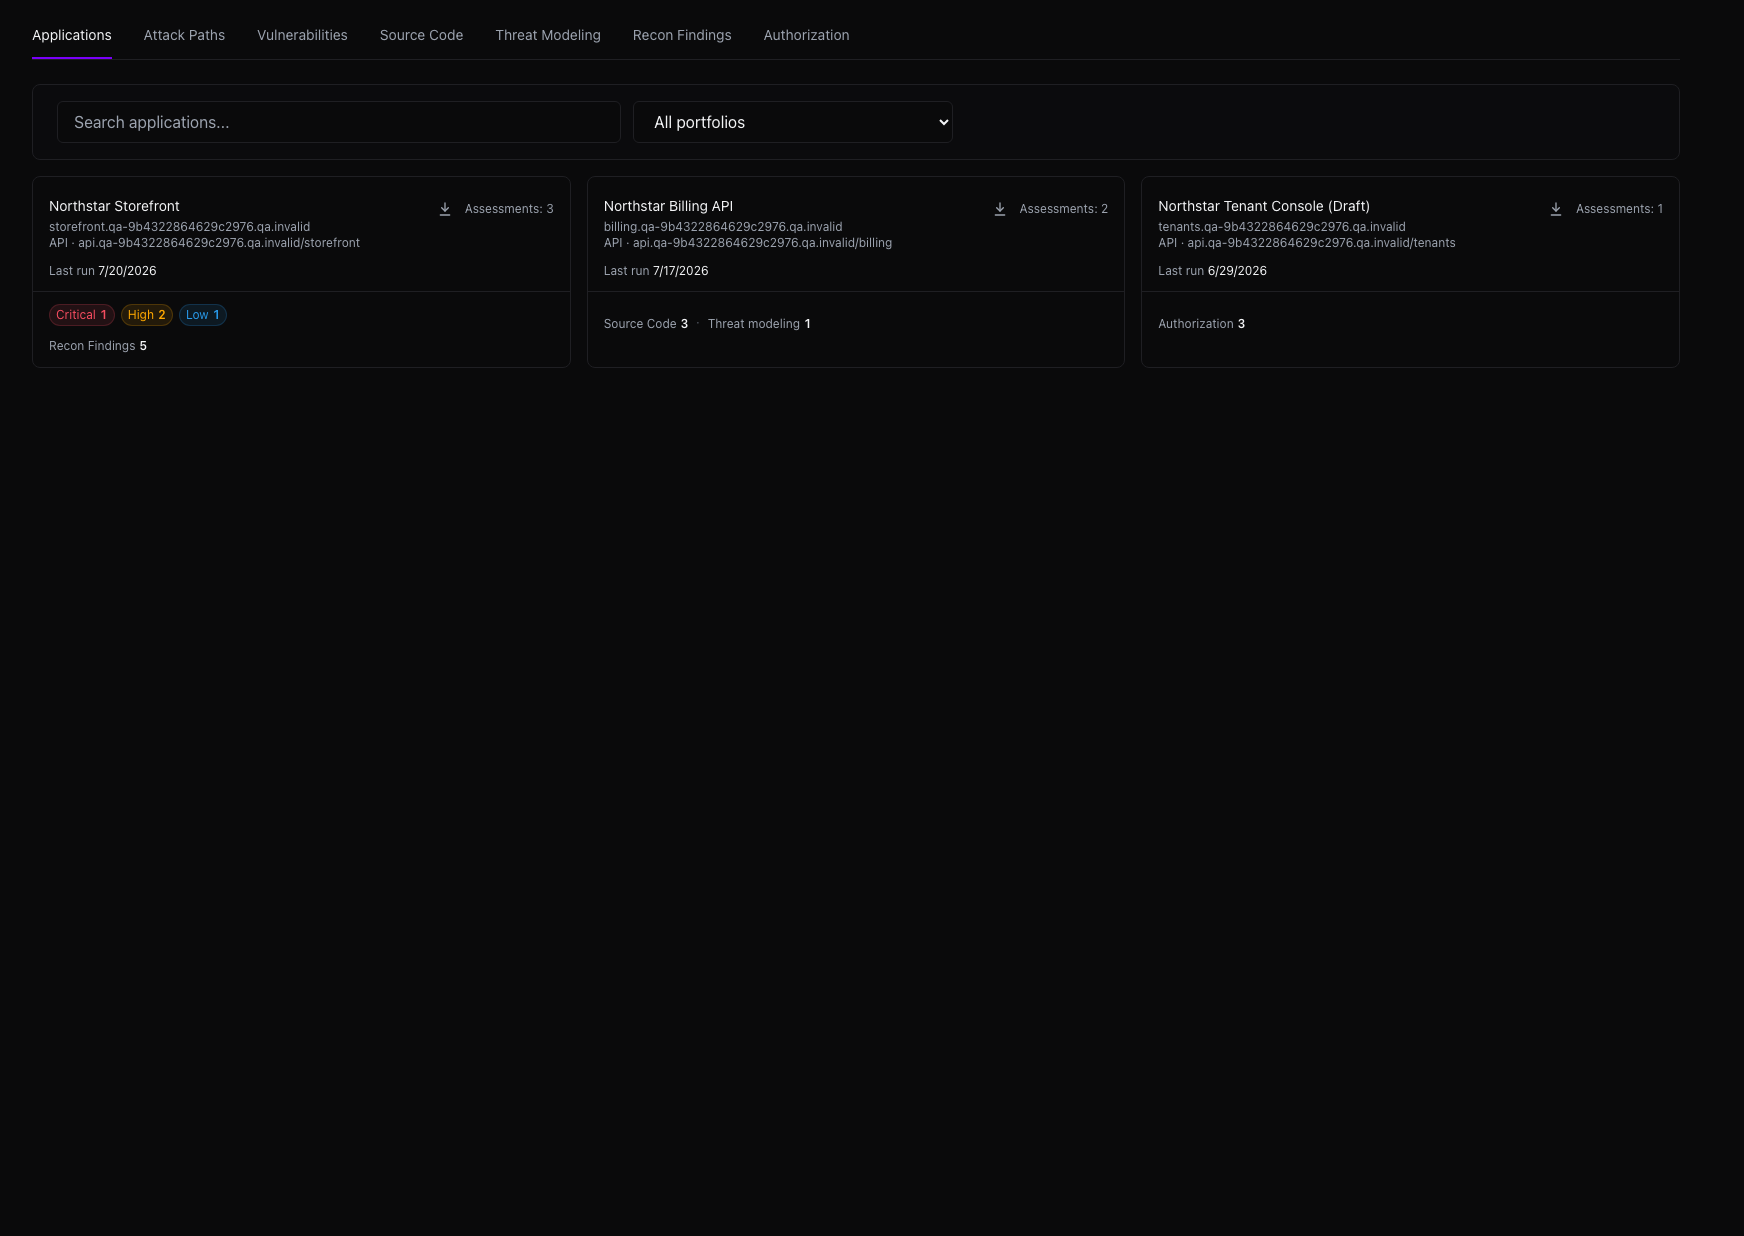
The **Applications** view is the best starting point when you are reviewing a specific product or service.
Each application card summarizes the current review surface for that application:
- Application name, app URL, and API URL.
- Latest assessment activity.
- Severity pills. Select one to open **Vulnerabilities** filtered to that application and severity.
- Nonzero category links. Select one to open **Recon Findings**, **Source Code**, **Attack Paths**, **Authorization**, or **Threat Modeling** for that application. Empty categories are omitted.
- A report export icon when reports are configured and you have permission to export them.
Select an application name to open **Vulnerabilities** filtered to that application. Use the search field to find an application by name, URL, API URL, or portfolio. When available, the portfolio filter is on this **Applications** view only; it does not apply to other Findings tabs.
An application card showing **No findings** has assessment activity but no current surfaced results. **Not scanned yet** means no assessment exists for that application. If you can run assessments, select **Run assessment** to open that application's Assessments view.
## Vulnerabilities
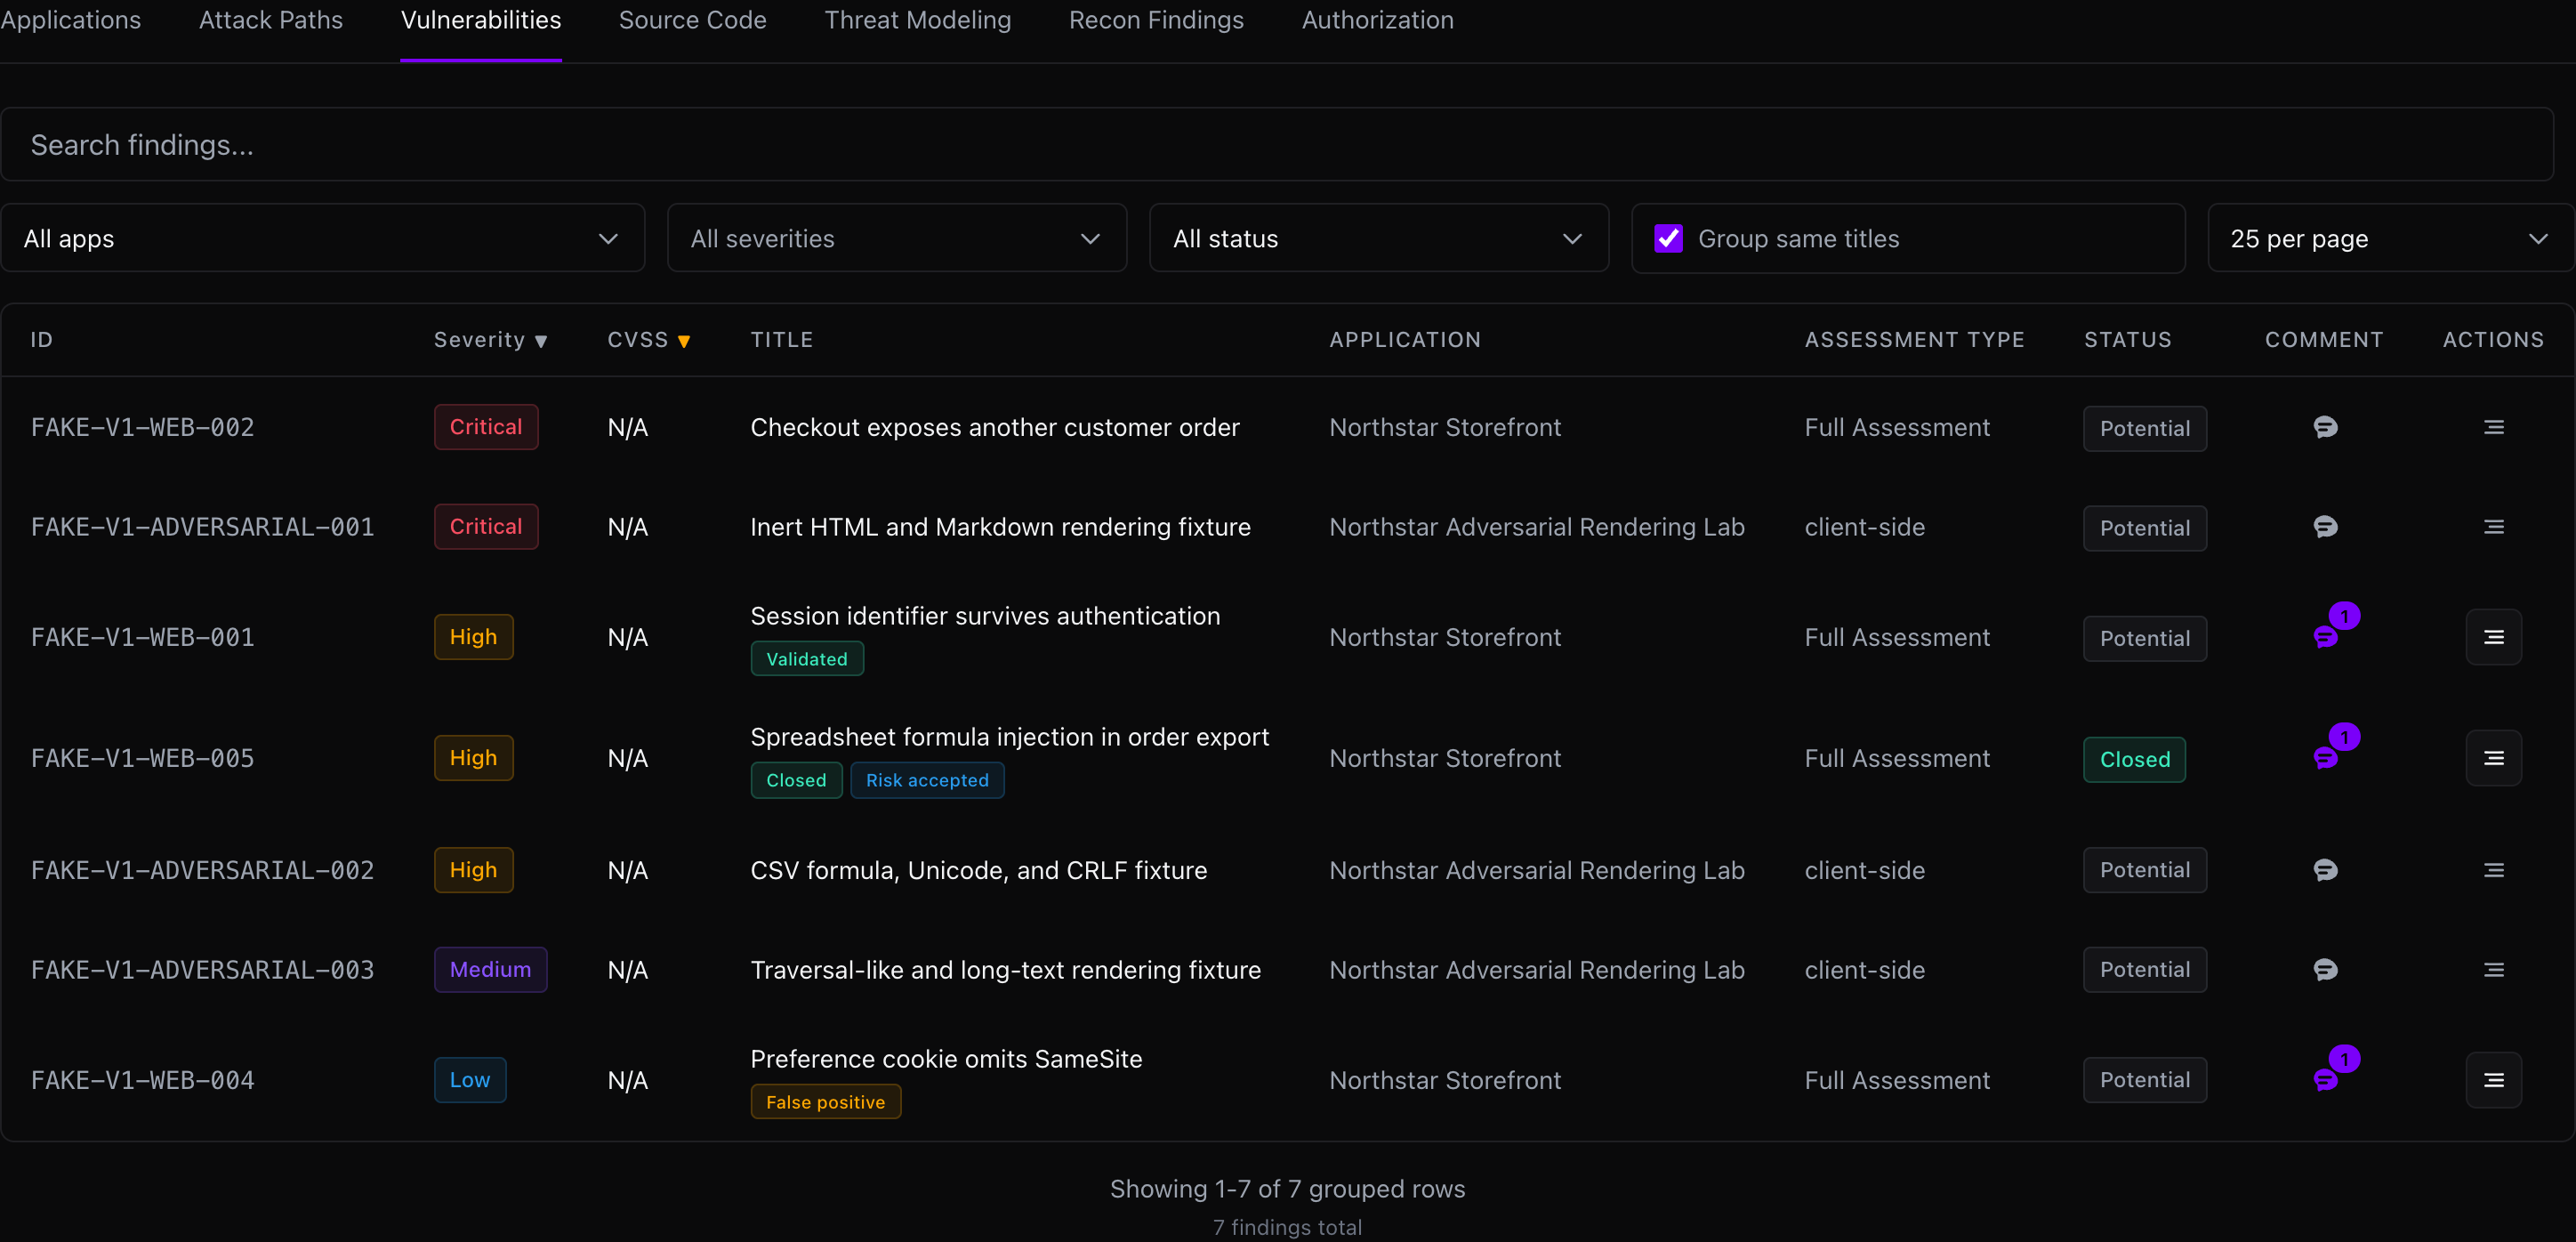
The **Vulnerabilities** tab is the standard finding list for web, API, and application security issues.
Use this tab to:
- Review verified and potential vulnerabilities.
- Filter by application, assessment, severity, and status.
- Sort by CVSS or severity.
- Group findings with the same title.
- Open a finding detail page.
- Add comments and review decisions.
- Create or update tickets.
- Start a retest for a selected application and assessment.
By default, the all-applications view focuses on the latest assessment per application. Select a specific application when you need to inspect an older assessment or compare assessment runs.
## Search and filters
Use filters to narrow the finding list before triage:
- **Search**: finds vulnerability titles.
- **Application**: limits results to one application.
- **Assessment**: appears after selecting an application, and limits results to one run.
- **Severity**: filters by Critical, High, Medium, Low, or Info.
- **Status**: filters by closed, verified, validated, or potential state.
- **Group same titles**: combines findings with the same normalized title so repeated patterns are easier to review.
- **Items per page**: changes how many rows are shown at once.
When grouping is enabled, expand a grouped row to inspect the individual findings behind the repeated title.
## Finding detail
Open a finding to review the complete evidence package.
Depending on the finding type and available data, the detail page can include:
- Severity and contextual severity.
- CVSS score, vector, and rationale.
- Verification status.
- Review status and closure state.
- Endpoint, method, tags, CWE, WSTG, or MASTG references.
- Description, targeted explanation, and impact.
- Evidence references and screenshots.
- Steps to reproduce.
- Recommendation and extended recommendation.
- Source-code action plan or AI fix prompt, when the finding came from source analysis.
- Related attack paths.
- Comment history and review actions.
Use **Copy as Markdown** when you need to share a finding with a teammate, paste it into an internal review, or preserve a readable snapshot outside Tahr.
## Finding action menu
The action menu on a finding detail page contains the main triage actions for that finding. The options you see depend on your organization role, whether the finding is already closed, and whether ticketing is available. If an expected action is missing, review [member roles](/organization-settings#choose-a-member-role) or ask an organization administrator to assign an appropriate role.
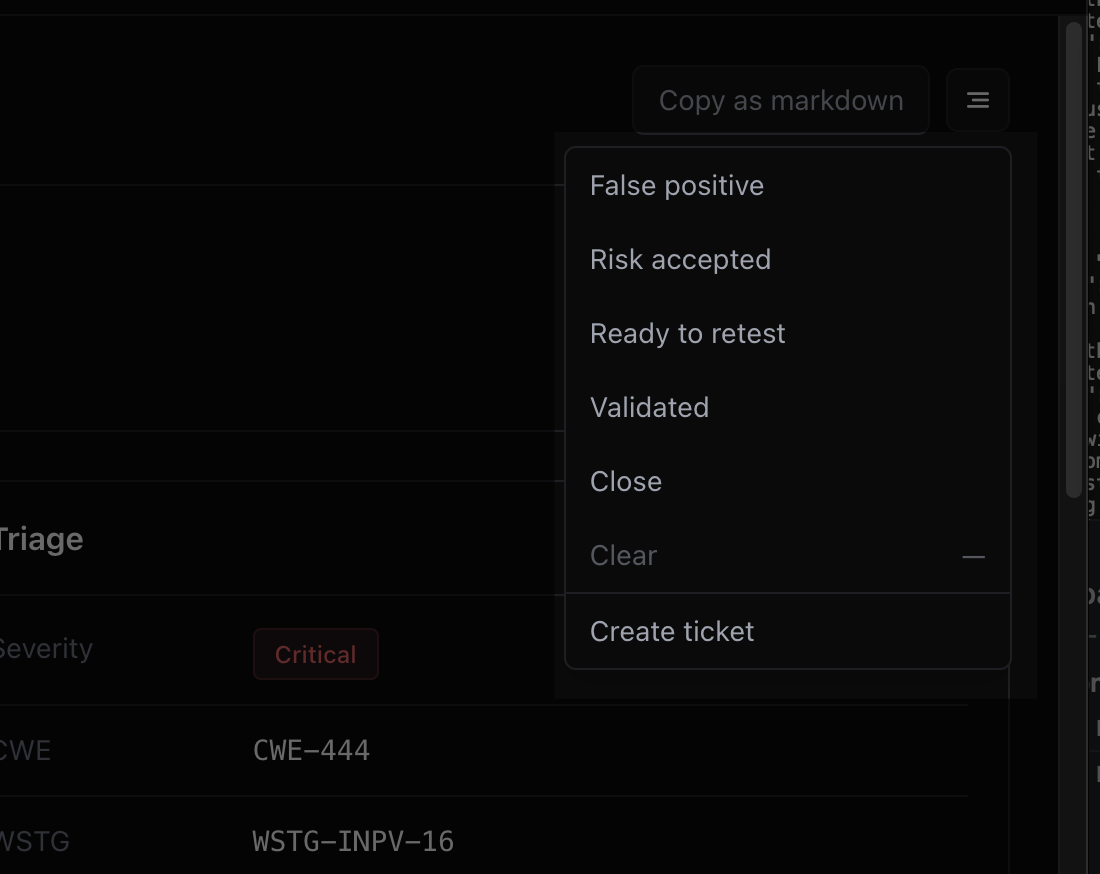
Common actions are:
- **Copy as markdown**: copies the finding title, metadata, evidence, impact, recommendation, and available remediation context into a markdown format.
- **False positive**: marks the finding as not valid for this target. Tahr asks for a comment explaining why.
- **Risk accepted**: keeps the finding as real, but records that the organization accepts the risk for now. Tahr asks for a comment explaining the acceptance.
- **Ready to retest**: marks the finding as fixed or ready for verification. Use this before launching a retest where retesting is supported.
- **Validated**: records that a reviewer confirmed the finding as valid. Tahr asks for a comment explaining how it was validated.
- **Close**: closes the finding after the review decision is clear, such as after remediation, duplicate handling, acceptance elsewhere, or a not-applicable decision.
- **Clear**: removes the current review state from the finding. This option is disabled when no review state is set.
- **Create ticket**: opens the ticket creation flow when a ticketing destination is available for the finding.
Use the menu for review decisions, not for hiding uncertainty. If the evidence is unclear, leave a comment and keep the finding open until the reviewer can decide.
## Status and review labels
Tahr separates assessment confidence from human review decisions.
| Label | Meaning |
| --- | --- |
| **Verified** | Tahr has evidence that the issue was reproduced or confirmed by the assessment pipeline. |
| **Potential** | The issue has meaningful indicators, but Tahr could not fully prove exploitation or impact. |
| **Validated** | A reviewer has confirmed the finding as valid. |
| **False positive** | A reviewer decided the finding is not valid for this target. |
| **Risk accepted** | A reviewer decided the finding is real but accepted for now. |
| **Ready to retest** | A fix is ready and the finding should be checked again. |
| **Closed** | The finding is no longer active in the review workflow. |
Use the labels for different purposes. **Verified** and **Potential** describe what Tahr found. **Validated**, **False positive**, **Risk accepted**, **Ready to retest**, and **Closed** describe what your team decided after review.
## Review actions
Use review actions to keep the workflow clear:
1. Open the finding and read the evidence.
2. Add a comment if the decision needs context.
3. Mark the finding as **Validated**, **False positive**, **Risk accepted**, or **Ready to retest**.
4. Create a ticket if the issue needs engineering work.
5. Close the finding when it is fixed, accepted elsewhere, duplicated, or no longer applicable.
Review-state changes require a comment so the next reviewer can understand the decision. Clearing a review state removes that decision from the finding, but it does not delete the previous discussion.
## Comments
Use comments to record reviewer context that should stay with the finding.
Good comments include:
- Why a finding was validated.
- Why a finding is considered a false positive.
- Why risk was accepted.
- Which fix was deployed.
- Which release, commit, or ticket should be checked during retest.
- Any product context that explains expected behavior.
Keep comments factual. Avoid putting passwords, API keys, private customer data, or unrelated secrets in comments.
## Tahr context
**Testing instructions** is the application-level base field. On a finding, authorization finding, or authorization matrix comment, choose **Add this comment to testing instructions for future assessments** when the comment should inform future assessments. The saved comment has a **Tahr context** badge and remains attached to its finding or authorization review item. Tahr merges it into effective instructions for future assessments without rewriting the application's **Testing instructions** field. Use it for durable testing guidance such as expected behavior, important scope, or a known product constraint. Do not mark secrets or one-off incident details as Tahr context.
## Tickets
If ticketing is configured, findings can be linked to an external issue tracker.
From a supported finding row or detail page, you can:
- Select **Create ticket**.
- Open the linked external issue.
- Refresh ticket status from the external system.
- See issue key, ticket status, destination, assignee, and sync details when available.
- Remove or close the external issue link when the workflow requires it.
Ticket creation depends on the configured destination scope. If no ticket action appears, check [Ticketing integrations](/integrations#ticketing-destinations) and confirm that the destination applies to the application you are reviewing.
## Retesting
Use retesting after a fix is ready.
For standard vulnerability findings:
1. Mark the relevant finding as **Ready to retest**.
2. Select the application in the Vulnerabilities tab.
3. Select the assessment that produced the finding.
4. Click **Start Retest**.
5. Review the retest result after the new assessment completes.
The retest button is available only when your role can run assessments and the page has enough context to know which application and assessment should be retested.
Authorization findings and source-code observations may follow a different remediation workflow. Use their detail pages, comments, and tickets to preserve the review decision.
## Authorization
The **Authorization** tab combines two kinds of output:
- **Authorization Findings**: promoted access-control issues that need review.
- **Authorization Matrix**: endpoint-by-role evidence showing how different identities behaved.
Use this tab when you need to understand whether users, roles, tenants, objects, or operations were protected correctly.
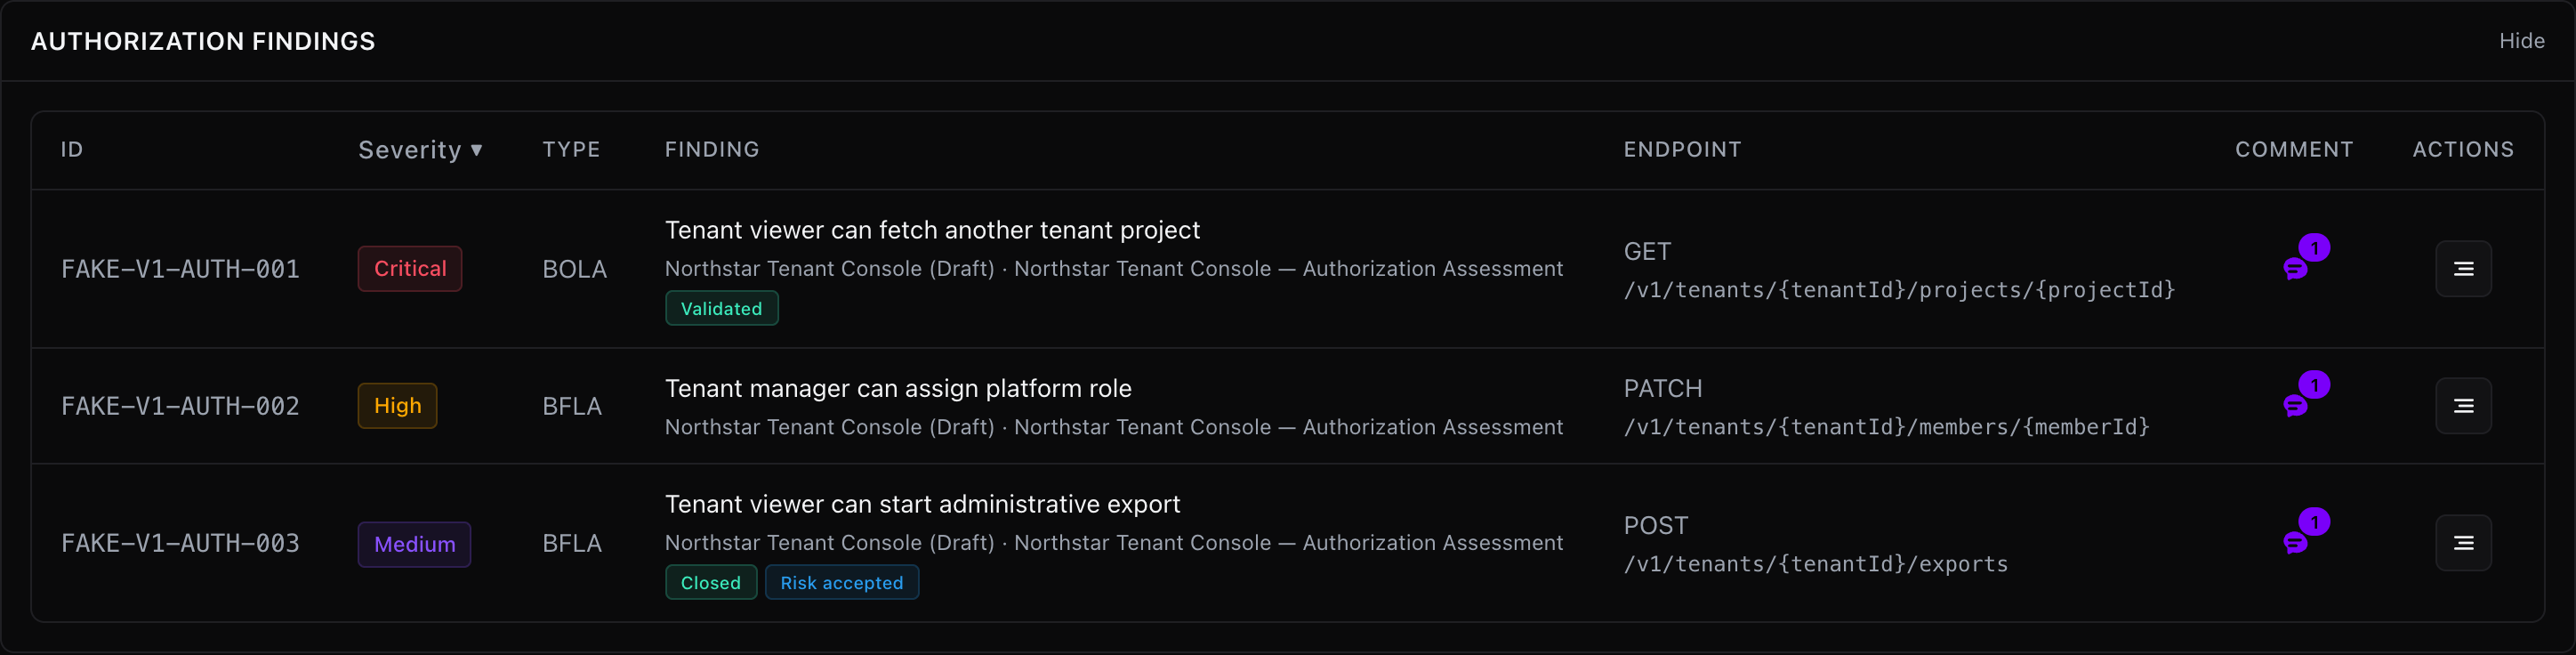
Authorization findings usually include:
- Vulnerability type.
- Endpoint and method.
- HTTP status code.
- Affected role or identity context.
- Reproduction steps.
- Verification method and verification details.
- Evidence references or screenshots.
- Remediation guidance.
- CWE, WSTG, CVSS, and confidence when available.
## Authorization filters
The Authorization tab supports filters that are specific to access-control review:
- **Search**: finds authorization finding IDs, titles, vulnerability types, endpoints, methods, CWE, WSTG, matrix paths, matrix methods, summaries, and categories.
- **Application**: limits results to one application.
- **Assessment**: appears after selecting an application.
- **HTTP status**: filters authorization findings and matrix entries by observed status code.
- **Items per page**: controls pagination for authorization findings.
Use the HTTP status filter carefully. A `200` can be expected for a public endpoint, suspicious for a protected endpoint, or harmless if the response is an error envelope. Read the row context before deciding.
## Authorization matrix
The matrix shows endpoint results across identities and roles. It is useful for spotting access-control patterns that a single spot check can miss.
The matrix is split into:
- **Same-tenant access**: checks how roles behave inside the same tenant or organization boundary.
- **Cross-tenant access**: checks whether one tenant can access another tenant's objects or operations.
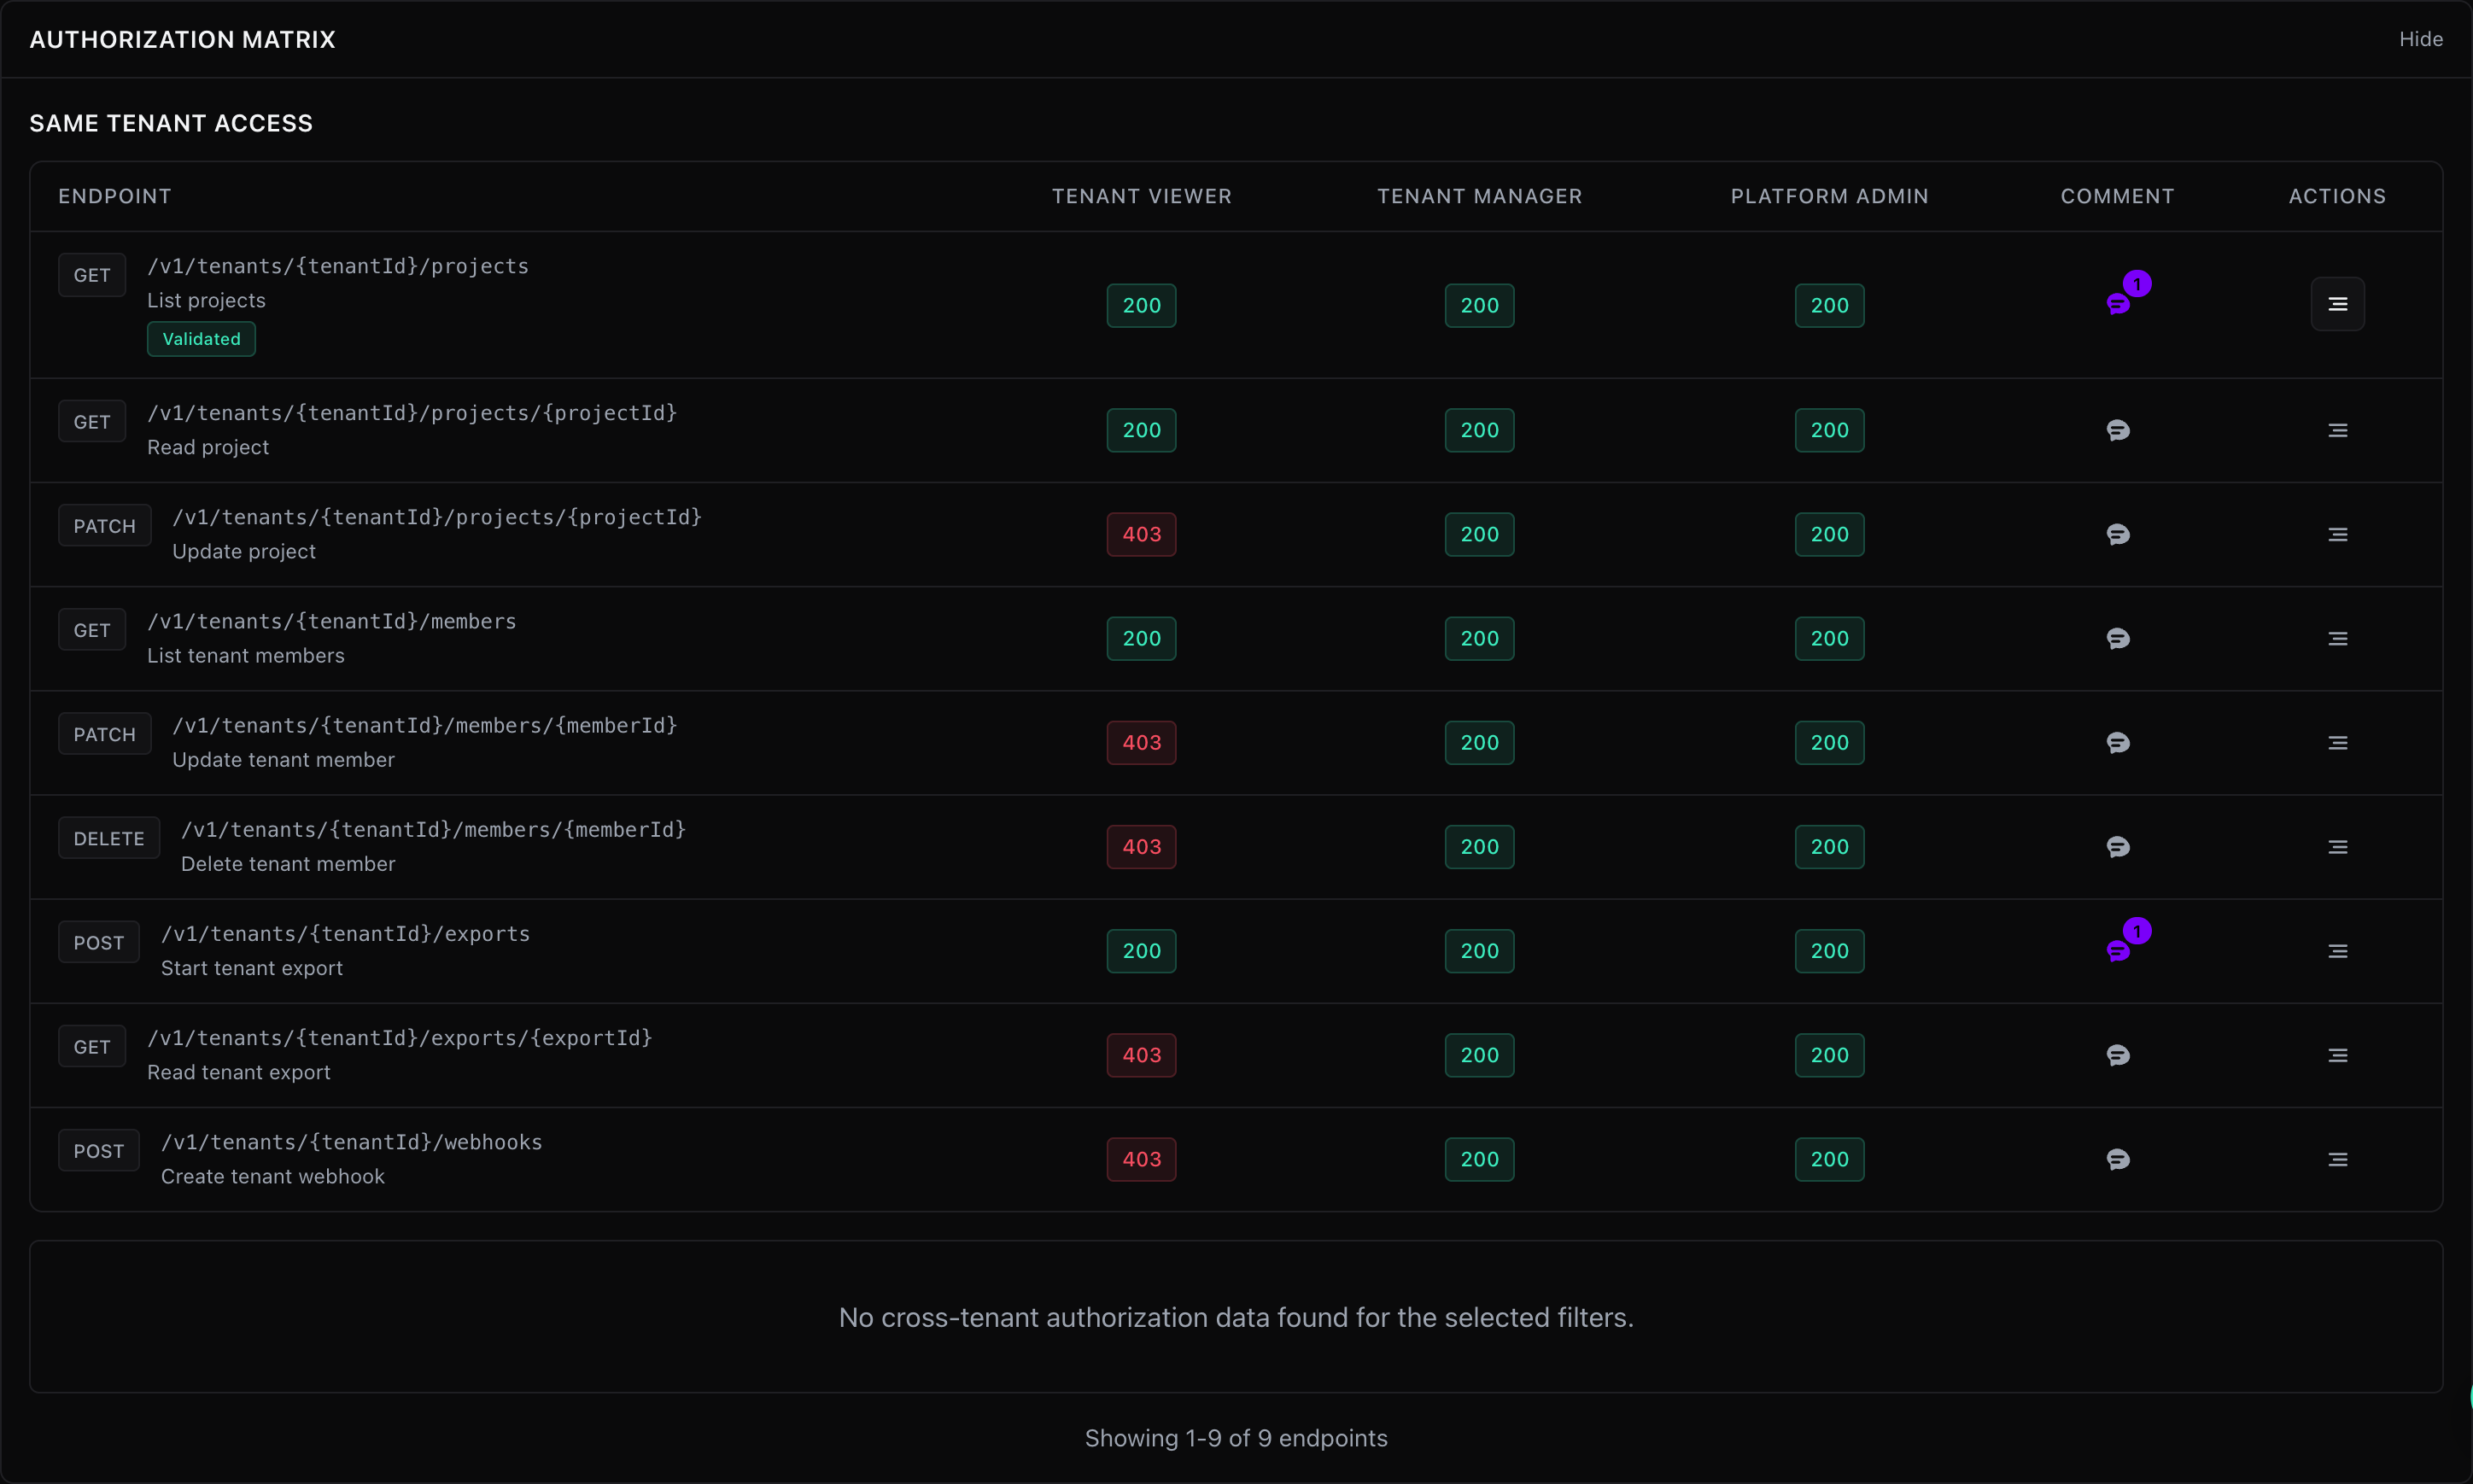
Each matrix row represents an endpoint or operation. Each role column shows the observed result for that role, usually including HTTP status and result context.
Use the matrix to answer questions such as:
- Which role was allowed?
- Which role was denied?
- Did the same endpoint behave differently across tenants?
- Did an endpoint return data, an error, or an empty response?
- Does the observed behavior match the intended product permission model?
The matrix is evidence for review. A matrix entry becomes a finding only when there is enough context to show a security issue.
## Attack paths
Attack paths connect related findings into a larger risk story.
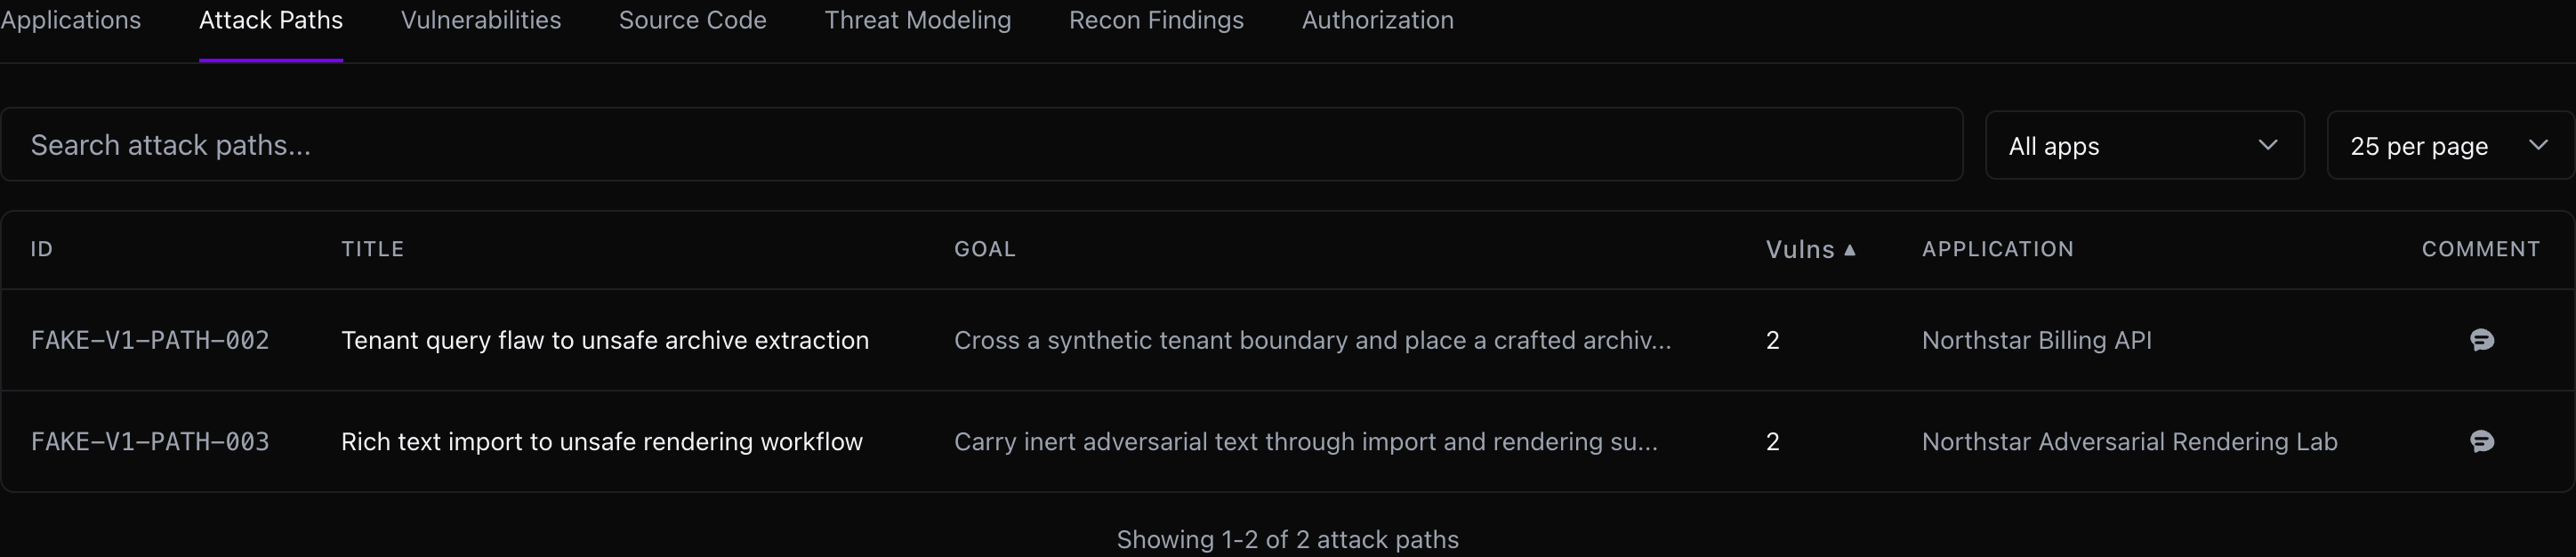
Use **Attack Paths** when you need to understand how separate weaknesses could combine into a meaningful impact. An attack path can include:
- Goal.
- Final impact.
- Preconditions.
- Entry points.
- Ordered attack steps.
- Required vulnerabilities.
- Optional amplifiers.
- Related evidence pointers.
- Comments.
Attack paths are especially useful when individual findings look moderate but the chain is more serious. Review the required vulnerabilities first. If one required vulnerability is not valid, the path may need to be downgraded or rejected.
## Attack path filters
Use the Attack Paths tab to:
- Search by title.
- Filter by application.
- Filter by assessment after selecting an application.
- Sort by vulnerability count.
- Open the attack path detail page.
- Add comments when you have finding edit access.
In all-applications mode, Tahr focuses on the latest assessment per application so old paths do not crowd the current review.
## Source Code
The **Source Code** tab shows risks from source-code review assessments.
Use it when you want to review code-backed observations, architectural risks, missing controls, dangerous patterns, or remediation guidance tied to files and symbols.
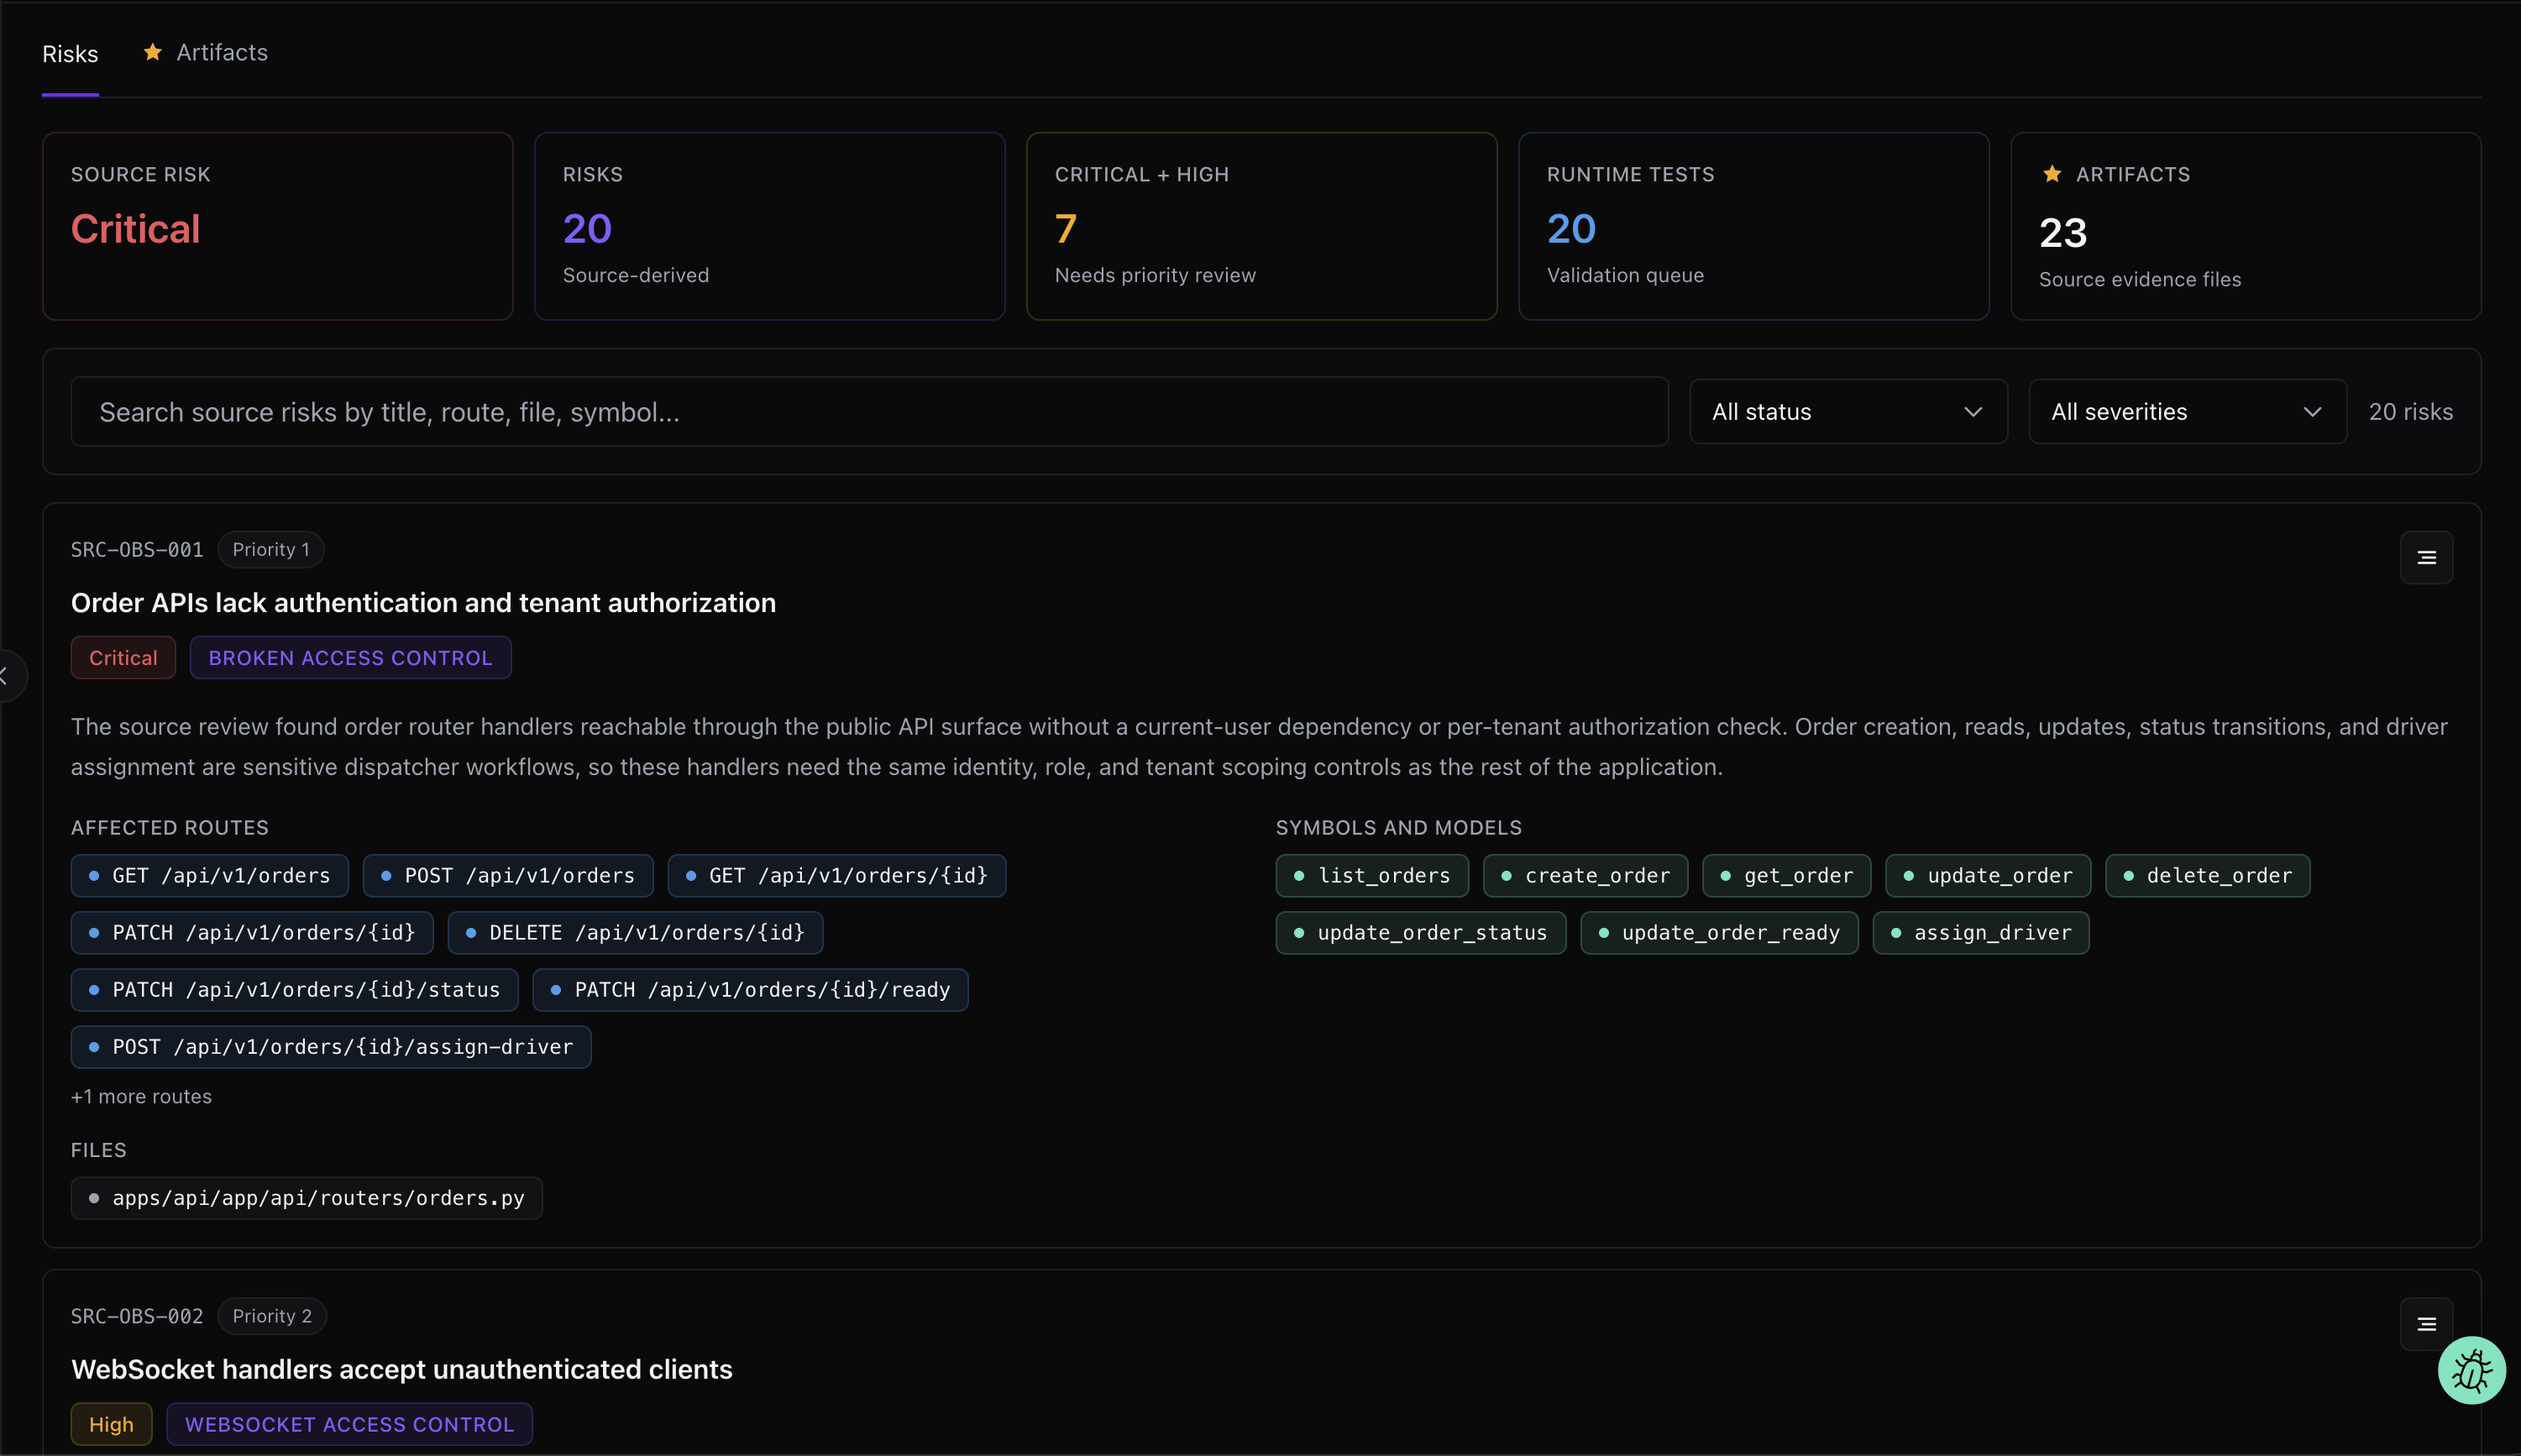
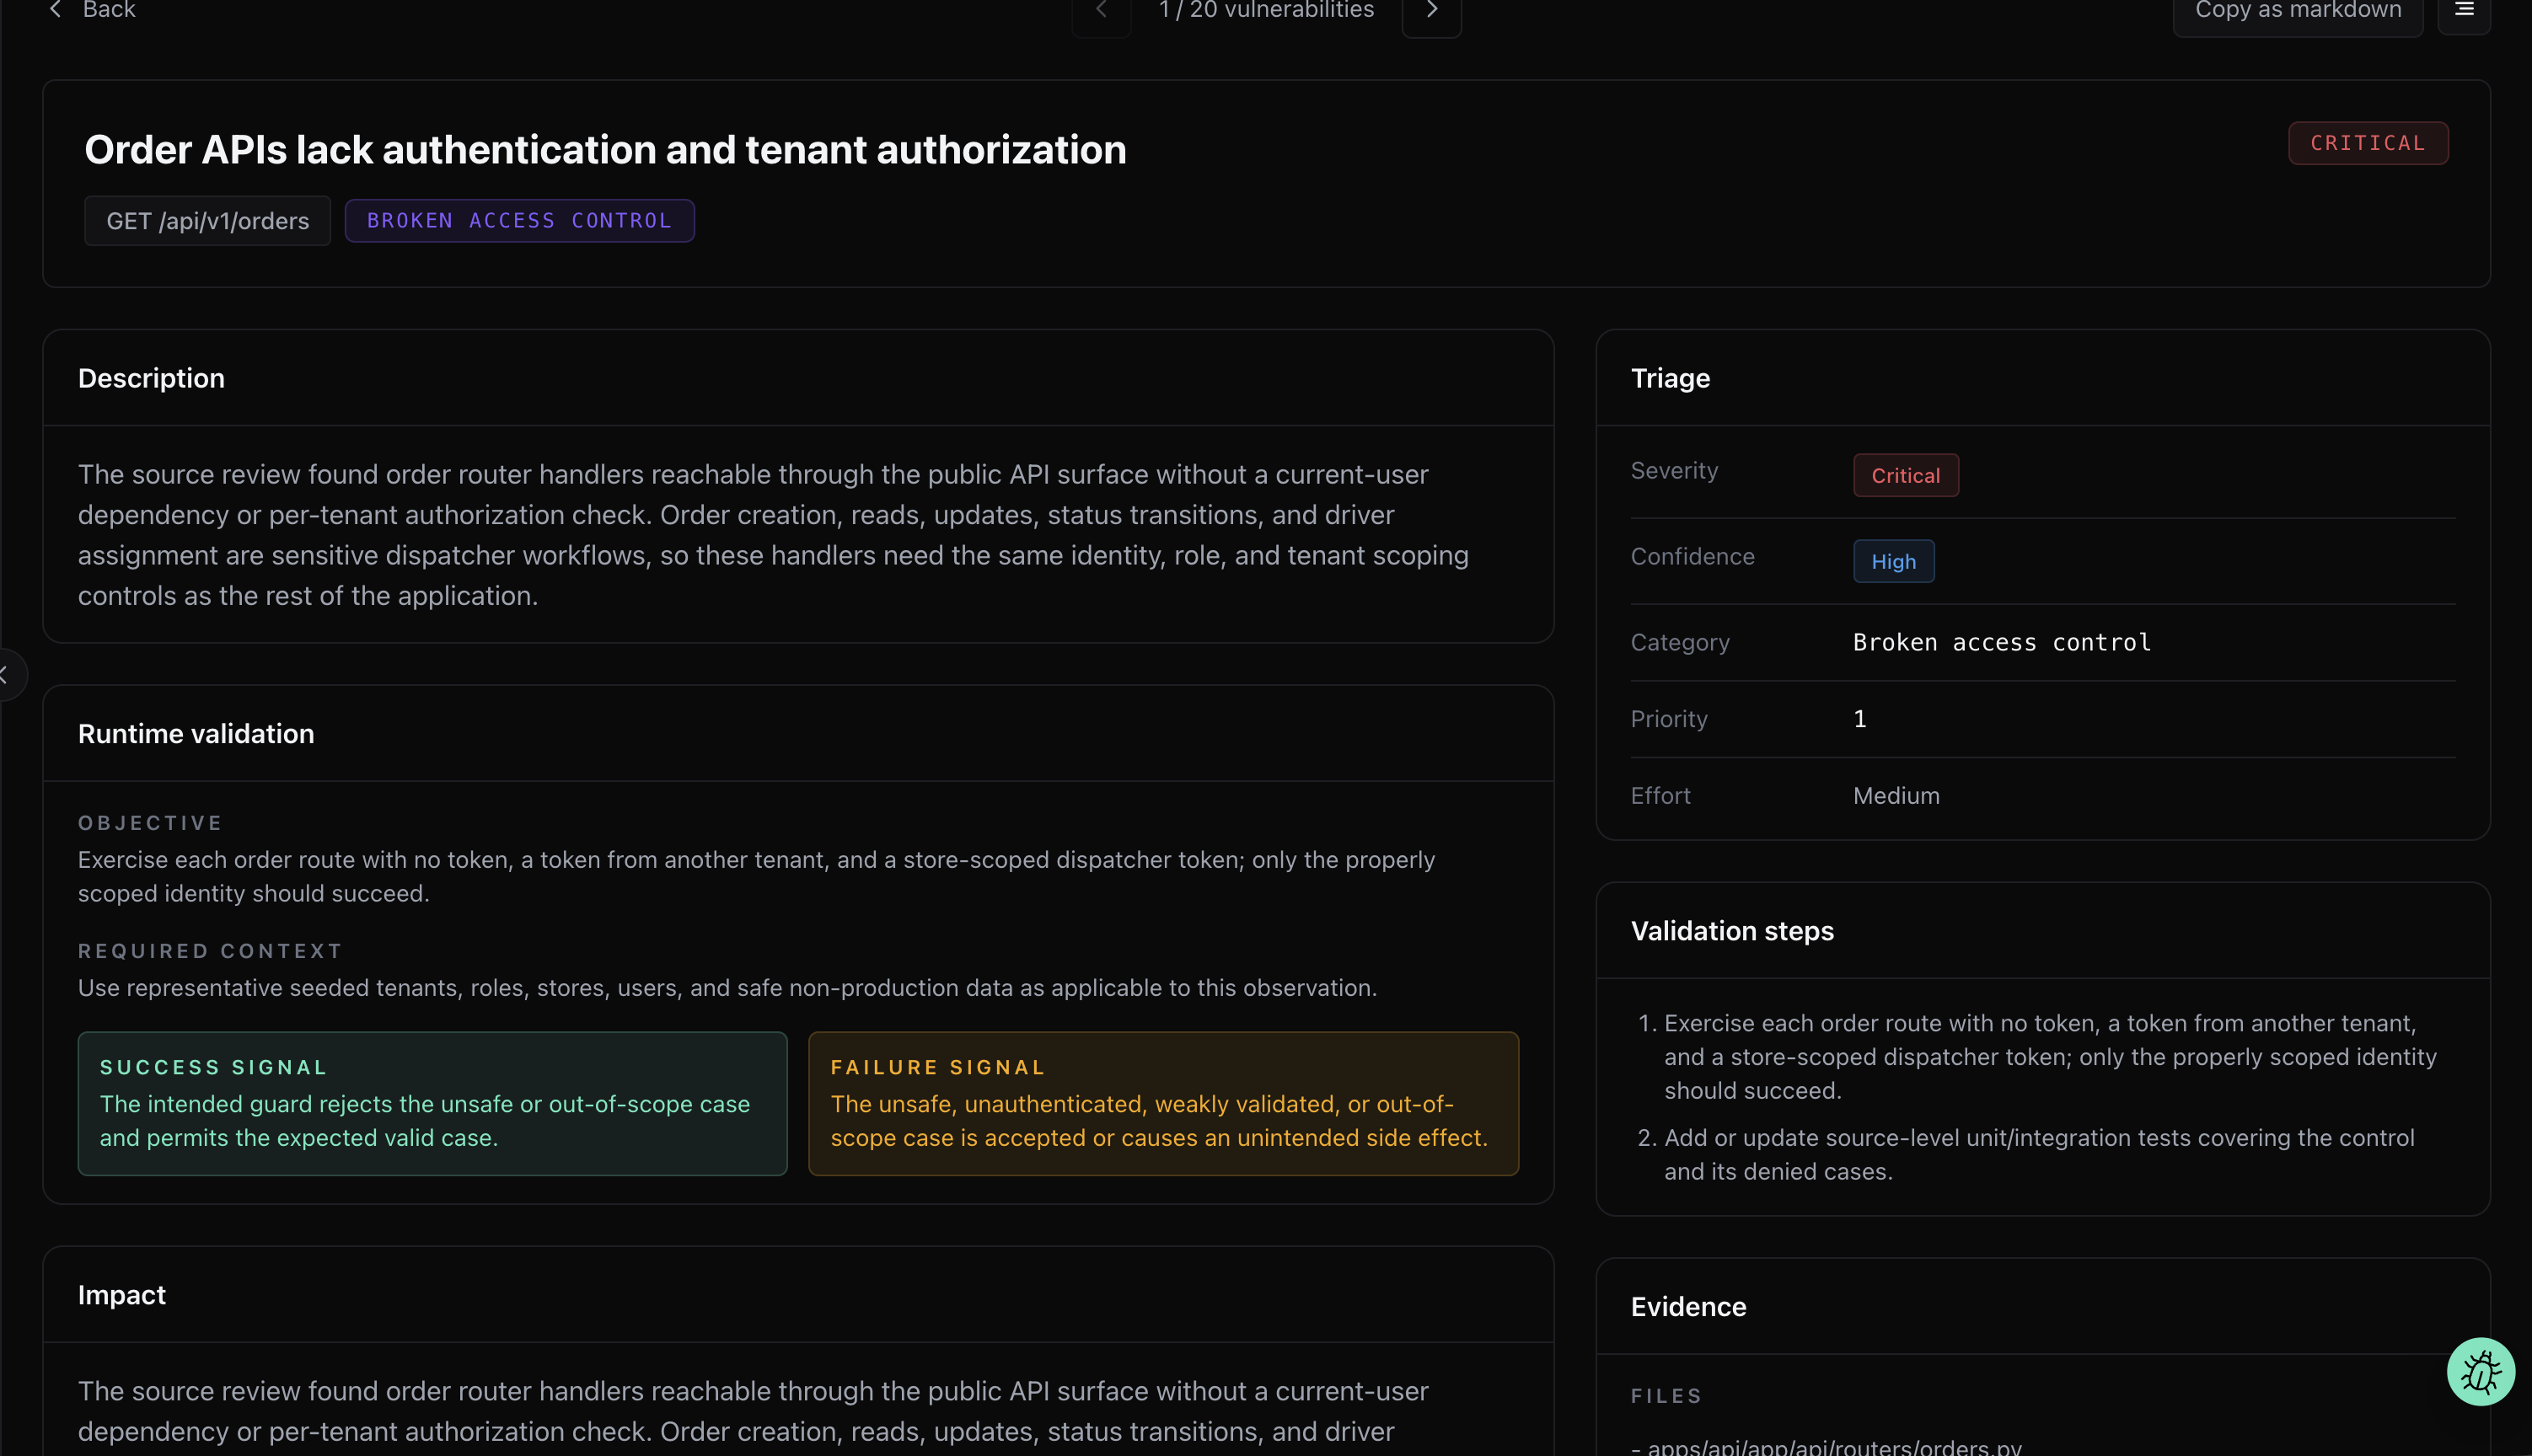
Source-code observations can include:
- Severity and category.
- Title and summary.
- Files, routes, symbols, or affected components.
- Evidence and reasoning.
- Remediation guidance.
- Import status.
- Linked finding actions when the observation has been imported as a finding.
Some source-code observations are reviewable risks before they become normal findings. If an observation has not been imported as a finding yet, normal finding actions may be unavailable. Import or open the linked finding before creating tickets or applying review states.
## Source Code filters
The Source Code workspace supports:
- Application selection.
- Assessment selection.
- Search by title, route, file, or symbol.
- Severity filtering.
- Status filtering for open, closed, false positive, risk accepted, ready to retest, and validated states.
Use source-code findings as source-review evidence. If you need runtime proof, add that requirement to the ticket or run a follow-up assessment that can test the behavior dynamically.
## Recon Findings
Recon findings come from discovery and attack-surface analysis. They can point to exposed endpoints, risky services, technology signals, undocumented routes, admin surfaces, authentication patterns, or other observations that affect security posture.
Use **Recon Findings** to:
- Review recon observations in the same triage workflow as other findings.
- Filter by application, assessment, severity, and status.
- Open details for evidence and context.
- Create tickets when an observation needs follow-up.
Recon output is most useful when paired with application context. A discovered admin route, debug endpoint, or public API surface may be expected in one environment and risky in another.
## Recon workspace
The recon workspace can include:
- Overview statistics.
- Endpoint counts.
- Method and authentication distribution.
- Public, documented, undocumented, admin, and debug endpoint groupings.
- Technology and authentication observations.
- Key findings from the discovered attack surface.
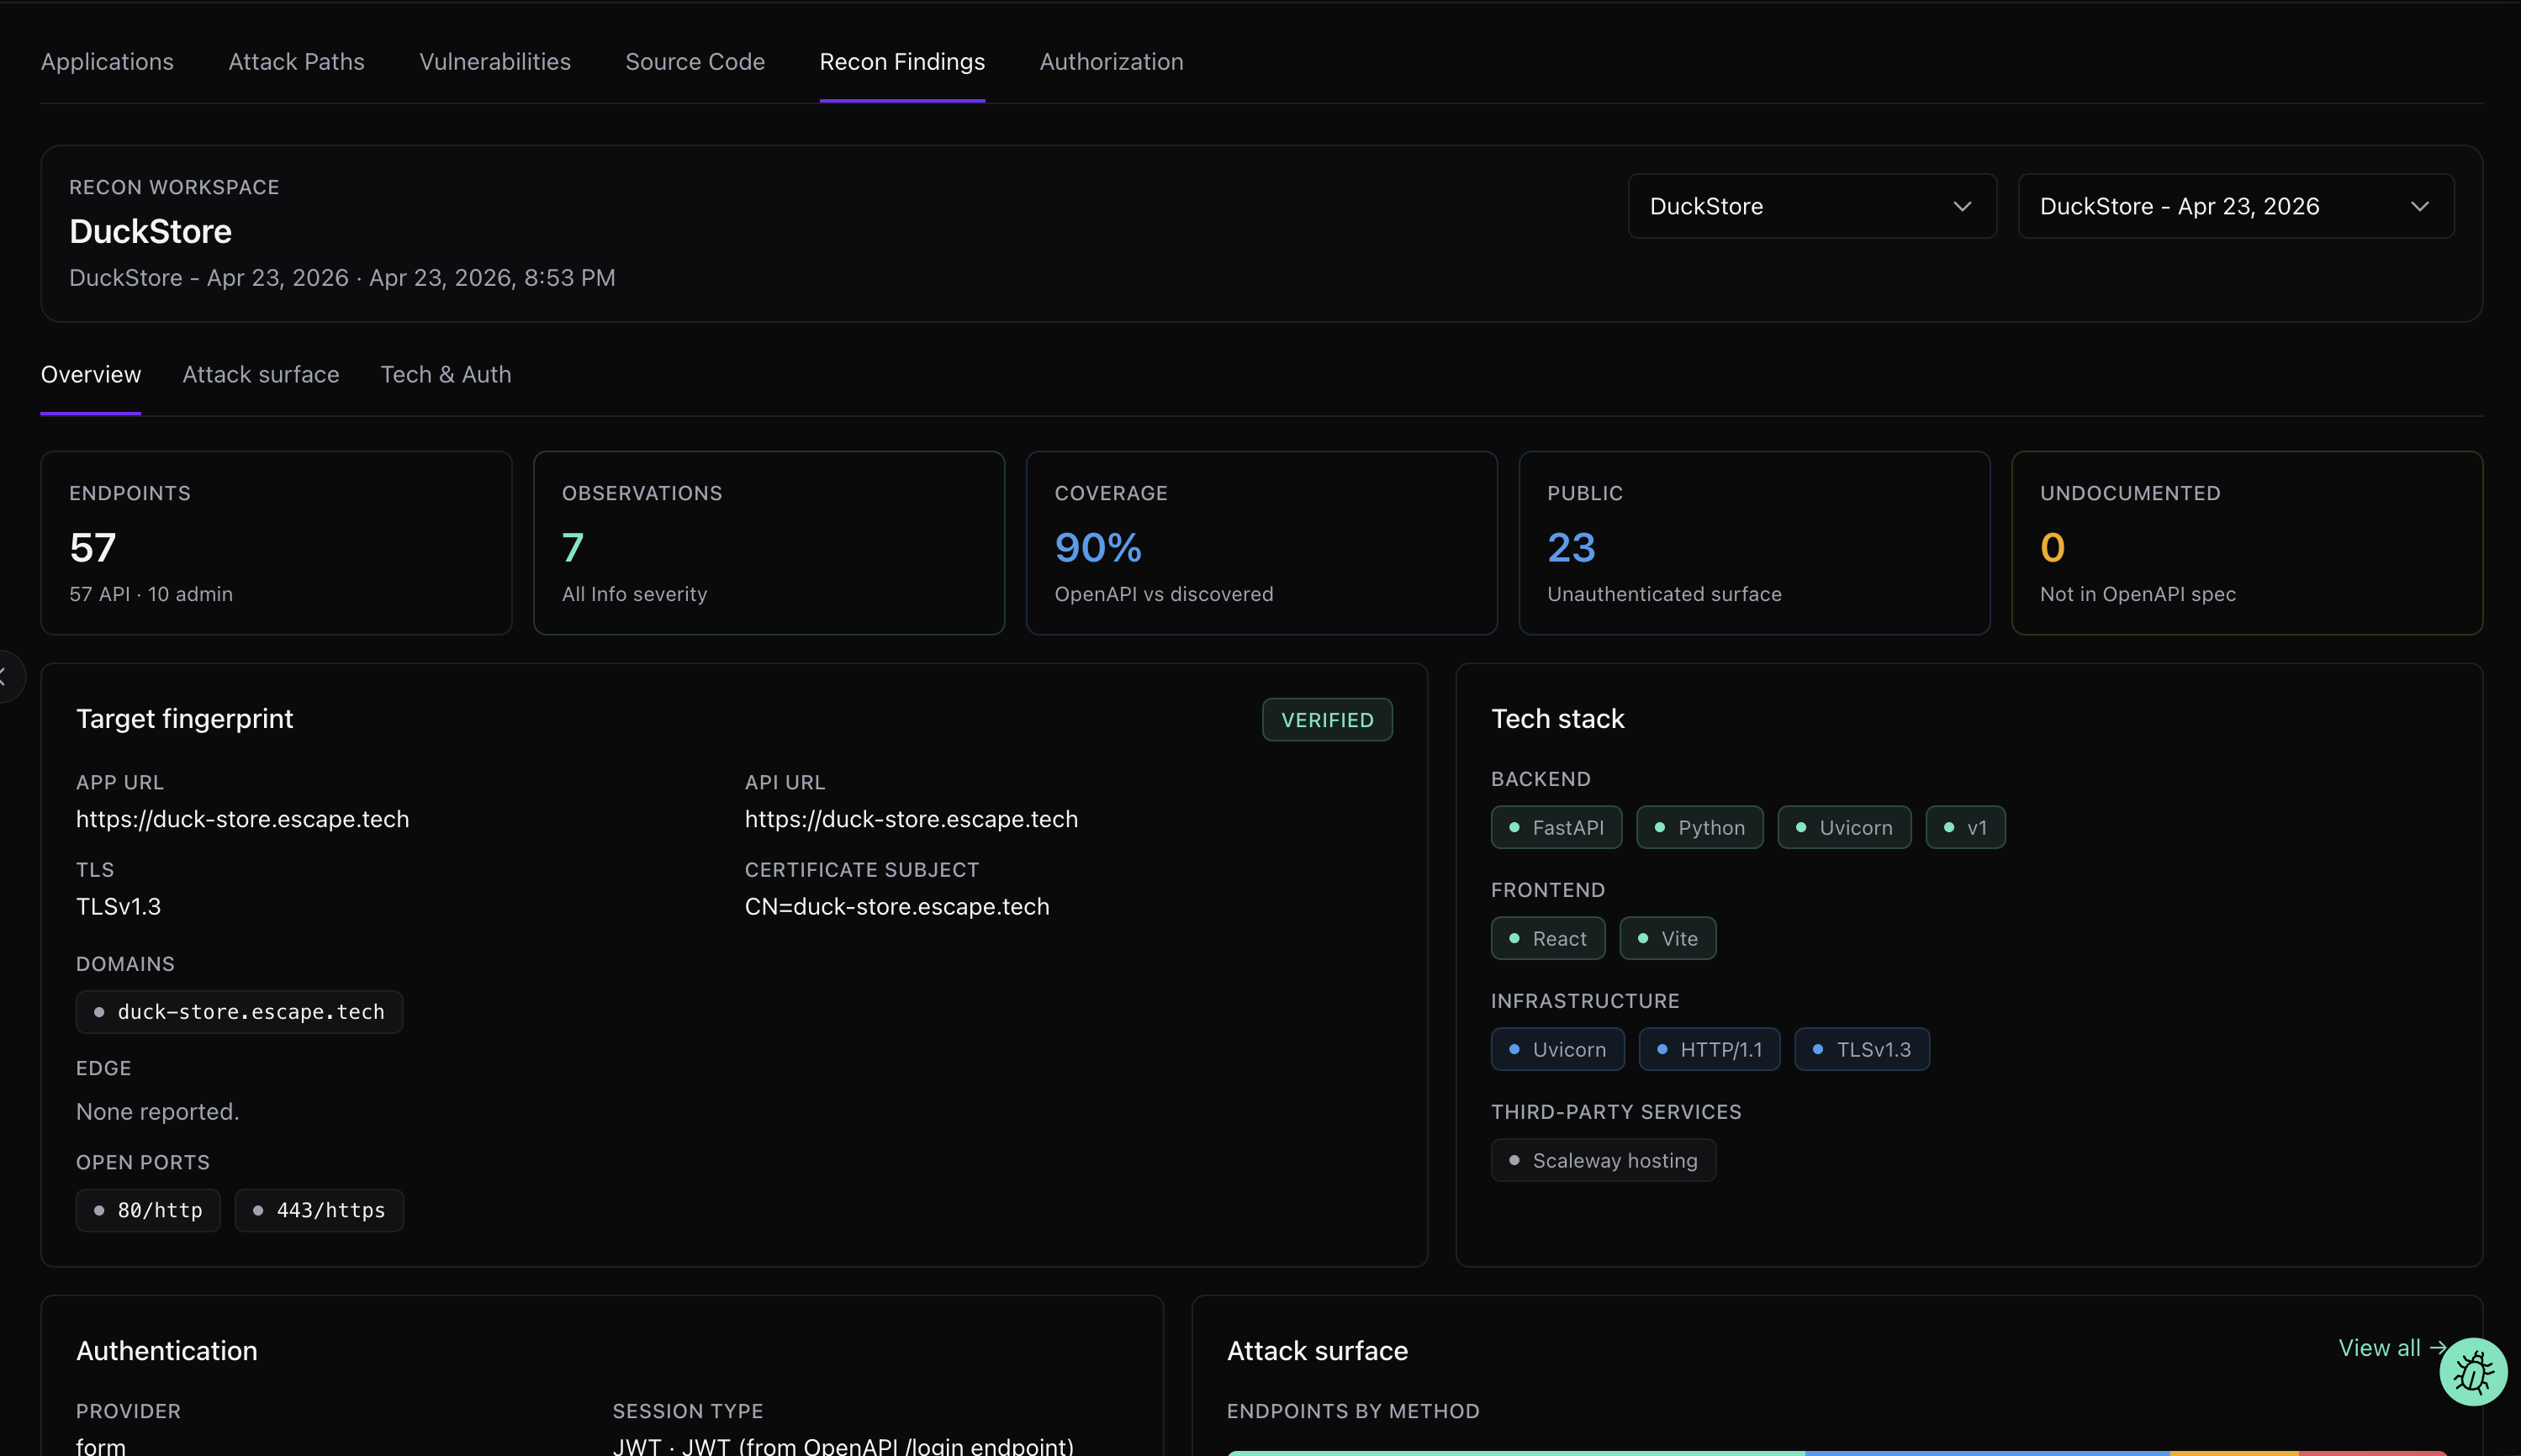
Use the workspace to understand the shape of the exposed surface before reviewing individual recon findings.
## Recommended triage flow
Use this flow for most assessments:
1. Open **Applications** and choose the target.
2. Review Critical and High vulnerabilities first.
3. Open **Authorization** and inspect both findings and the matrix.
4. Review **Attack Paths** to understand chained risk.
5. Review **Source Code** if the assessment included repository access.
6. Review **Recon Findings** for exposed-surface issues.
7. Validate or reject findings with comments.
8. Create tickets for remediation work.
9. Mark fixed items as **Ready to retest** where supported.
10. Close items only when the review decision is clear.
For large assessments, do not try to close everything in one pass. Start with verified Critical and High findings, then review Potential findings and lower-severity patterns.
## What to avoid
Avoid these review mistakes:
- Do not treat every Potential finding as confirmed.
- Do not close a finding without explaining why.
- Do not use **Risk accepted** when the issue is actually false.
- Do not use **False positive** when the issue is real but temporarily accepted.
- Do not create duplicate tickets for grouped findings unless each instance needs separate remediation.
- Do not ignore attack paths just because the individual findings look lower severity.
- Do not assume a `200` response in the authorization matrix means a vulnerability without checking the response context.
- Do not put secrets in comments, testing notes, or tickets created from findings.
The goal of the Findings area is to make every security decision traceable: what Tahr found, what evidence supports it, what your team decided, and what should happen next.
If a ticket status looks stale, open the finding or ticket row and choose **Refresh ticket status**. Check the integration connection and the external issue directly. If the status still does not sync, record the visible message and use [Integrations](/integrations#ticket-status-and-sync) for next steps.
Source: https://docs.tahr.one/findings
---
# Assistant (Coming Soon)
Learn about the planned Assistant experience and use current Tahr review workspaces in the meantime.
:::note Coming soon
Assistant is not currently available. No launch date is announced.
:::
Assistant will provide an organization-scoped chat for security triage. It is planned to help teams find and understand assessment results without leaving Tahr.
## Planned capabilities
Assistant is expected to help review:
- Findings, severity, status, evidence, and recommended remediation.
- Completed assessments and what they covered.
- Authorization findings and matrix results.
- Attack paths and how related findings combine.
- Source Code and Recon results.
## What to use now
- Use [Findings](/findings) to review vulnerabilities, authorization results, attack paths, source-code risks, and recon findings.
- Use [Threat Modeling](/threat-modeling) for threats, assets, trust boundaries, and recommended mitigations.
- Use [Reports](/reports) for shareable output from supported completed assessments.
When Assistant becomes available, treat its answers as review aids rather than proof. Verify important details in the linked assessment records and keep secrets, credentials, and private customer data out of questions.
Source: https://docs.tahr.one/assistant
---
# Threat Modeling
Assess repository and application context to understand threats, attack paths, and recommended mitigations.
Choose **Threat Modeling** when you want a structured view of how an application could be attacked and what controls should reduce that risk. It is especially useful early in a design or review, or when repository context and business workflows matter more than a standard vulnerability list.
## Before you start
Threat Modeling requires a ready application with repository access. Add the repository that matches the application, and make sure Tahr can read the selected branch. Add [application documents](/applications#application-documents) when they contain useful product, architecture, workflow, or security context.
Supported application documents include PDF, Markdown, text, DOCX, JSON, YAML, and image files. Keep documents relevant to the application and remove them when they are no longer appropriate.
## Start the assessment
1. Open **Assessments** and choose **New assessment**.
2. Select the application.
3. Select **Threat Modeling**.
4. Review the repository and application-document context shown by Tahr.
5. Resolve any readiness messages, then start the assessment.
Threat Modeling can use the repository and documents attached to this application. It does not require test users for authenticated testing. When Tahr shows source or recon context as available for a workflow, review the date and scope before relying on it; do not assume every assessment uses those results.
## Read the result
Open the completed assessment in the Threat Modeling workspace. Use the application and assessment selectors to choose the result. At the top, open the **Summary** and **Key Risks** disclosures for an overview before reviewing the workspace sections.
The workspace has five sections:
- **Actions**
- **Threats**
- **Attack Paths**
- **Coverage**
- **Report Details**
Use search on the list sections to find relevant items. In **Threats**, switch between **Priority threats** and **All threats**, and sort by **Report order** or **Evidence high to low**.
Open an item from a list to review its details and evidence. Permitted users can comment on items, set their review status, and close or reopen them.
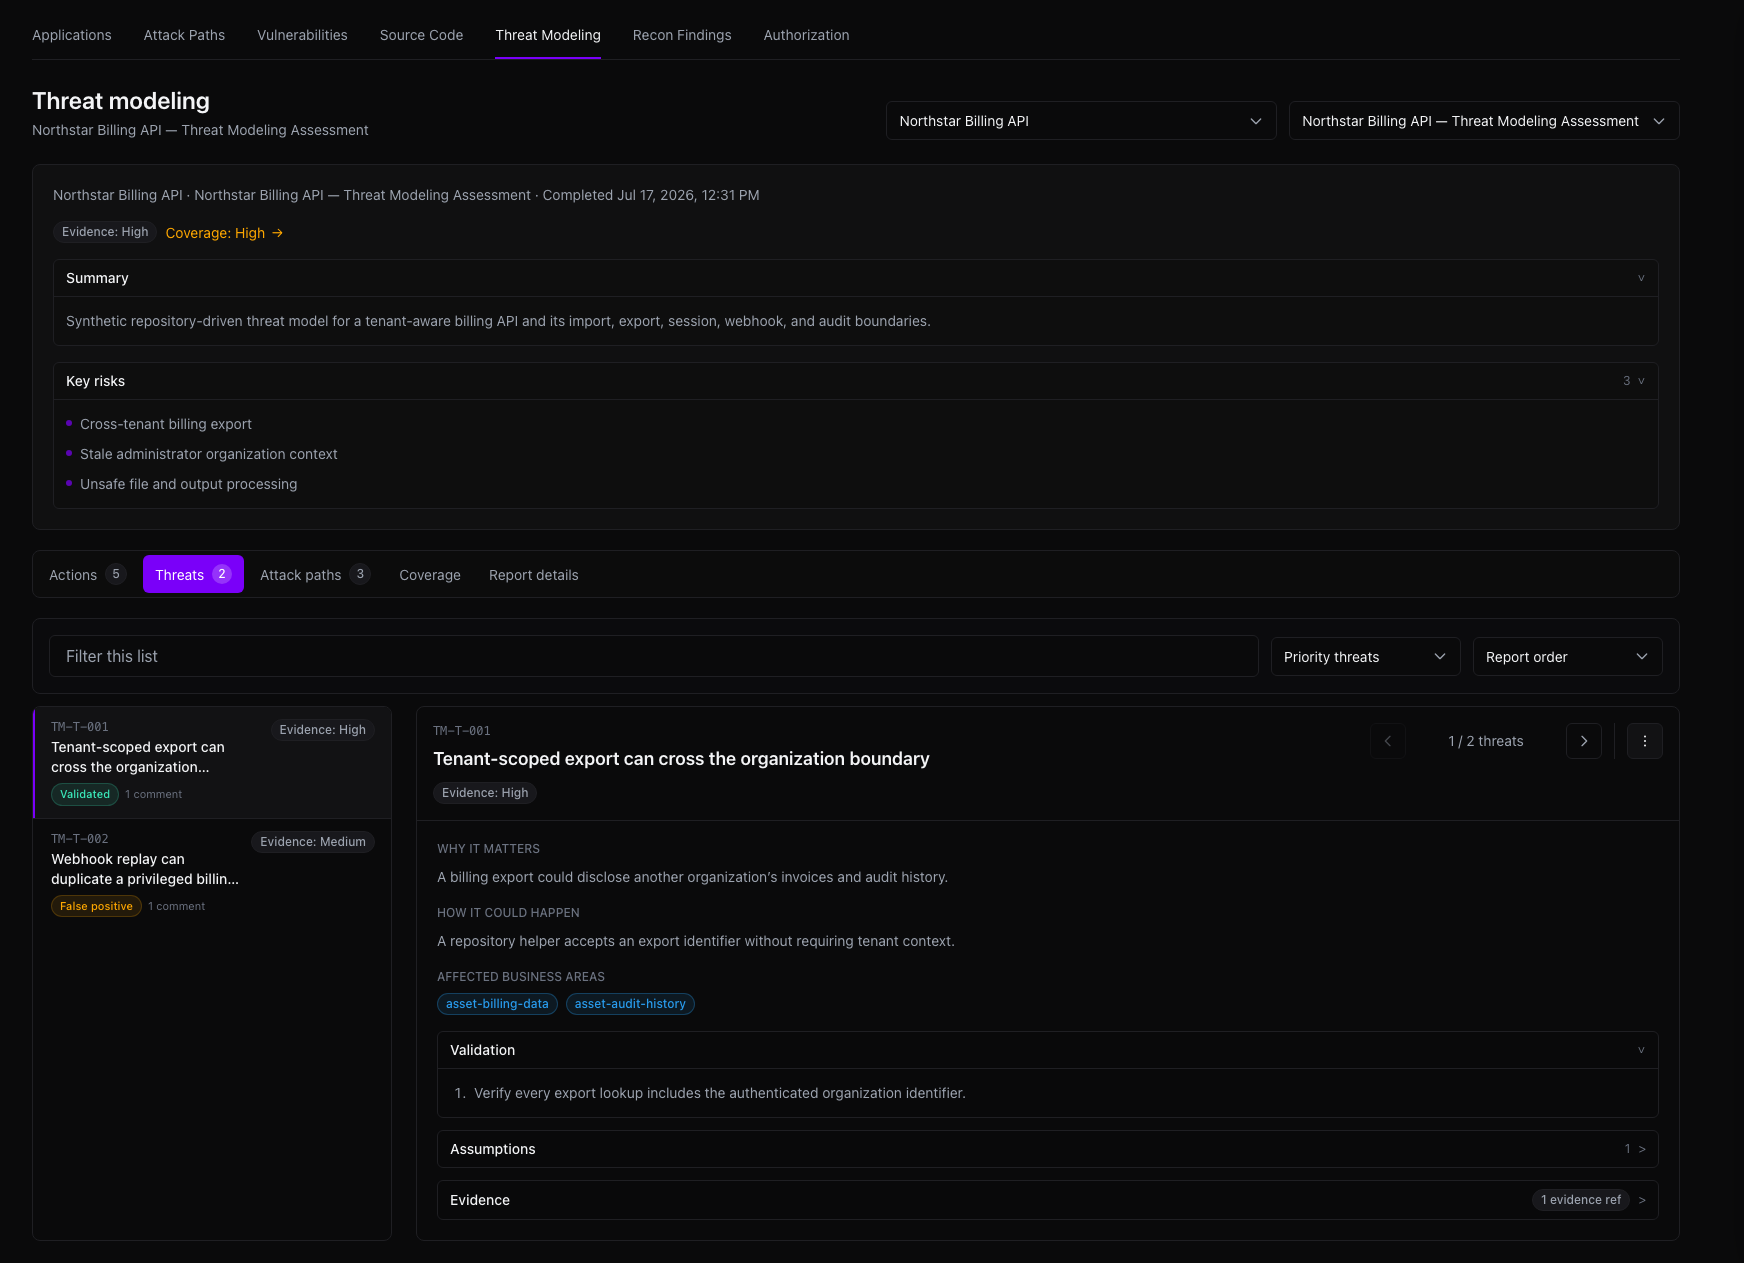
The result can include:
- Threats and why they matter.
- Assumptions and limitations that affect confidence.
- Evidence references and application context.
- Attack paths showing how weaknesses could combine.
- Recommended actions and practical validation steps.
Treat recommendations as review guidance. Confirm important claims against the repository, documents, and product behavior.
## Threat Modeling versus other outputs
Threat Modeling is a separate workspace and output focused on risks, trust boundaries, assets, attack paths, assumptions, and mitigations. Normal [Findings](/findings) are individual issues produced by security assessments and their evidence. Standard [Reports](/reports) summarize supported assessment results; they do not replace the Threat Modeling workspace.
If the assessment cannot start, check repository access, application readiness, and document availability. If the completed result is unavailable, retry from the assessment workspace and contact Tahr support with the visible message if the problem continues.
Source: https://docs.tahr.one/threat-modeling
---
# Reports
Generate and download assessment reports for completed Tahr assessments.
Use Reports when you need a shareable output from a completed assessment. Reports are generated from existing assessment results, so start in Findings when you still need to review, triage, or change finding status.
## Before you generate a report
Reports are available for completed assessment results when the relevant report options are shown in your workspace.
Before generating one, confirm:
- The assessment is completed.
- The findings have been reviewed enough for the intended audience.
- The report sections, report types, and export formats you need are shown.
If Reports is unavailable, contact your Tahr support contact rather than changing unrelated application settings.
## Generate a report
Open **Reports**, then choose:
1. **Application**: filter the completed assessment list to a specific application, or keep all applications visible.
2. **Completed assessment**: choose the assessment the report should use.
3. **Report type**: choose **Full report** or **Executive report**, depending on what your organization has enabled.
4. **Export format**: choose the available output format.
5. **Included sections**: select at least one report section.
Then click **Generate**. The report appears in report history while it is being generated.
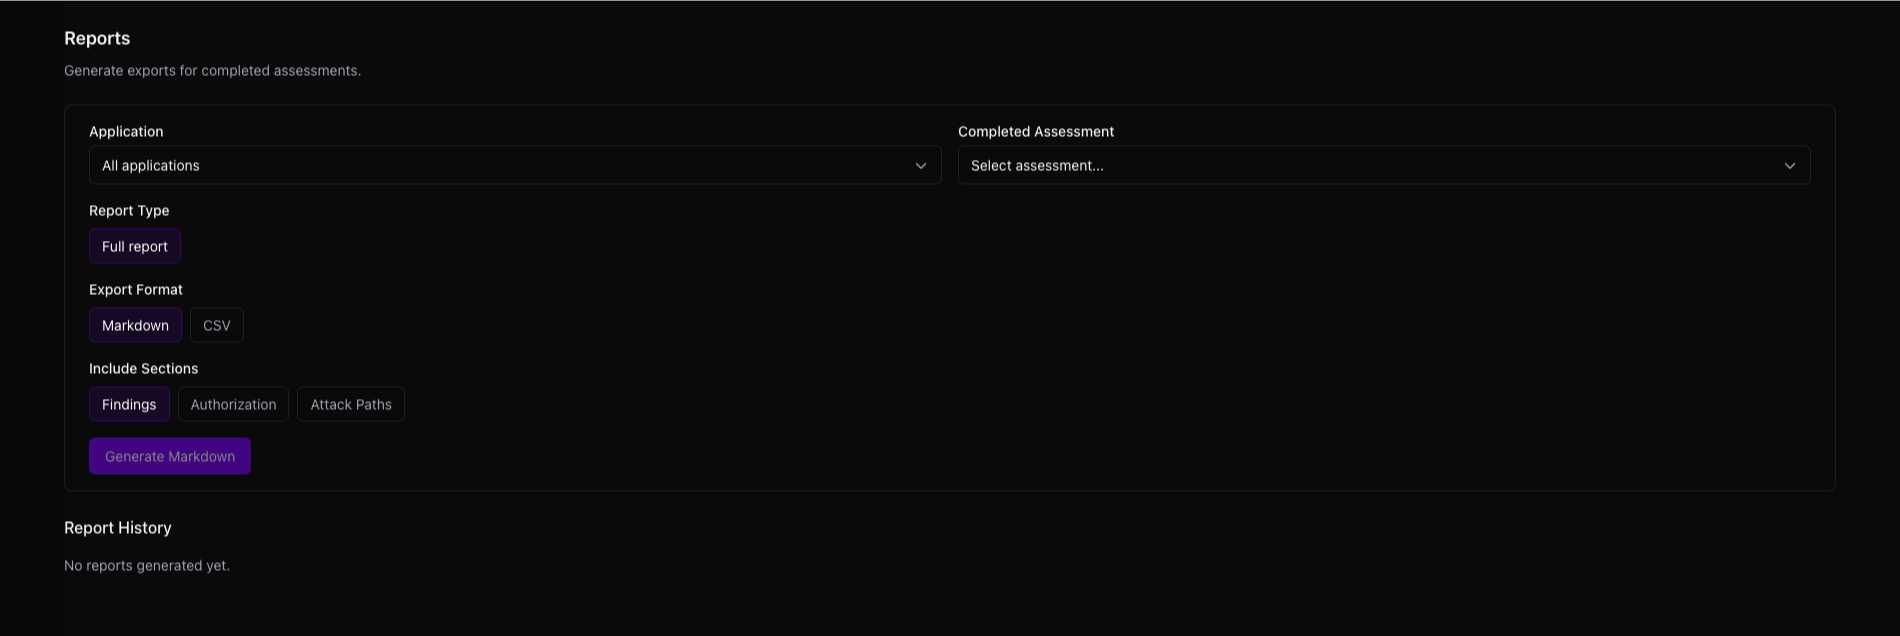
## Report sections
Available sections depend on the selected assessment and what Tahr shows. Standard reports can include:
- **Findings**: standard vulnerability findings from the assessment.
- **Authorization**: authorization-specific findings and access-control evidence.
- **Attack Paths**: chained issues where multiple findings combine into a larger path.
Choose only the sections that make sense for the audience. For example, an executive report may need fewer technical sections than a remediation handoff.
Standard reports summarize assessment findings and evidence. **Threat Modeling** has a separate workspace and output, while **Source Code** and **Recon** have separate workspaces and outputs; use those areas when you need their specialized context.
## Export formats
Available export formats depend on your organization's configuration and can include **PDF**, **HTML**, **Markdown**, and **CSV**.
Use PDF or HTML for shareable rendered reports, Markdown for editable text, and CSV for filtering or tracking.
## Report history
Report history shows reports that were generated for the organization. Each row includes:
- Generated time.
- Creator.
- Application.
- Completed assessment.
- Report type.
- Format.
- Included sections.
- Status.
Reports generated automatically by routine steps appear in this same history, subject to the configured report options.
Statuses can be **Generating**, **Completed**, or **Failed**.
## Download, retry, and delete
Completed reports can be downloaded from report history. If a report is still generating, wait for it to finish before downloading.
If generation fails and the retry action is available, use **Retry generation** once the underlying issue has been addressed.
When **Delete** is available, remove a report only when it is no longer needed or was generated with the wrong scope.
## Troubleshooting
If you cannot generate a report, check:
- The report options you need are available in the page.
- You selected a completed assessment.
- You selected at least one section before generating.
If the report content looks incomplete, return to [Findings](/findings) and confirm the assessment output you expect is present before generating another report.
Source: https://docs.tahr.one/reports
---
# Administration
Use Administration to manage your organization profile, domains, members, roles, and shared assessment settings.
Administration controls who can use Tahr and which assets your team is allowed to assess.
## Settings areas
Administration is organized into these areas:
- **General**: organization name, timezone, owner, and organization lifecycle actions.
- **Domain**: DNS verification for application and API domains.
- **Users**: members, invitations, and role assignment.
- **MCP**: manage member access and organization tokens for MCP clients when available.
- **Integrations**: repository access and ticketing destinations.
- **Reserved IPs**: static IPs for WAF and firewall allowlists.
- **SSO Accounts**: shared SSO-backed test accounts for authenticated testing.
- **SMS**: phone numbers used for SMS-based 2FA in test identities.
## General settings
Use **General** to rename the organization, choose its timezone, or copy the **Organization ID** when Tahr Support requests the exact identifier. The timezone affects scheduled work and displayed timestamps. Click **Save changes** after editing.
Ownership changes and deletion are sensitive actions. The current owner can choose **Transfer ownership**, select a trusted member, and confirm. At the end of General, the **Danger Zone** contains organization deletion. Deletion removes organization-scoped applications, domains, API keys, and member access; use it only when the organization is no longer needed and confirm the organization name when prompted.
## Domains
Domains define the hostnames your organization can use for applications and API targets. Tahr requires verification before an application can be marked ready for assessment.
### Where to verify a domain
Manage verification from **Administration** in **Domain**. You need a role that can manage domains. If you can view domains but cannot change them, ask an organization administrator to assign an appropriate role.
### Verify a domain
1. Open **Administration**, then **Domain**.
2. In **Add Domain**, enter the domain name only, such as `example.com`. Do not include `https://`, paths, query strings, usernames, or email addresses.
3. Click **Add Domain**, expand the pending domain in **Your Domains**, and copy its TXT record to your DNS provider.
4. Wait for DNS propagation, then return to Tahr and click **Verify Now**.

Tahr displays **Host / Name** (`_tahr`), **Full DNS Record** (`_tahr.example.com`), and **Value** (`tahr-verify=`). Providers usually append the domain to `_tahr`; use the full record name when requested. A successful status changes from **pending** to **verified**, and a verified parent covers subdomains. If verification fails, check the exact TXT value and allow more time for propagation.
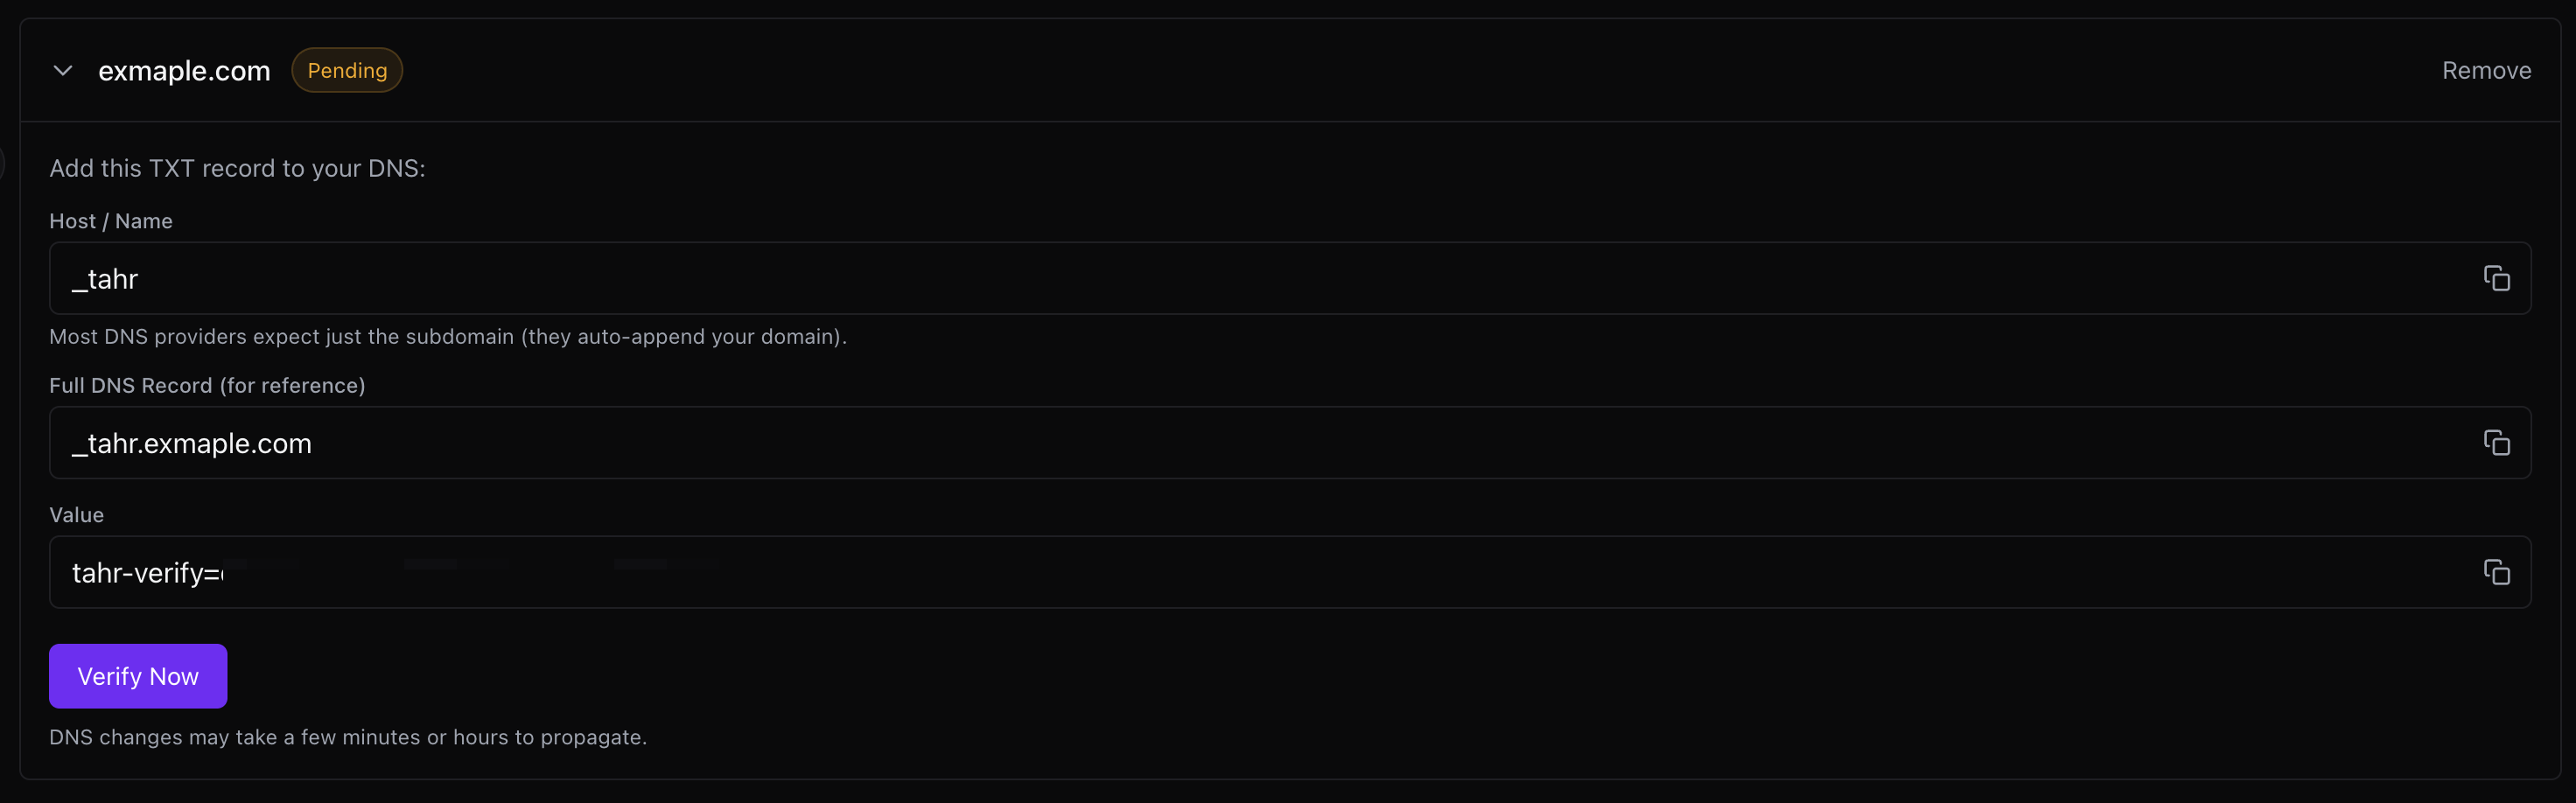
## Users and invites
The **Users** area shows members, pending invitations, roles, and removal controls. Only roles that can manage members can invite users, change roles, or remove members.
### Add a member
Open **Administration** > **Users**, enter an email in **Invite team member**, choose a role, and click **Send invite**. The user remains under **Pending invites** until acceptance or expiry. Use **Revoke** for a mistaken invite and **Show invite history** to review older invitations.

### Choose a member role
Assign the lowest role that meets the user's work:
- **org admin**: manage Administration, members, billing, integrations, applications, assessments, findings, and reports.
- **operator**: manage applications, run assessments and schedules, review findings, and use reports.
- **viewer**: inspect available organization and assessment information without changing setup or starting assessments.
- **integrator**: manage integrations, domains, reserved IPs, and application setup, and inspect findings and reports.
- **integrator operator**: combine operator and integrator capabilities.
The selector shows only roles the current user can assign. When an information control or role-details modal is shown, use it to review the assignable roles and their grouped capabilities before choosing a role. Start with **viewer** when possible and increase access only when needed.
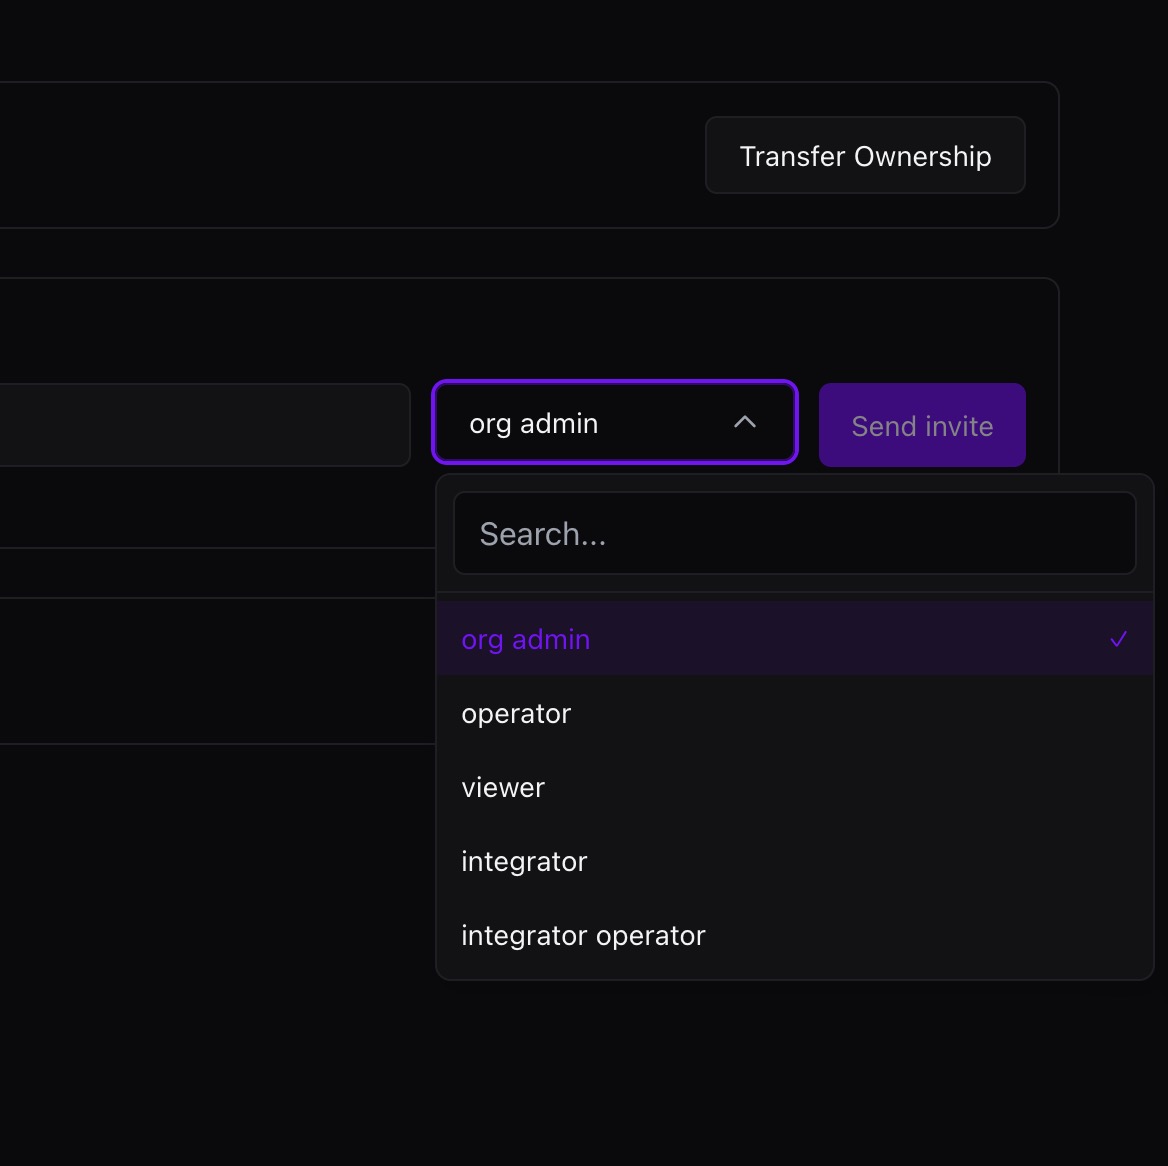
### Manage existing members
Use the member row to change a role or remove a member. Removal revokes access immediately. Do not remove the organization owner before transferring ownership through the supported flow. Invite only people who need access to sensitive assessment data, repositories, credentials, or test-user setup.
## Integrations
Use **Integrations** for external systems used by assessments and downstream workflows. See [Integrations](/integrations) for current provider procedures. Plans, credits, payment details, invoices, and reserved IP capacity are covered in [Billing](/billing). You need a role that can manage integrations to add, edit, or delete connections.
### Repository access
Repository access connects GitHub, Bitbucket, GitLab, or a personal access token so Tahr can read source code. Open [Integrations](/integrations) to connect a provider, select the repository or namespace, test access, or change the default integration.
### Ticketing integrations
Ticketing integrations send findings to Jira, GitLab, Azure DevOps, Linear, or another ticketing integration shown for your organization. Open [Integrations](/integrations) to add the provider, configure its project or team, scope it to **All apps** or **Specific apps**, choose a default, and use **Test connection**. Keep tokens secret.
## MCP access
Administrators can grant member MCP access and manage organization MCP tokens from **Administration** > **MCP** when it is available. Personal tokens and client setup are in **Profile** > **MCP**; see [MCP access](/mcp-access). Organization MCP access applies to the organization, so grant only the access needed and revoke unused access or tokens.
## Reserved IPs
Reserved IPs are static IPs for targets that only accept traffic from approved addresses, such as a WAF, firewall, VPN, or network allowlist. Availability depends on the organization plan. If the tab says reserved IPs are not available, review [Billing](/billing) or contact Tahr Support.
To reserve and scope an IP:
1. Open **Administration** > **Reserved IPs** and click **Reserve IP**.
2. Wait for the status to become **Running**, then copy the IP into the required allowlist.
3. Click **Modify** under **Scope** and choose **All apps** or **Specific apps**. For specific apps, select them and click **Add**, then **Done**.
Statuses include **Running** (ready), **Provisioning** (not ready), **Releasing**, and **Error**. Use **Specific apps** when targets have different allowlist rules. Before **Release**, remove the IP from WAF or firewall rules and confirm no active assessment or routine needs it. Tahr blocks release while the IP is in use or has an active dependency. See [Troubleshooting](/troubleshooting#reserved-ip-cannot-be-released) if it remains unavailable.
## SSO accounts
Use **SSO Accounts** when SSO is enabled for your organization, the area is shown, and you have permission to manage it. Add only an organization Google or Microsoft test account that is safe for automated testing. Creating or changing an account can disrupt access or trigger an account ban; acknowledge that risk before continuing.
1. Open **Administration** > **SSO Accounts**.
2. Click **Add account** for Google or Microsoft.
3. Enter the email and password, then provide TOTP when requested. TOTP may be optional when you first create the account.
4. Click **Save account**. An account without TOTP is not ready or selectable for application authentication until you choose **Configure TOTP**.
When the controls are available, use **Replace TOTP** for an existing account and update its password as needed. The TOTP preview and copy are short-lived; never share the secret or code.
If **Remove** or **Delete** is shown, remove an account that is no longer needed. Remove application references first if Tahr requires it.
## SMS numbers
Eligible organizations can use **SMS** when it is shown for SMS-based 2FA test identities. Claim an available number, or claim additional numbers when your organization has that entitlement. Inspect or copy the active number details for the relevant application test identity. Before **Release**, remove every reference to the number from application test identities. If number inventory or your entitlement is unavailable, contact Tahr Support. See [Billing](/billing#sms-capacity) for SMS capacity and add-on billing.
## Safe setup checklist
Before adding applications, confirm:
- Domains are verified.
- Members have the minimum role they need.
- Dedicated test users are available for authenticated testing.
- Reserved IPs are configured if the target requires allowlisting.
- Repository access is connected for source-code review.
- Ticketing integrations are scoped correctly if findings should create tickets.
- SSO accounts or SMS numbers are available when authenticated testing needs them.
For the canonical provider procedures, use [Integrations](/integrations); for blockers, use [Troubleshooting](/troubleshooting).
Source: https://docs.tahr.one/organization-settings
---
# Billing
Review plans, credits, payment details, invoices, and reserved IP and SMS add-ons in Tahr.
Open **Billing** to review your organization's plan, credits, payment details, invoices, and reserved IP or SMS add-on capacity.
## Plan and credit balance
The **Overview** tab shows your current plan, renewal or cancellation timing, standard credits, included monthly credits, and available reserved IPs. If Source Code Diff credits or **Convert credits** are shown, use the visible balance and controls for that credit type. Assessment launches show the credit type they need before you start them.
Use **Credit log** to review credit activity. Use its visible filters to narrow entries by activity type or date, then move through the pages to find a balance change.
### Convert credits
Choose the **From** and **To** credit types between standard and Code-diff credits, then enter the amount to convert. Review the conversion rate and resulting balances before confirming. You can reverse a conversion using the rate Tahr shows at that time; do not assume the rate or resulting value will match a previous conversion.
## Add credits
If **Buy more credits** and a **Buy** action are shown, choose a credit pack and complete the checkout flow. If the action is not shown, use the balance displayed in Billing and contact your Tahr support contact if you need more capacity.
## Payment details and invoices
Choose **Manage billing** when it is available to update payment details or review subscription information. **Payment history** lists available invoices; choose **View** or **PDF** on an invoice to open it.
If a payment or checkout action fails, do not repeat it until you have checked the visible message and your payment details. Try again once, then contact support with the message and date.
## Reserved IP capacity
The **Reserved IPs** section shows included capacity and any extra reserved IPs. When extra capacity is available to buy, choose the billing interval, enter the number of **Extra reserved IPs**, and select **Buy extra IPs**. For an existing add-on, use **Update extra IPs** to change capacity.
To stop renewing extra capacity, choose **Cancel extra IPs** and follow the selection step. The add-on remains available until the displayed end date. Choose **Keep extra IPs** before that date to continue it.
Tahr may require you to select which IPs will be released when extra capacity ends. Running assessments finish first; scheduled work may be disabled when it depends on an IP selected for release. A reserved IP that is currently used by an assessment or routine cannot be released until that work is no longer active.
## SMS capacity
When SMS capacity is shown for your organization, Billing distinguishes included or complimentary capacity from paid capacity. For a paid SMS add-on, review the quantity and billing interval before choosing the available **Buy** action. Existing add-ons may show controls to update the quantity, cancel renewal, resume, or keep the add-on.
Review the displayed renewal or end date after changing an add-on. If paid capacity ends, resolve any number-release or application dependencies that the interface identifies before the affected capacity can be removed. Claiming, copying, and releasing SMS numbers are managed in [Administration](/organization-settings#sms-numbers).
Source: https://docs.tahr.one/billing
---
# Integrations
Connect repositories and ticketing destinations used by Tahr workflows.
Integrations connect Tahr to repository providers and ticketing destinations used for setup and remediation. Configure connections here, then select them in an application's setup fields.
## Repository access
Repository access supports source-code analysis and workflows that need repository context. Public repositories may not need a connection; private repositories require a supported access method.
Available methods may include:
- **GitHub App**: install the app for the organization or repositories Tahr should browse.
- **Bitbucket OAuth**: authorize the workspace and repositories needed for assessment.
- **GitLab OAuth**: authorize the group or projects needed for assessment.
- **Personal access token (PAT)**: use only when an app or OAuth connection is not suitable, with the narrowest repository permissions possible.
After connecting, browse or refresh the repository list, then select the correct workspace, namespace, organization, or project area. In the application, choose the repository URL and branch; leave the default branch unless another branch is in scope. If an application and API use different repositories, select the repository relevant to the assessment.
Set a **default integration** only when it is appropriate for most applications. A connection can be removed when it is no longer needed, but applications that rely on it may lose repository access and need another integration selected. Test access to the target repository after changing the provider, workspace, namespace, or permissions.
When a provider exposes more than one workspace, organization, namespace, or project, choose the one that owns the application repository rather than relying on a similarly named result. Refresh the repository list after granting access or changing a provider authorization. If the repository is not listed, confirm the app installation or OAuth scope includes it, then reconnect or update the authorization before selecting a different repository.
## Ticketing destinations
Ticketing destinations let Tahr create external work items for findings. Depending on your organization's configuration, destinations may include:
- **Jira**: provide the site and project details required by the connection.
- **GitLab**: provide the host or group/project details required by the destination.
- **Azure DevOps**: provide the organization and project details.
- **Linear**: provide the workspace and team details.
Other ticketing integrations shown for your organization can also be used.
Enter the provider's required project or team fields, then choose whether the destination applies to **All apps** or only **Specific apps**. Set a default destination only when it is the intended destination for most findings. Confirm labels, assignee behavior, and other visible field mappings with a test ticket before enabling broad use. GitLab destinations may need custom headers when the provider or network requires them; add only approved headers.
Use **Specific apps** when teams, projects, or data-handling rules differ. Use **All apps** only when every application should create work in the same provider area. Before enabling automatic ticket creation, confirm that the selected project or team accepts the issue type and required fields, and that the destination account can update an existing ticket as well as create one.
## Connection tests
Use **Test connection** after creating or changing a repository or ticketing connection. A passing test confirms the supplied account can reach the selected provider area, but it does not guarantee every repository or future ticket action. If it fails, check the provider URL, workspace or project selection, token scope, OAuth authorization, and whether the account can access the target resource.
For application setup, select the tested integration and verify that the intended repository, branch, project, or team is available. Re-test after rotating credentials or changing destination scope.
## Ticket status and sync
When an external issue changes but Tahr shows an old status, refresh the ticket status from the finding or ticket row. If refresh fails, confirm that the issue still exists and that the connection can access it, then update or reconnect the destination and test it again. Verify the destination project or team when changing an application's scope.
## Credential hygiene
Treat repository, OAuth, PAT, and ticketing credentials as sensitive. Prefer an app or OAuth connection with least privilege, limit PAT permissions to the required repositories or projects, remove unused connections, and rotate credentials according to your policy or immediately after exposure. Review the [Security Notices](/security-notices) for the complete integration and scope safeguards.
Never paste tokens, passwords, client secrets, or recovery codes into application context, testing instructions, comments, or finding notes.
When rotating a credential, update the connection, run its connection test, and confirm the applications or destinations that use it still work. Remove the old credential from the provider when the replacement is active.
Source: https://docs.tahr.one/integrations
---
# Glossary
Common Tahr terms used across applications, assessments, routines, and findings.
Use this page when a term in the Tahr interface is unfamiliar.
## Application
An [application](/applications) is a target Tahr can assess, including its URLs, access details, repository settings, and testing context.
## Assessment
An assessment is one execution of a Tahr testing workflow against an application. It may be started manually, scheduled, triggered from CI/CD, or run in a routine.
## Authenticated testing
[Authenticated testing](/authenticated-testing) uses test users to exercise functionality unavailable to anonymous visitors.
## Finding
A finding is a security issue or observation produced by an assessment, with severity, evidence, affected areas, status, and review controls.
## Authorization finding
An authorization finding concerns access-control behavior, such as a user viewing or changing data they should not access.
## Attack path
An attack path connects observations into a larger exploitation chain and explains how smaller issues can combine into greater risk.
## Routine
A [routine](/routines) is an ordered set of assessment steps used to repeat a standard workflow.
## Portfolio
A portfolio groups applications by product, team, business unit, or environment.
## Verified domain
A [verified domain](/organization-settings#where-to-verify-a-domain) proves that an organization controls a hostname and helps prevent accidental testing of assets it does not own.
## Reserved IP
A [reserved IP](/organization-settings#reserved-ips) is a dedicated IP useful when a target requires IP allowlisting.
## Assistant
[Assistant](/assistant) is a planned organization-scoped chat for reviewing findings and assessment information. It is coming soon and is not currently available.
## Threat Modeling
Threat Modeling is an assessment and workspace for threats, attack paths, assets, assumptions, evidence, and recommended mitigations.
## Tahr context
**Testing instructions** is the application-level base field. A finding, authorization finding, or authorization matrix comment can be marked with **Add this comment to testing instructions for future assessments**. The saved comment has a **Tahr context** badge and remains attached to its finding or authorization review item. Tahr merges marked comments into effective instructions for future assessments without rewriting the application's **Testing instructions** field.
## Application Document
An application document is an uploaded file that adds context to supported workflows, especially Threat Modeling.
## Assessment Credit
An assessment credit is a unit used when Tahr starts an assessment type that shows a credit requirement.
## Source Code Diff Review
Source Code Diff Review examines repository changes since a selected source analysis commit.
## Routine Template
A routine template is a provided starting workflow that teams can copy when its assessment types are available.
Source: https://docs.tahr.one/glossary
---
# Troubleshooting
Resolve common setup blockers, assessment launch issues, authentication problems, and finding workflow questions.
This page covers common issues that prevent applications from becoming ready or assessments from running correctly.
## Quick route for common blockers
Use this list when you know the symptom but not the product area.
- **Access or permissions**: if you need access, cannot invite users, or cannot change a setting, review [member roles](/organization-settings#choose-a-member-role) or ask an organization owner to assign the appropriate role.
- **Application draft or readiness**: open [Application stays in draft](#application-stays-in-draft) and [Domain readiness](/applications#domain-readiness).
- **Domain verification**: open [Domain verification is pending](#domain-verification-is-pending) and [Where to verify a domain](/organization-settings#where-to-verify-a-domain).
- **Login or session failure**: check [Authentication Check URL always returns 200](#authentication-check-url-always-returns-200) and [Authenticated Testing](/authenticated-testing).
- **Assessment launch**: open [Assessment cannot start](#assessment-cannot-start) and [Manual runs](/running-assessments#manual-runs).
- **WAF or allowlist**: configure [Reserved IPs](/organization-settings#reserved-ips).
- **Finding review**: review [Finding action menu](/findings#finding-action-menu) and [Status and review labels](/findings#status-and-review-labels).
- **Ticketing**: check [Tickets](/findings#tickets) and [Ticketing integrations](/integrations).
- **Routine inputs**: if a routine used old source or recon data, open [Routine uses the wrong source or recon output](#routine-uses-the-wrong-source-or-recon-output).
- **Assistant or Threat Modeling**: Assistant is [coming soon](/assistant). Use [Findings](/findings) for current assessment results or [Threat Modeling](/threat-modeling) for threat-model output.
## Application setup issues
### Domain verification is pending
Check that the DNS record is on the correct domain and has propagated. If verification fails, confirm the domain and TXT value have no typos, then wait and retry.
If an application says the domain is not verified, open [Administration](/organization-settings#where-to-verify-a-domain), expand the domain, and confirm the TXT record matches Tahr. Enter the domain name only.
A verified parent domain covers subdomains. For example, verifying `example.com` covers `app.example.com` and `api.example.com`.
### Application stays in draft
Open the application setup review step and read the blockers. Common causes are missing domain verification, incomplete authentication, or missing repository access. Resolve the first blocker, then review [Application Setup](/application-setup).
### Authenticated testing cannot be saved
Confirm that the Login URL is a full public HTTP(S) URL where sign-in begins. The Authentication Check URL must be a full URL on the configured application or API origin and prove the user is logged in. Public third-party or custom identity-provider redirects can be intermediate steps, but do not use them as the final check. See [Authenticated Testing](/authenticated-testing).
Check that each test user has the required username, role, tenant, password or account reference, and second-factor configuration.
## Authentication issues
### Authentication Check URL always returns 200
Do not use a public homepage, health check, static asset, or generic API route as the authentication check URL. If the same response is returned before and after login, Tahr cannot use it to prove the session worked.
Use an endpoint that returns authenticated user-specific data, such as `/me`, `/profile`, `/account`, `/api/me`, `/api/user`, or `/api/profile`. The exact URL depends on your application, but the response must differ meaningfully between logged-out and logged-in requests.
If the application uses SSO or tenant selection after login, record that detail in **Extra context for authentication** and Sign-in automation.
### 2FA setup fails
Confirm the second-factor method for each user. Mark users that do not need it accordingly.
For authenticator app codes, confirm the setup value is complete. For SMS codes, confirm the selected organization phone number is available. See [Administration](/organization-settings#sms-numbers).
## Assessment launch issues
### Source-code analysis is unavailable
Confirm the application has a repository URL and that [Integrations](/integrations) can reach the selected private repository and branch.
If the repository moved or permissions changed, update the integration and test the connection from [Integrations](/integrations).
### Assessment cannot start
Check that the application is ready and that the selected type matches its setup. Some types require authentication, repository access, API files, or mobile artifacts.
If the target is behind a WAF or allowlist, confirm [Reserved IPs](/organization-settings#reserved-ips) and launch options before retrying.
### New assessments are temporarily unavailable
New manual, CI/CD, or routine launches may be unavailable while existing assessments continue. Scheduled occurrences may be skipped or advanced; check the visible status and try again later.
### Credits or plan are unavailable
If Tahr reports insufficient credits or plan limitations, open [Billing](/billing). Choose an available assessment or contact Tahr Support if the displayed capacity is unexpected.
### Provided routine templates are missing
Templates appear only when available assessment types are available for the selected application. Create a routine manually or resolve the readiness blocker shown by Tahr.
### Reserved IP cannot be released
Tahr blocks release when the IP is being used by an active assessment or routine, or is not in a releasable state. Wait for the work to finish, choose another IP when the release prompt offers that option, or try again after the status changes. See [Administration](/organization-settings#reserved-ips).
### Assessment recovery
Check the visible status and message before retrying, and avoid duplicate active or queued launches. When offered, pause or resume the run; cancel it if the work must stop. Cancelling queued routine steps does not cancel an assessment that is currently active.
Use **Retry cleanup** only when the assessment finished but cleanup failed. Before retrying, resolve the visible readiness, credits, authentication, launch availability, or WAF/IP blocker. For manual IP selection, see [Choose an IP](/running-assessments#choose-an-ip) and [Running Assessments](/running-assessments#during-a-run).
## Automation and integration issues
### Ticket status is not syncing
Open the finding and choose **Refresh ticket status**. Test the ticketing connection and confirm the external issue still exists. Update or reconnect it from [Integrations](/integrations) if refresh continues to fail.
### Reauthentication is requested during an account change
Complete the reauthentication prompt for a sensitive account change. If it fails, cancel the change, sign in again, and retry once.
### Threat Modeling or application documents are unavailable
Threat Modeling needs repository access, and documents may be unavailable until the application draft is saved. Save the application, check readiness messages, and upload a supported document when the document area appears.
### CI/CD trigger does not work
Confirm the pipeline uses the current trigger token stored as a secret, and that the requested assessment type is allowed for CI/CD.
Avoid retry loops that repeatedly trigger assessments after a failure. Fix the setup issue first, then review [Running Assessments](/running-assessments#ci-cd-triggers).
### Routine uses the wrong source or recon output
Open the routine and check each step's input settings. Steps run in order, and same-run outputs are used first.
If configured, a step falls back to the latest saved source-code analysis or recon output when the current run has not produced it. Disable fallback to require fresh same-run output.
Put the producing step before the consumer. Use a dedicated non-production environment for every assessment; do not run production testing. See [Routines](/routines#reusing-recon-and-source-outputs).
## Findings look unexpected
Review application context, test-user permissions, and assessment scope. Unexpected access or missing setup context can make a finding look incorrect.
Use comments to capture review decisions so other teammates understand whether the finding is valid, accepted, duplicate, or not applicable.
## Contact Support
Use the in-app Support widget. Choose **Bug** for a product malfunction or **Support** for usage or access help. Include the active organization, application, assessment name or ID when visible, timestamp, visible error, concise steps, and only safe screenshots.
Never include passwords, tokens, TOTP or recovery secrets, test credentials, customer data, or private repository content. If organization Slack support is offered or pending, follow the visible status and do not repeatedly request it.
Source: https://docs.tahr.one/troubleshooting