Findings are the main review output from Tahr assessments. Use this area to triage issues, inspect evidence, mark review decisions, create tickets, and decide what needs a retest.
The Findings section is not only a flat vulnerability list. It separates assessment output into views that match how security teams review work: applications, attack paths, vulnerabilities, source-code risks, threat modeling, recon findings, and authorization evidence.
#Findings area map
The Findings page has these main areas:
| Area | Use it for |
|---|---|
| Applications | Start from an application and open the relevant finding type for that target. |
| Attack Paths | Review chains where multiple weaknesses combine into a higher-impact path. |
| Vulnerabilities | Review standard web, API, and application security findings. |
| Source Code | Review source-code risks from source-code assessments. |
| Threat Modeling | Review threats, assumptions, evidence, attack paths, and recommendations. |
| Recon Findings | Review recon observations and discovered attack-surface issues. |
| Authorization | Review access-control findings and the authorization matrix. |
Start with Applications when you are reviewing one target. Start with Vulnerabilities, Authorization, Source Code, Recon Findings, or Threat Modeling when you are reviewing by finding type or workspace across the organization.
#Applications view
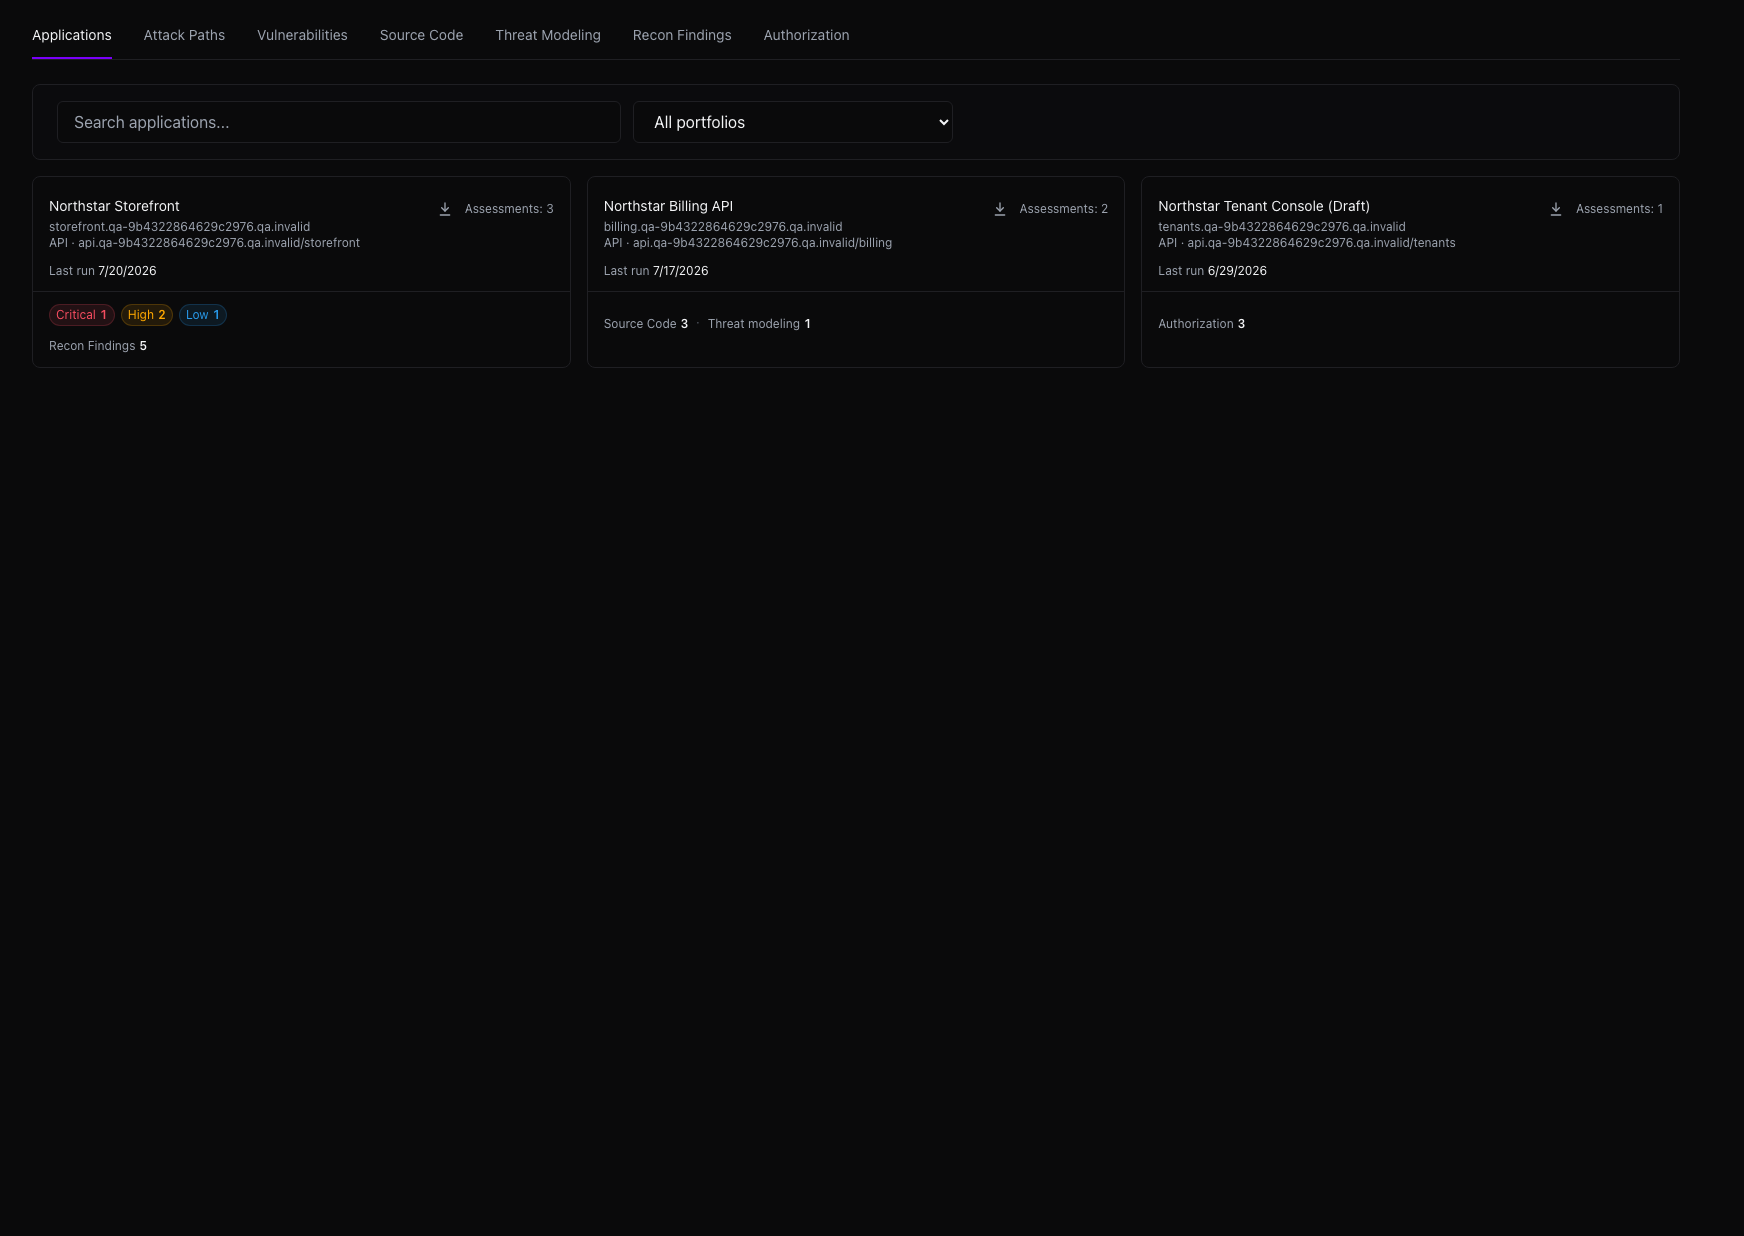
The Applications view is the best starting point when you are reviewing a specific product or service.
Each application card summarizes the current review surface for that application:
- Application name, app URL, and API URL.
- Latest assessment activity.
- Severity pills. Select one to open Vulnerabilities filtered to that application and severity.
- Nonzero category links. Select one to open Recon Findings, Source Code, Attack Paths, Authorization, or Threat Modeling for that application. Empty categories are omitted.
- A report export icon when reports are configured and you have permission to export them.
Select an application name to open Vulnerabilities filtered to that application. Use the search field to find an application by name, URL, API URL, or portfolio. When available, the portfolio filter is on this Applications view only; it does not apply to other Findings tabs.
An application card showing No findings has assessment activity but no current surfaced results. Not scanned yet means no assessment exists for that application. If you can run assessments, select Run assessment to open that application's Assessments view.
#Vulnerabilities
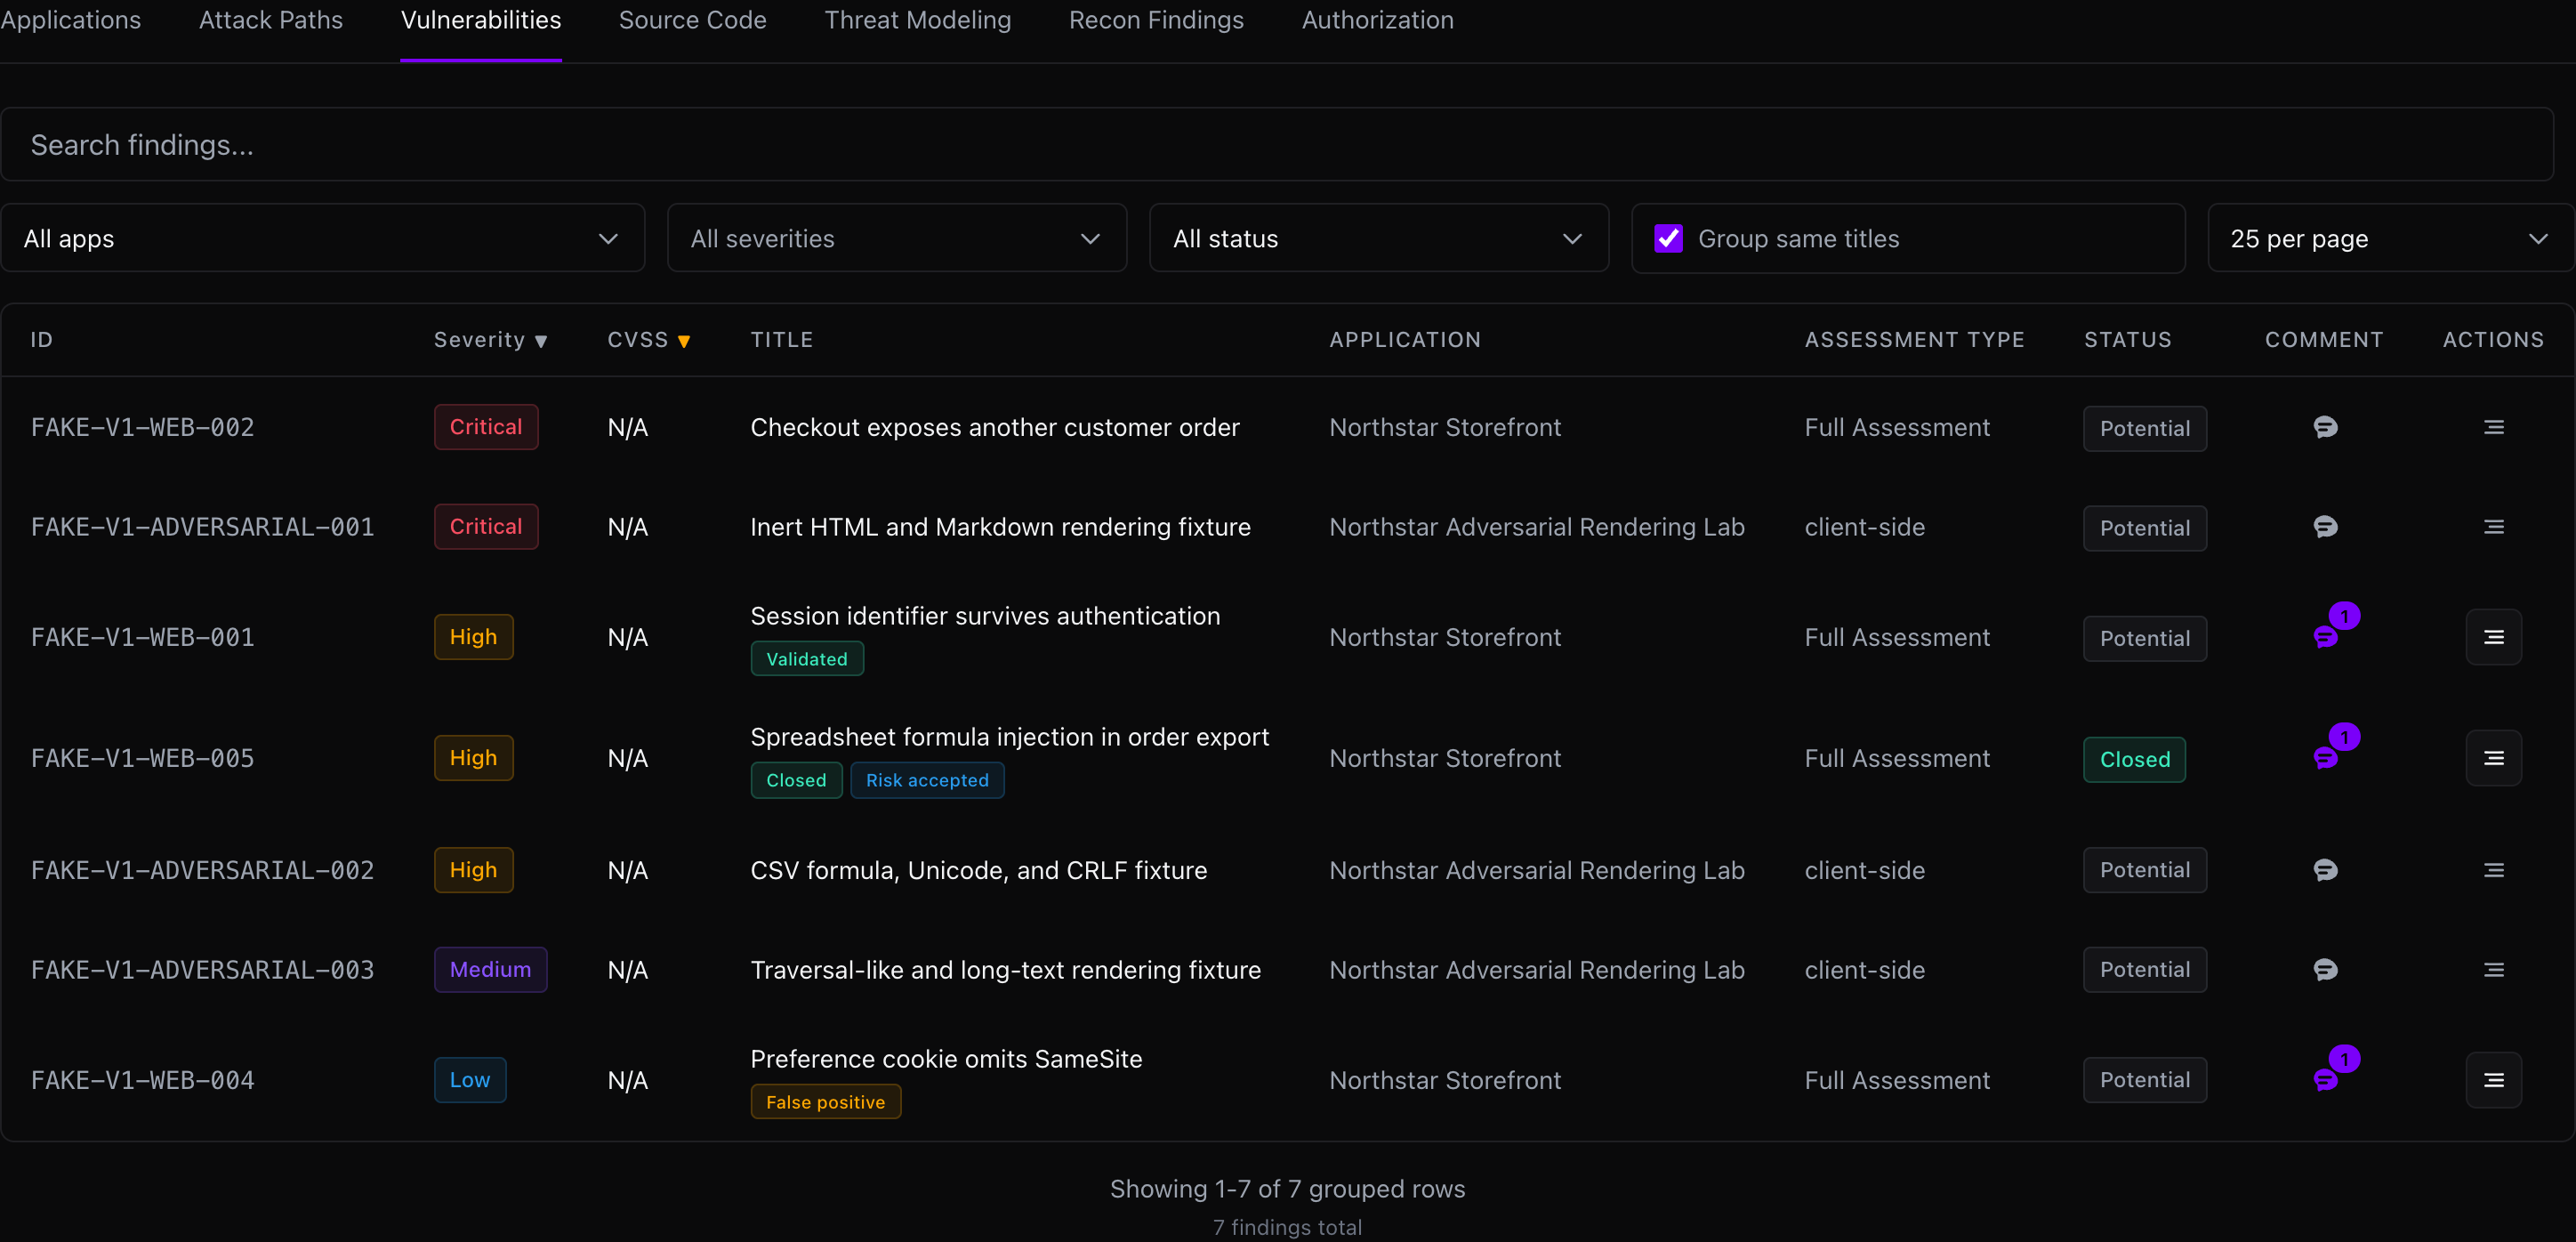
The Vulnerabilities tab is the standard finding list for web, API, and application security issues.
Use this tab to:
- Review verified and potential vulnerabilities.
- Filter by application, assessment, severity, and status.
- Sort by CVSS or severity.
- Group findings with the same title.
- Open a finding detail page.
- Add comments and review decisions.
- Create or update tickets.
- Start a retest for a selected application and assessment.
By default, the all-applications view focuses on the latest assessment per application. Select a specific application when you need to inspect an older assessment or compare assessment runs.
#Search and filters
Use filters to narrow the finding list before triage:
- Search: finds vulnerability titles.
- Application: limits results to one application.
- Assessment: appears after selecting an application, and limits results to one run.
- Severity: filters by Critical, High, Medium, Low, or Info.
- Status: filters by closed, verified, validated, or potential state.
- Group same titles: combines findings with the same normalized title so repeated patterns are easier to review.
- Items per page: changes how many rows are shown at once.
When grouping is enabled, expand a grouped row to inspect the individual findings behind the repeated title.
#Finding detail
Open a finding to review the complete evidence package.
Depending on the finding type and available data, the detail page can include:
- Severity and contextual severity.
- CVSS score, vector, and rationale.
- Verification status.
- Review status and closure state.
- Endpoint, method, tags, CWE, WSTG, or MASTG references.
- Description, targeted explanation, and impact.
- Evidence references and screenshots.
- Steps to reproduce.
- Recommendation and extended recommendation.
- Source-code action plan or AI fix prompt, when the finding came from source analysis.
- Related attack paths.
- Comment history and review actions.
Use Copy as Markdown when you need to share a finding with a teammate, paste it into an internal review, or preserve a readable snapshot outside Tahr.
#Finding action menu
The action menu on a finding detail page contains the main triage actions for that finding. The options you see depend on your organization role, whether the finding is already closed, and whether ticketing is available. If an expected action is missing, review member roles or ask an organization administrator to assign an appropriate role.
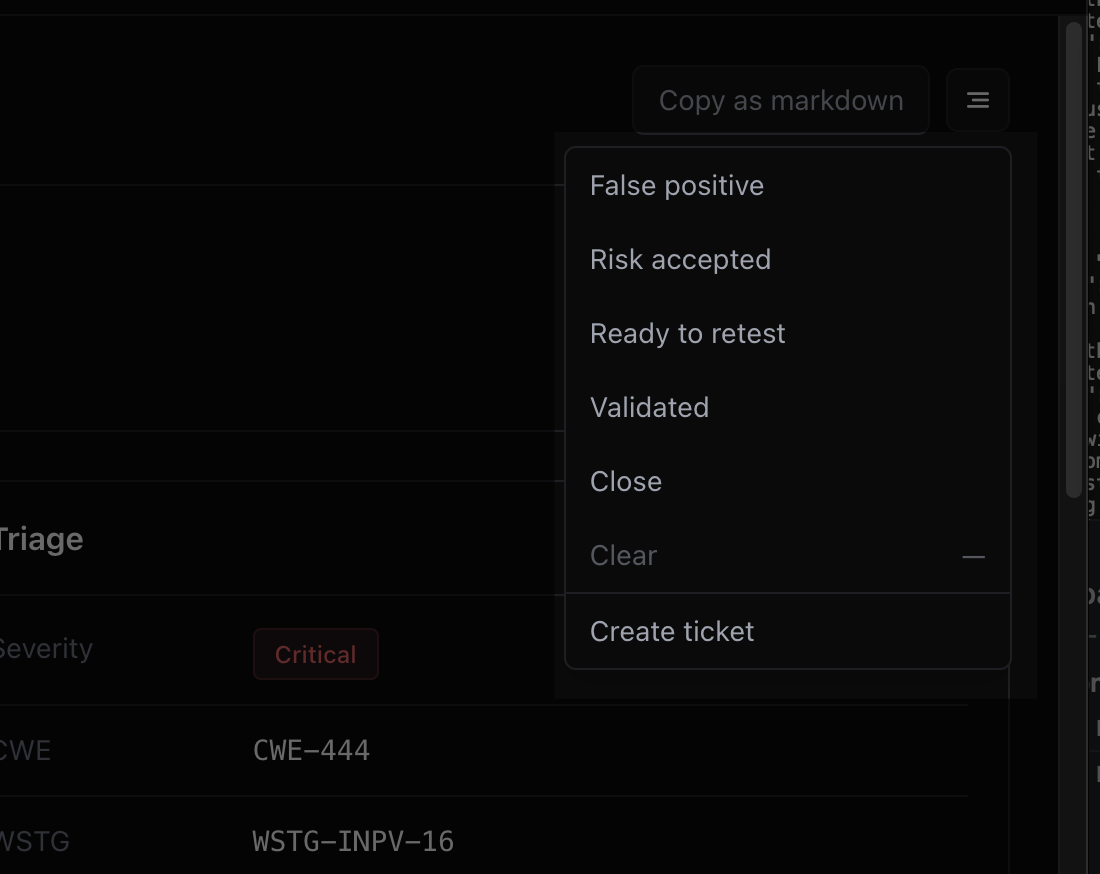
Common actions are:
- Copy as markdown: copies the finding title, metadata, evidence, impact, recommendation, and available remediation context into a markdown format.
- False positive: marks the finding as not valid for this target. Tahr asks for a comment explaining why.
- Risk accepted: keeps the finding as real, but records that the organization accepts the risk for now. Tahr asks for a comment explaining the acceptance.
- Ready to retest: marks the finding as fixed or ready for verification. Use this before launching a retest where retesting is supported.
- Validated: records that a reviewer confirmed the finding as valid. Tahr asks for a comment explaining how it was validated.
- Close: closes the finding after the review decision is clear, such as after remediation, duplicate handling, acceptance elsewhere, or a not-applicable decision.
- Clear: removes the current review state from the finding. This option is disabled when no review state is set.
- Create ticket: opens the ticket creation flow when a ticketing destination is available for the finding.
Use the menu for review decisions, not for hiding uncertainty. If the evidence is unclear, leave a comment and keep the finding open until the reviewer can decide.
#Status and review labels
Tahr separates assessment confidence from human review decisions.
| Label | Meaning |
|---|---|
| Verified | Tahr has evidence that the issue was reproduced or confirmed by the assessment pipeline. |
| Potential | The issue has meaningful indicators, but Tahr could not fully prove exploitation or impact. |
| Validated | A reviewer has confirmed the finding as valid. |
| False positive | A reviewer decided the finding is not valid for this target. |
| Risk accepted | A reviewer decided the finding is real but accepted for now. |
| Ready to retest | A fix is ready and the finding should be checked again. |
| Closed | The finding is no longer active in the review workflow. |
Use the labels for different purposes. Verified and Potential describe what Tahr found. Validated, False positive, Risk accepted, Ready to retest, and Closed describe what your team decided after review.
#Review actions
Use review actions to keep the workflow clear:
- Open the finding and read the evidence.
- Add a comment if the decision needs context.
- Mark the finding as Validated, False positive, Risk accepted, or Ready to retest.
- Create a ticket if the issue needs engineering work.
- Close the finding when it is fixed, accepted elsewhere, duplicated, or no longer applicable.
Review-state changes require a comment so the next reviewer can understand the decision. Clearing a review state removes that decision from the finding, but it does not delete the previous discussion.
#Comments
Use comments to record reviewer context that should stay with the finding.
Good comments include:
- Why a finding was validated.
- Why a finding is considered a false positive.
- Why risk was accepted.
- Which fix was deployed.
- Which release, commit, or ticket should be checked during retest.
- Any product context that explains expected behavior.
Keep comments factual. Avoid putting passwords, API keys, private customer data, or unrelated secrets in comments.
#Tahr context
Testing instructions is the application-level base field. On a finding, authorization finding, or authorization matrix comment, choose Add this comment to testing instructions for future assessments when the comment should inform future assessments. The saved comment has a Tahr context badge and remains attached to its finding or authorization review item. Tahr merges it into effective instructions for future assessments without rewriting the application's Testing instructions field. Use it for durable testing guidance such as expected behavior, important scope, or a known product constraint. Do not mark secrets or one-off incident details as Tahr context.
#Tickets
If ticketing is configured, findings can be linked to an external issue tracker.
From a supported finding row or detail page, you can:
- Select Create ticket.
- Open the linked external issue.
- Refresh ticket status from the external system.
- See issue key, ticket status, destination, assignee, and sync details when available.
- Remove or close the external issue link when the workflow requires it.
Ticket creation depends on the configured destination scope. If no ticket action appears, check Ticketing integrations and confirm that the destination applies to the application you are reviewing.
#Retesting
Use retesting after a fix is ready.
For standard vulnerability findings:
- Mark the relevant finding as Ready to retest.
- Select the application in the Vulnerabilities tab.
- Select the assessment that produced the finding.
- Click Start Retest.
- Review the retest result after the new assessment completes.
The retest button is available only when your role can run assessments and the page has enough context to know which application and assessment should be retested.
Authorization findings and source-code observations may follow a different remediation workflow. Use their detail pages, comments, and tickets to preserve the review decision.
#Authorization
The Authorization tab combines two kinds of output:
- Authorization Findings: promoted access-control issues that need review.
- Authorization Matrix: endpoint-by-role evidence showing how different identities behaved.
Use this tab when you need to understand whether users, roles, tenants, objects, or operations were protected correctly.
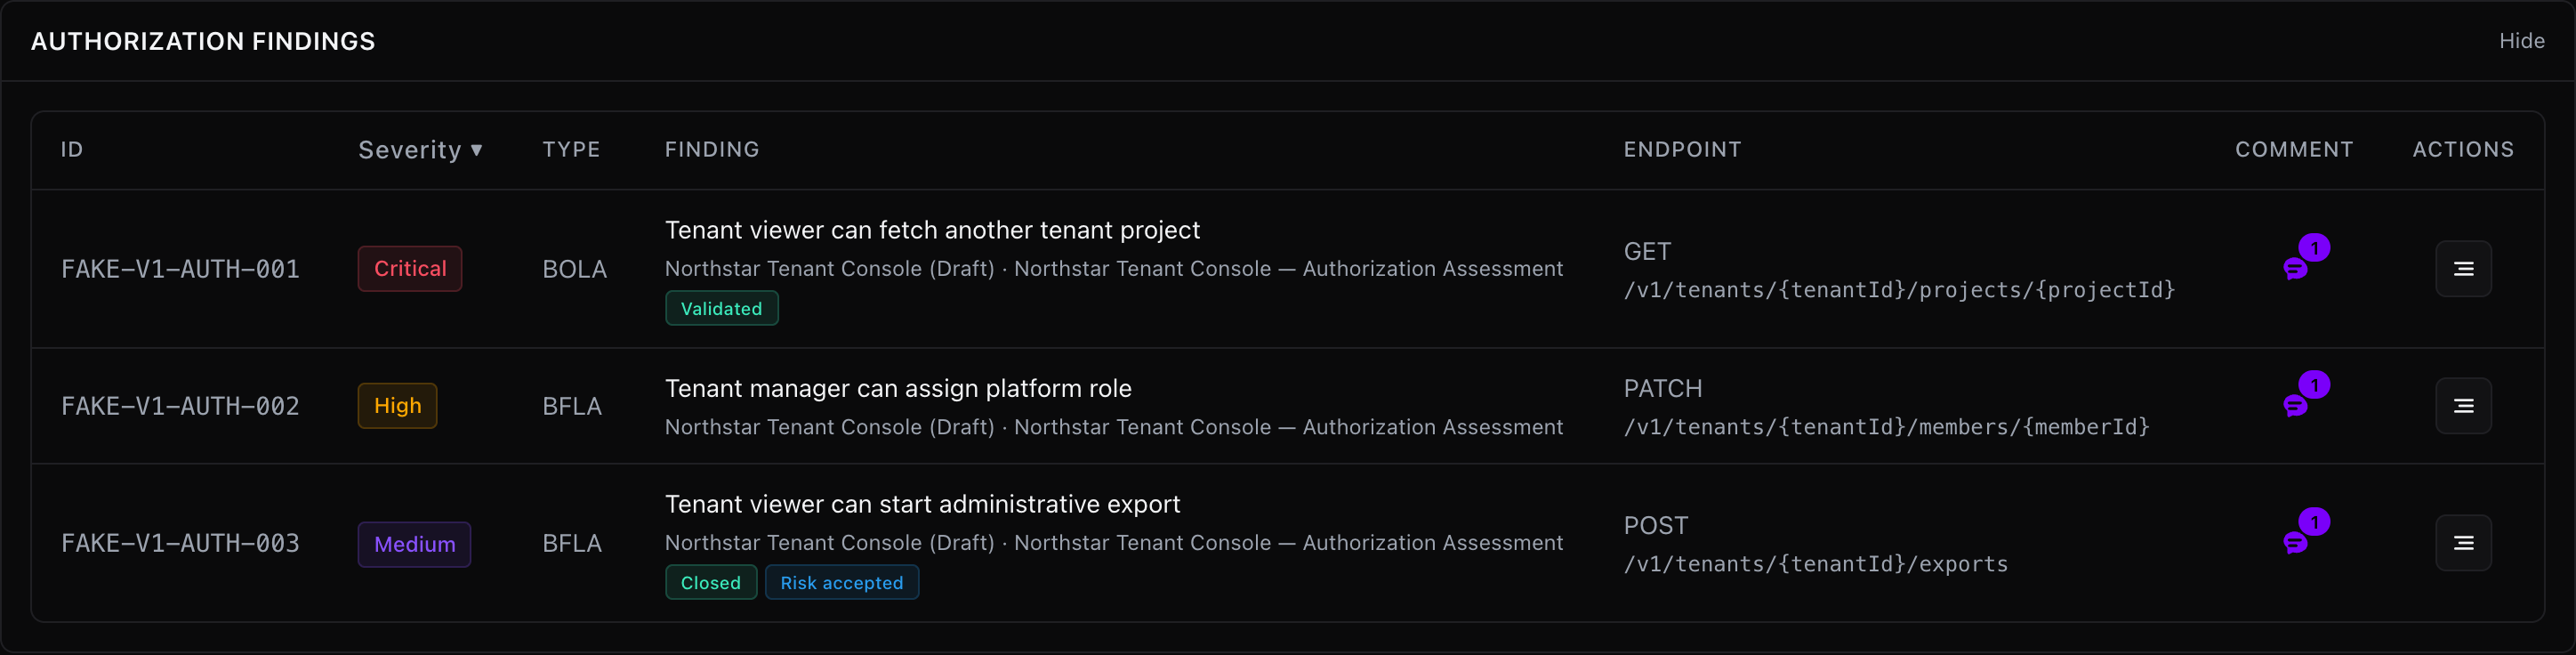
Authorization findings usually include:
- Vulnerability type.
- Endpoint and method.
- HTTP status code.
- Affected role or identity context.
- Reproduction steps.
- Verification method and verification details.
- Evidence references or screenshots.
- Remediation guidance.
- CWE, WSTG, CVSS, and confidence when available.
#Authorization filters
The Authorization tab supports filters that are specific to access-control review:
- Search: finds authorization finding IDs, titles, vulnerability types, endpoints, methods, CWE, WSTG, matrix paths, matrix methods, summaries, and categories.
- Application: limits results to one application.
- Assessment: appears after selecting an application.
- HTTP status: filters authorization findings and matrix entries by observed status code.
- Items per page: controls pagination for authorization findings.
Use the HTTP status filter carefully. A 200 can be expected for a public endpoint, suspicious for a protected endpoint, or harmless if the response is an error envelope. Read the row context before deciding.
#Authorization matrix
The matrix shows endpoint results across identities and roles. It is useful for spotting access-control patterns that a single spot check can miss.
The matrix is split into:
- Same-tenant access: checks how roles behave inside the same tenant or organization boundary.
- Cross-tenant access: checks whether one tenant can access another tenant's objects or operations.
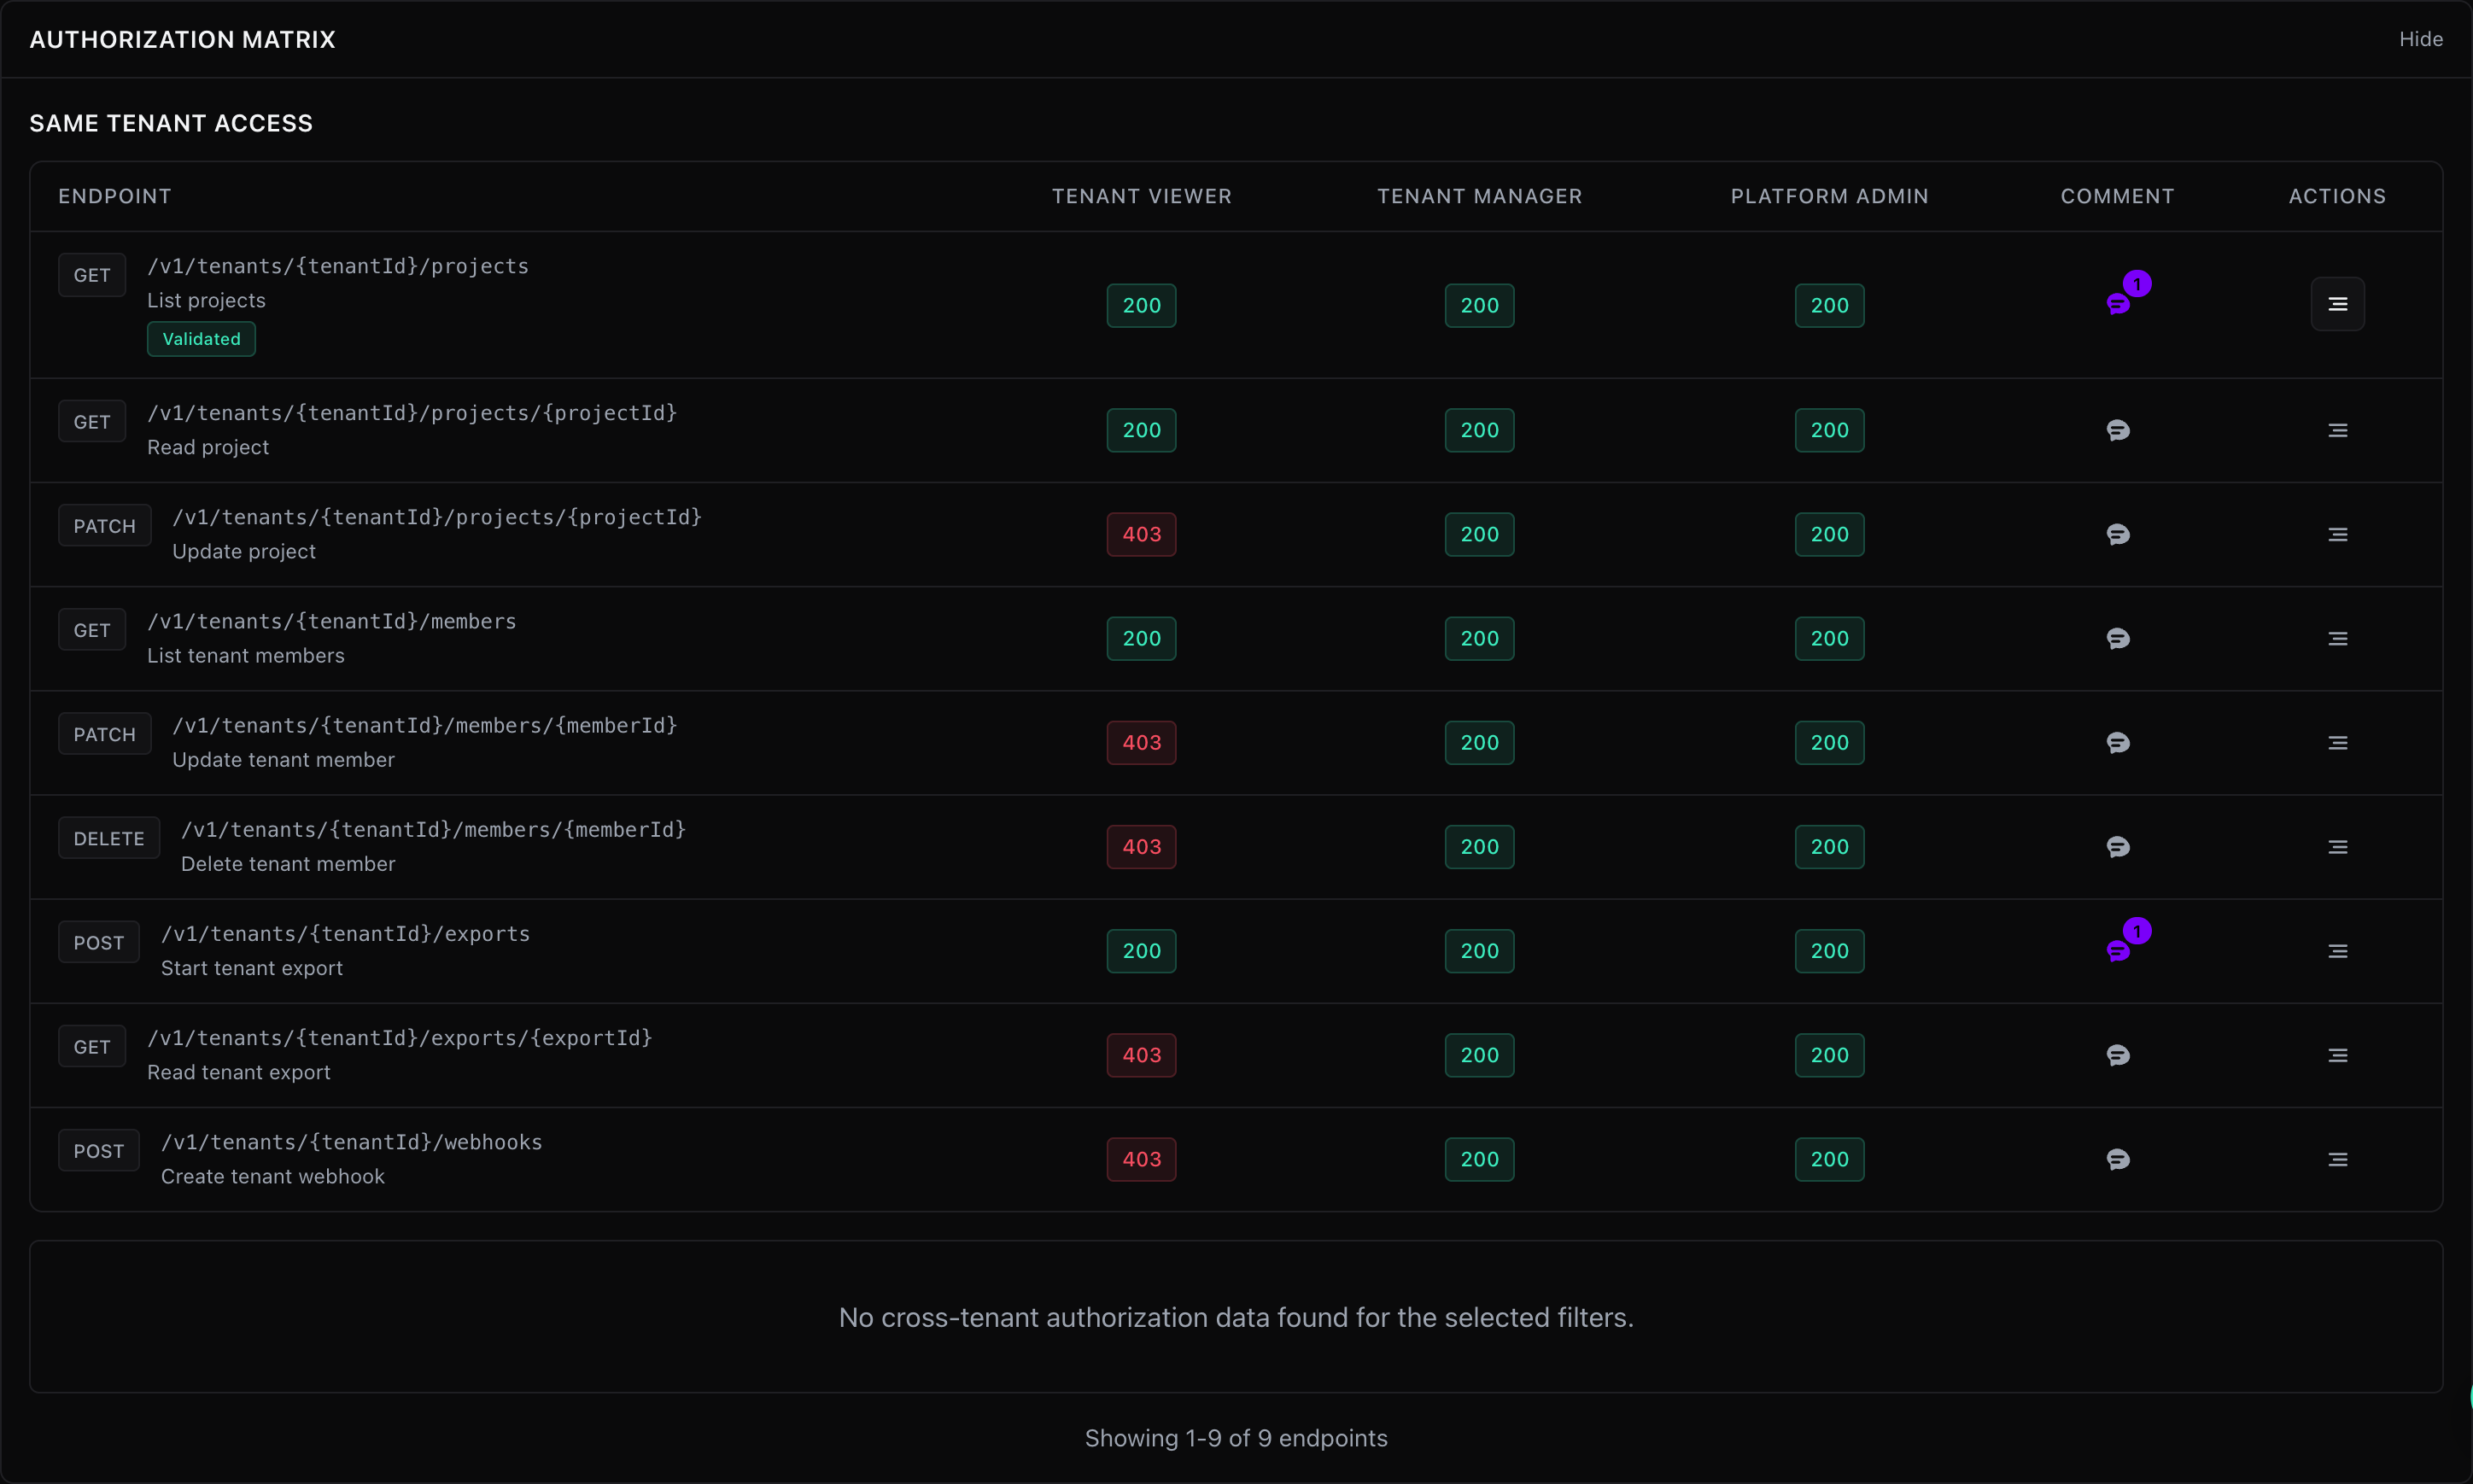
Each matrix row represents an endpoint or operation. Each role column shows the observed result for that role, usually including HTTP status and result context.
Use the matrix to answer questions such as:
- Which role was allowed?
- Which role was denied?
- Did the same endpoint behave differently across tenants?
- Did an endpoint return data, an error, or an empty response?
- Does the observed behavior match the intended product permission model?
The matrix is evidence for review. A matrix entry becomes a finding only when there is enough context to show a security issue.
#Attack paths
Attack paths connect related findings into a larger risk story.
Use Attack Paths when you need to understand how separate weaknesses could combine into a meaningful impact. An attack path can include:
- Goal.
- Final impact.
- Preconditions.
- Entry points.
- Ordered attack steps.
- Required vulnerabilities.
- Optional amplifiers.
- Related evidence pointers.
- Comments.
Attack paths are especially useful when individual findings look moderate but the chain is more serious. Review the required vulnerabilities first. If one required vulnerability is not valid, the path may need to be downgraded or rejected.
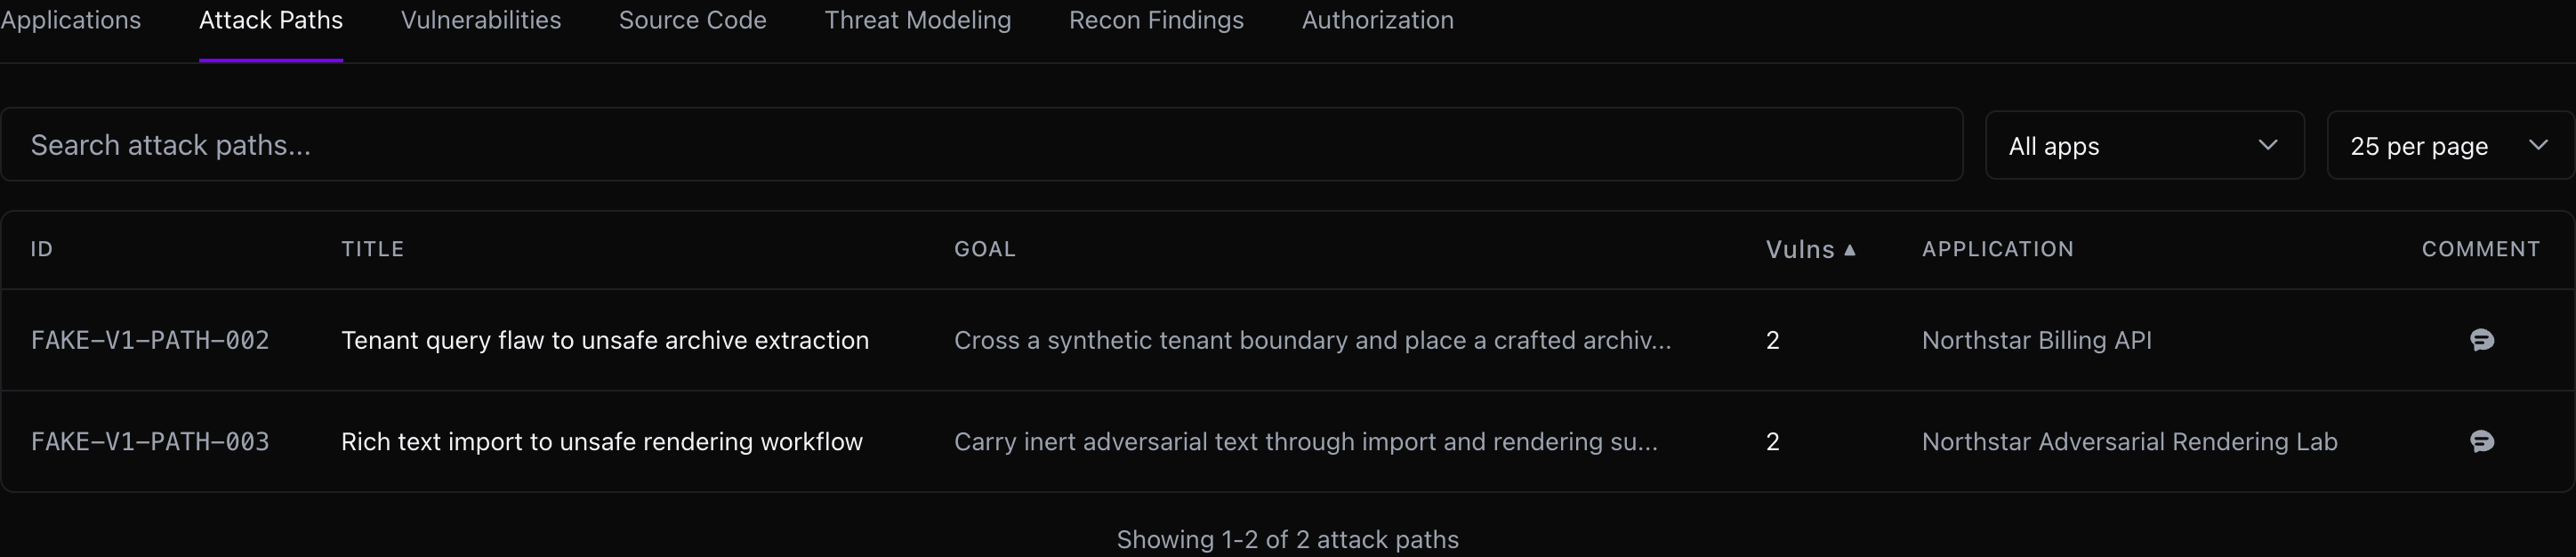
#Attack path filters
Use the Attack Paths tab to:
- Search by title.
- Filter by application.
- Filter by assessment after selecting an application.
- Sort by vulnerability count.
- Open the attack path detail page.
- Add comments when you have finding edit access.
In all-applications mode, Tahr focuses on the latest assessment per application so old paths do not crowd the current review.
#Source Code
The Source Code tab shows risks from source-code review assessments.
Use it when you want to review code-backed observations, architectural risks, missing controls, dangerous patterns, or remediation guidance tied to files and symbols.
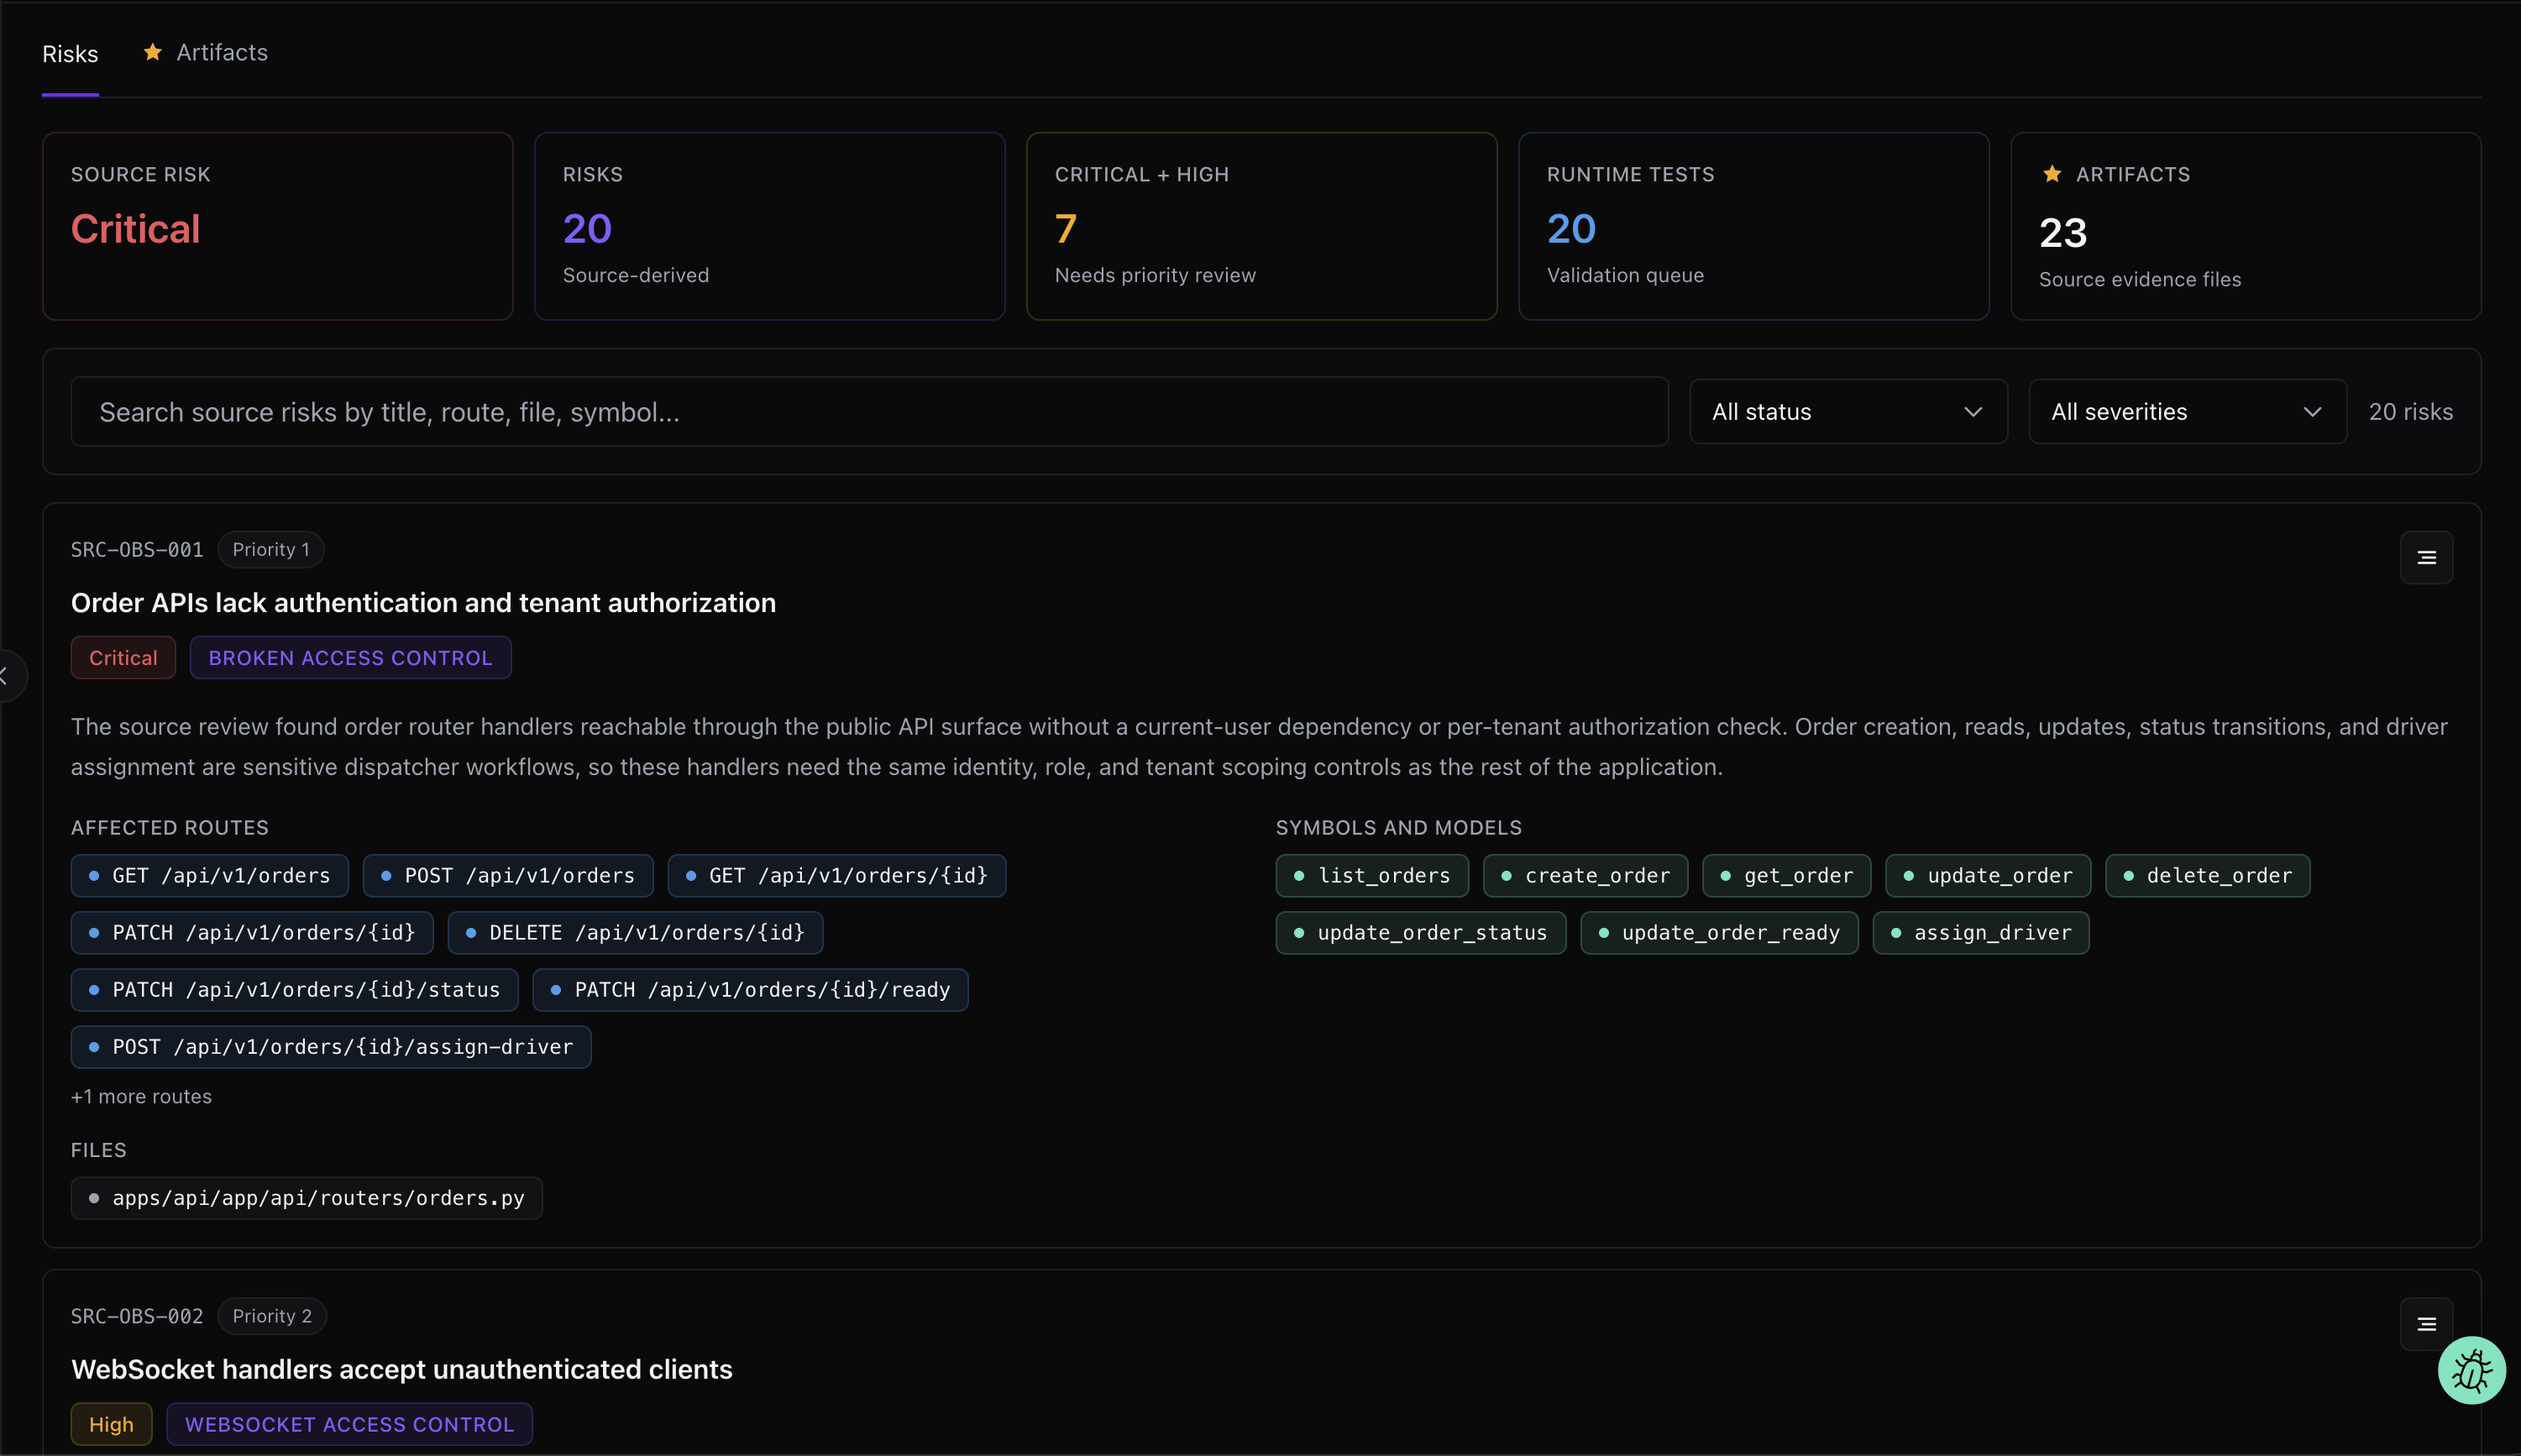
Source-code observations can include:
- Severity and category.
- Title and summary.
- Files, routes, symbols, or affected components.
- Evidence and reasoning.
- Remediation guidance.
- Import status.
- Linked finding actions when the observation has been imported as a finding.
Some source-code observations are reviewable risks before they become normal findings. If an observation has not been imported as a finding yet, normal finding actions may be unavailable. Import or open the linked finding before creating tickets or applying review states.
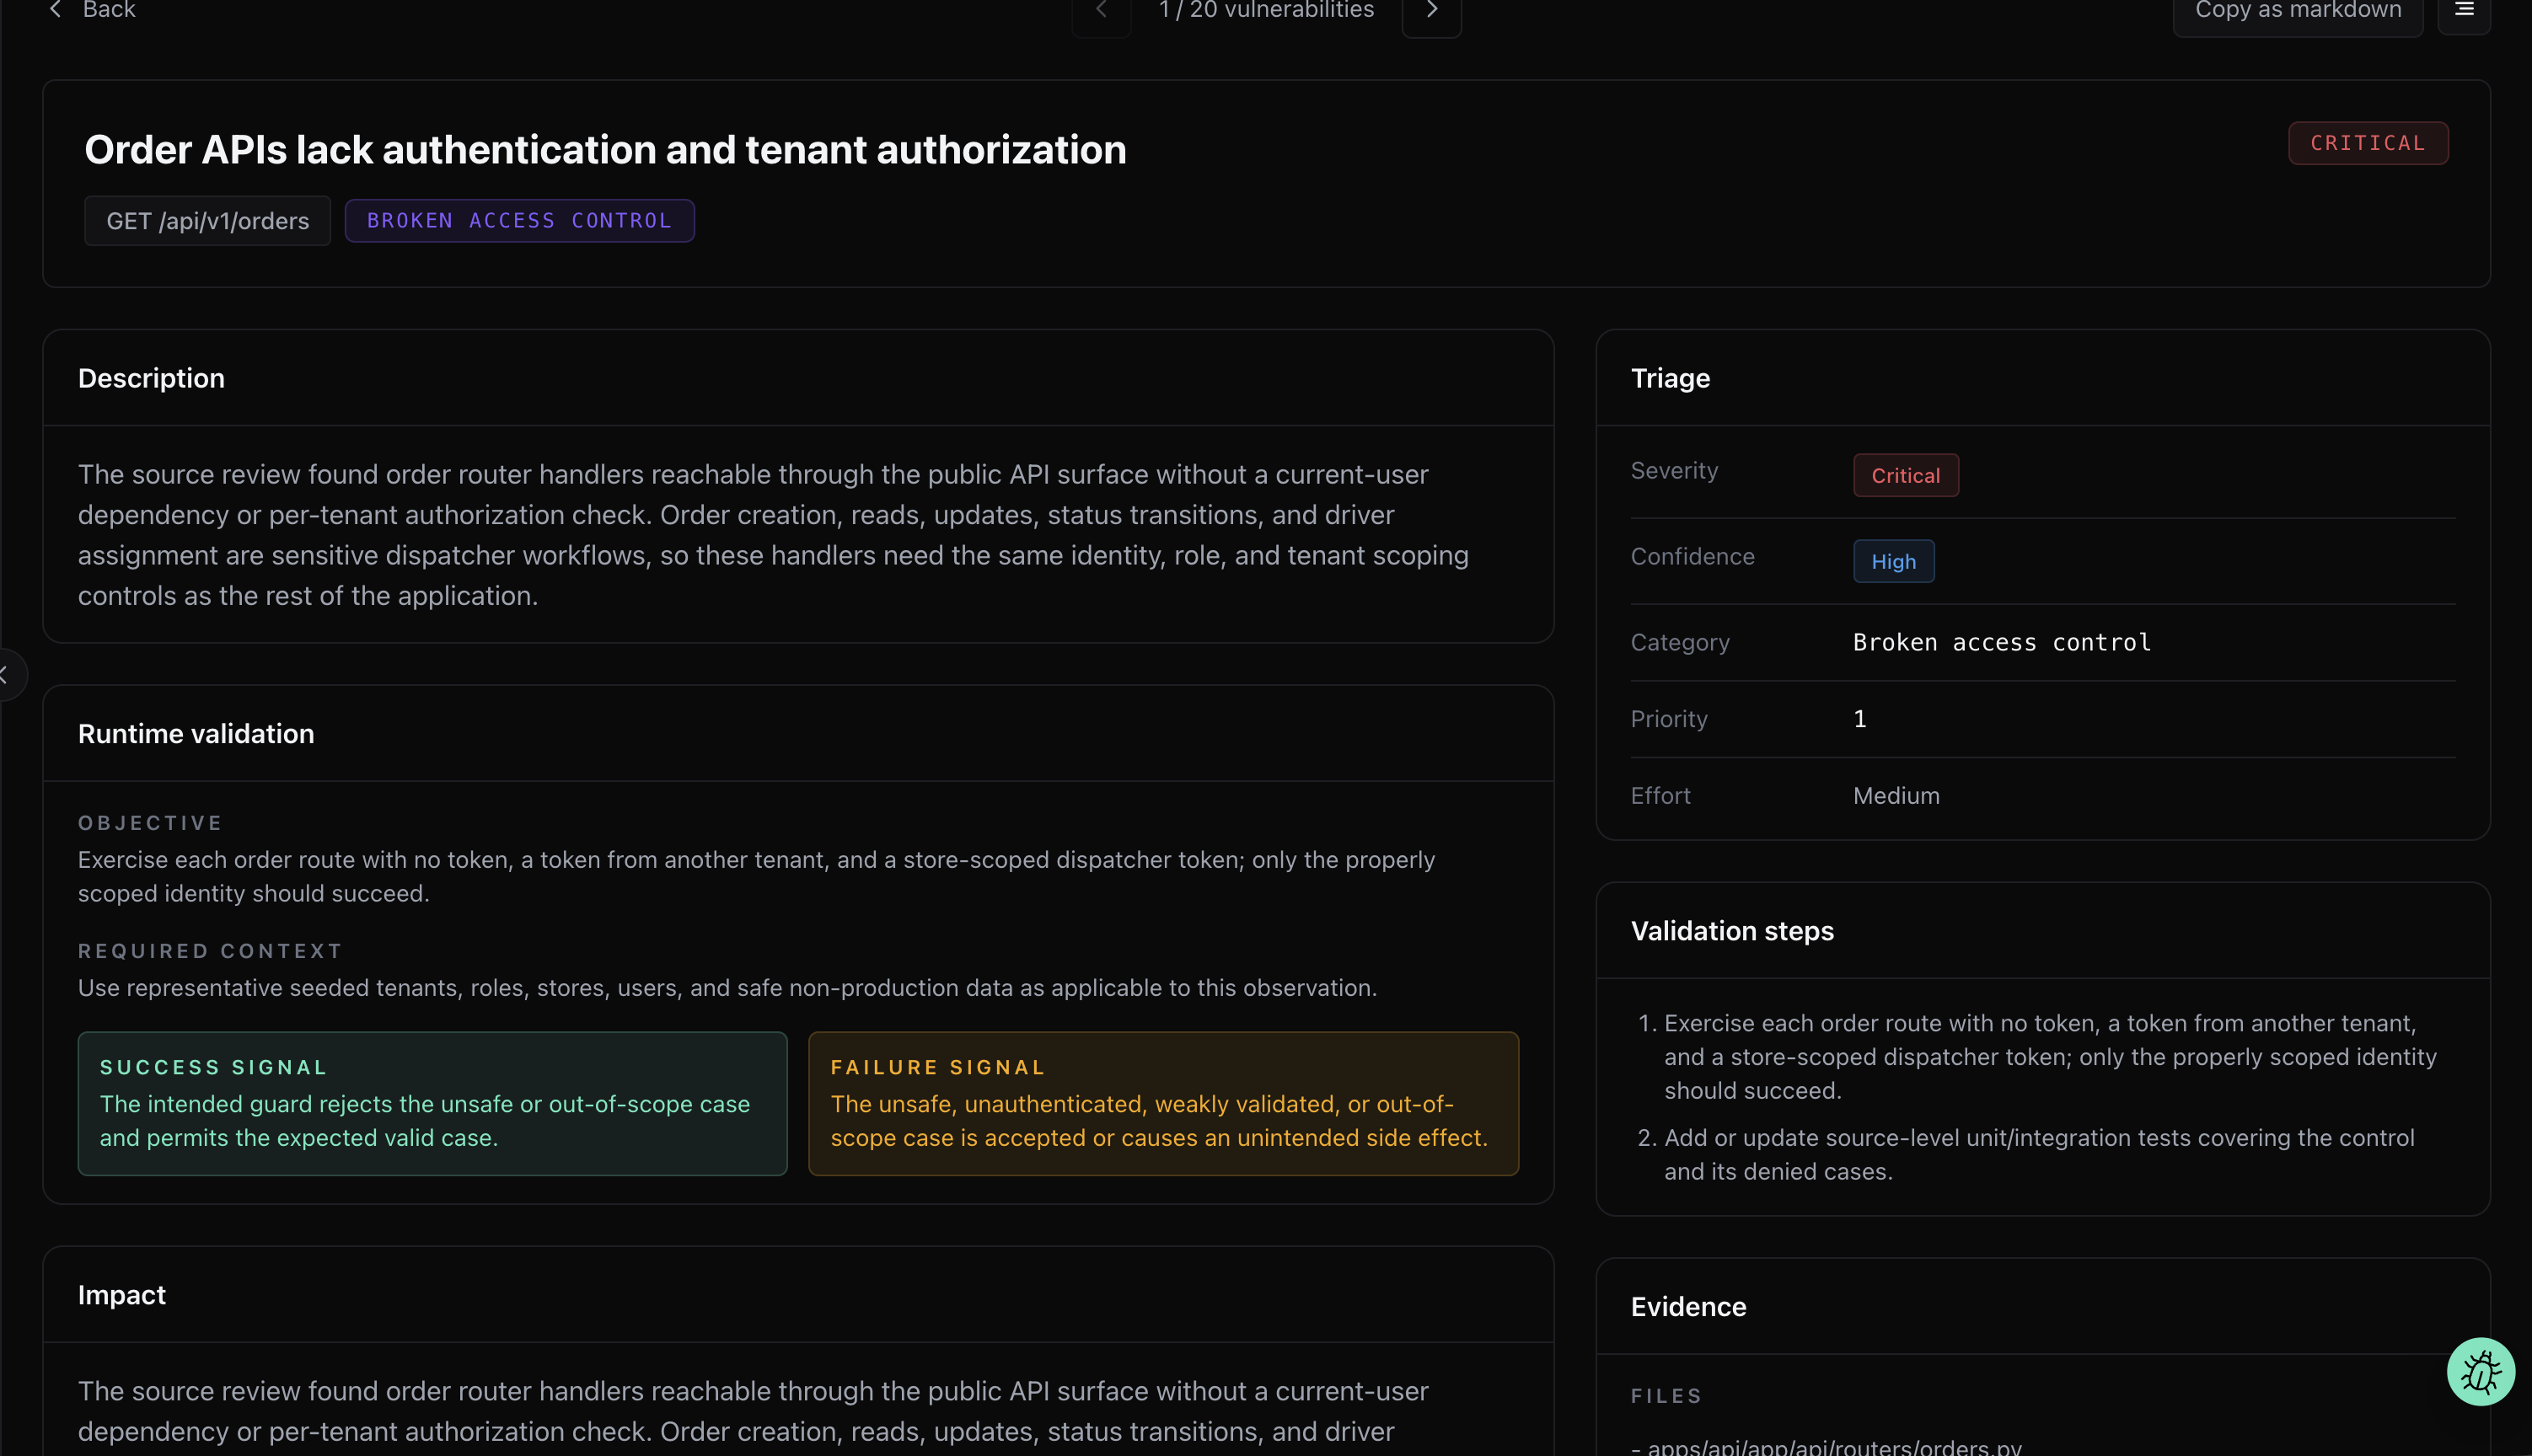
#Source Code filters
The Source Code workspace supports:
- Application selection.
- Assessment selection.
- Search by title, route, file, or symbol.
- Severity filtering.
- Status filtering for open, closed, false positive, risk accepted, ready to retest, and validated states.
Use source-code findings as source-review evidence. If you need runtime proof, add that requirement to the ticket or run a follow-up assessment that can test the behavior dynamically.
#Recon Findings
Recon findings come from discovery and attack-surface analysis. They can point to exposed endpoints, risky services, technology signals, undocumented routes, admin surfaces, authentication patterns, or other observations that affect security posture.
Use Recon Findings to:
- Review recon observations in the same triage workflow as other findings.
- Filter by application, assessment, severity, and status.
- Open details for evidence and context.
- Create tickets when an observation needs follow-up.
Recon output is most useful when paired with application context. A discovered admin route, debug endpoint, or public API surface may be expected in one environment and risky in another.
#Recon workspace
The recon workspace can include:
- Overview statistics.
- Endpoint counts.
- Method and authentication distribution.
- Public, documented, undocumented, admin, and debug endpoint groupings.
- Technology and authentication observations.
- Key findings from the discovered attack surface.
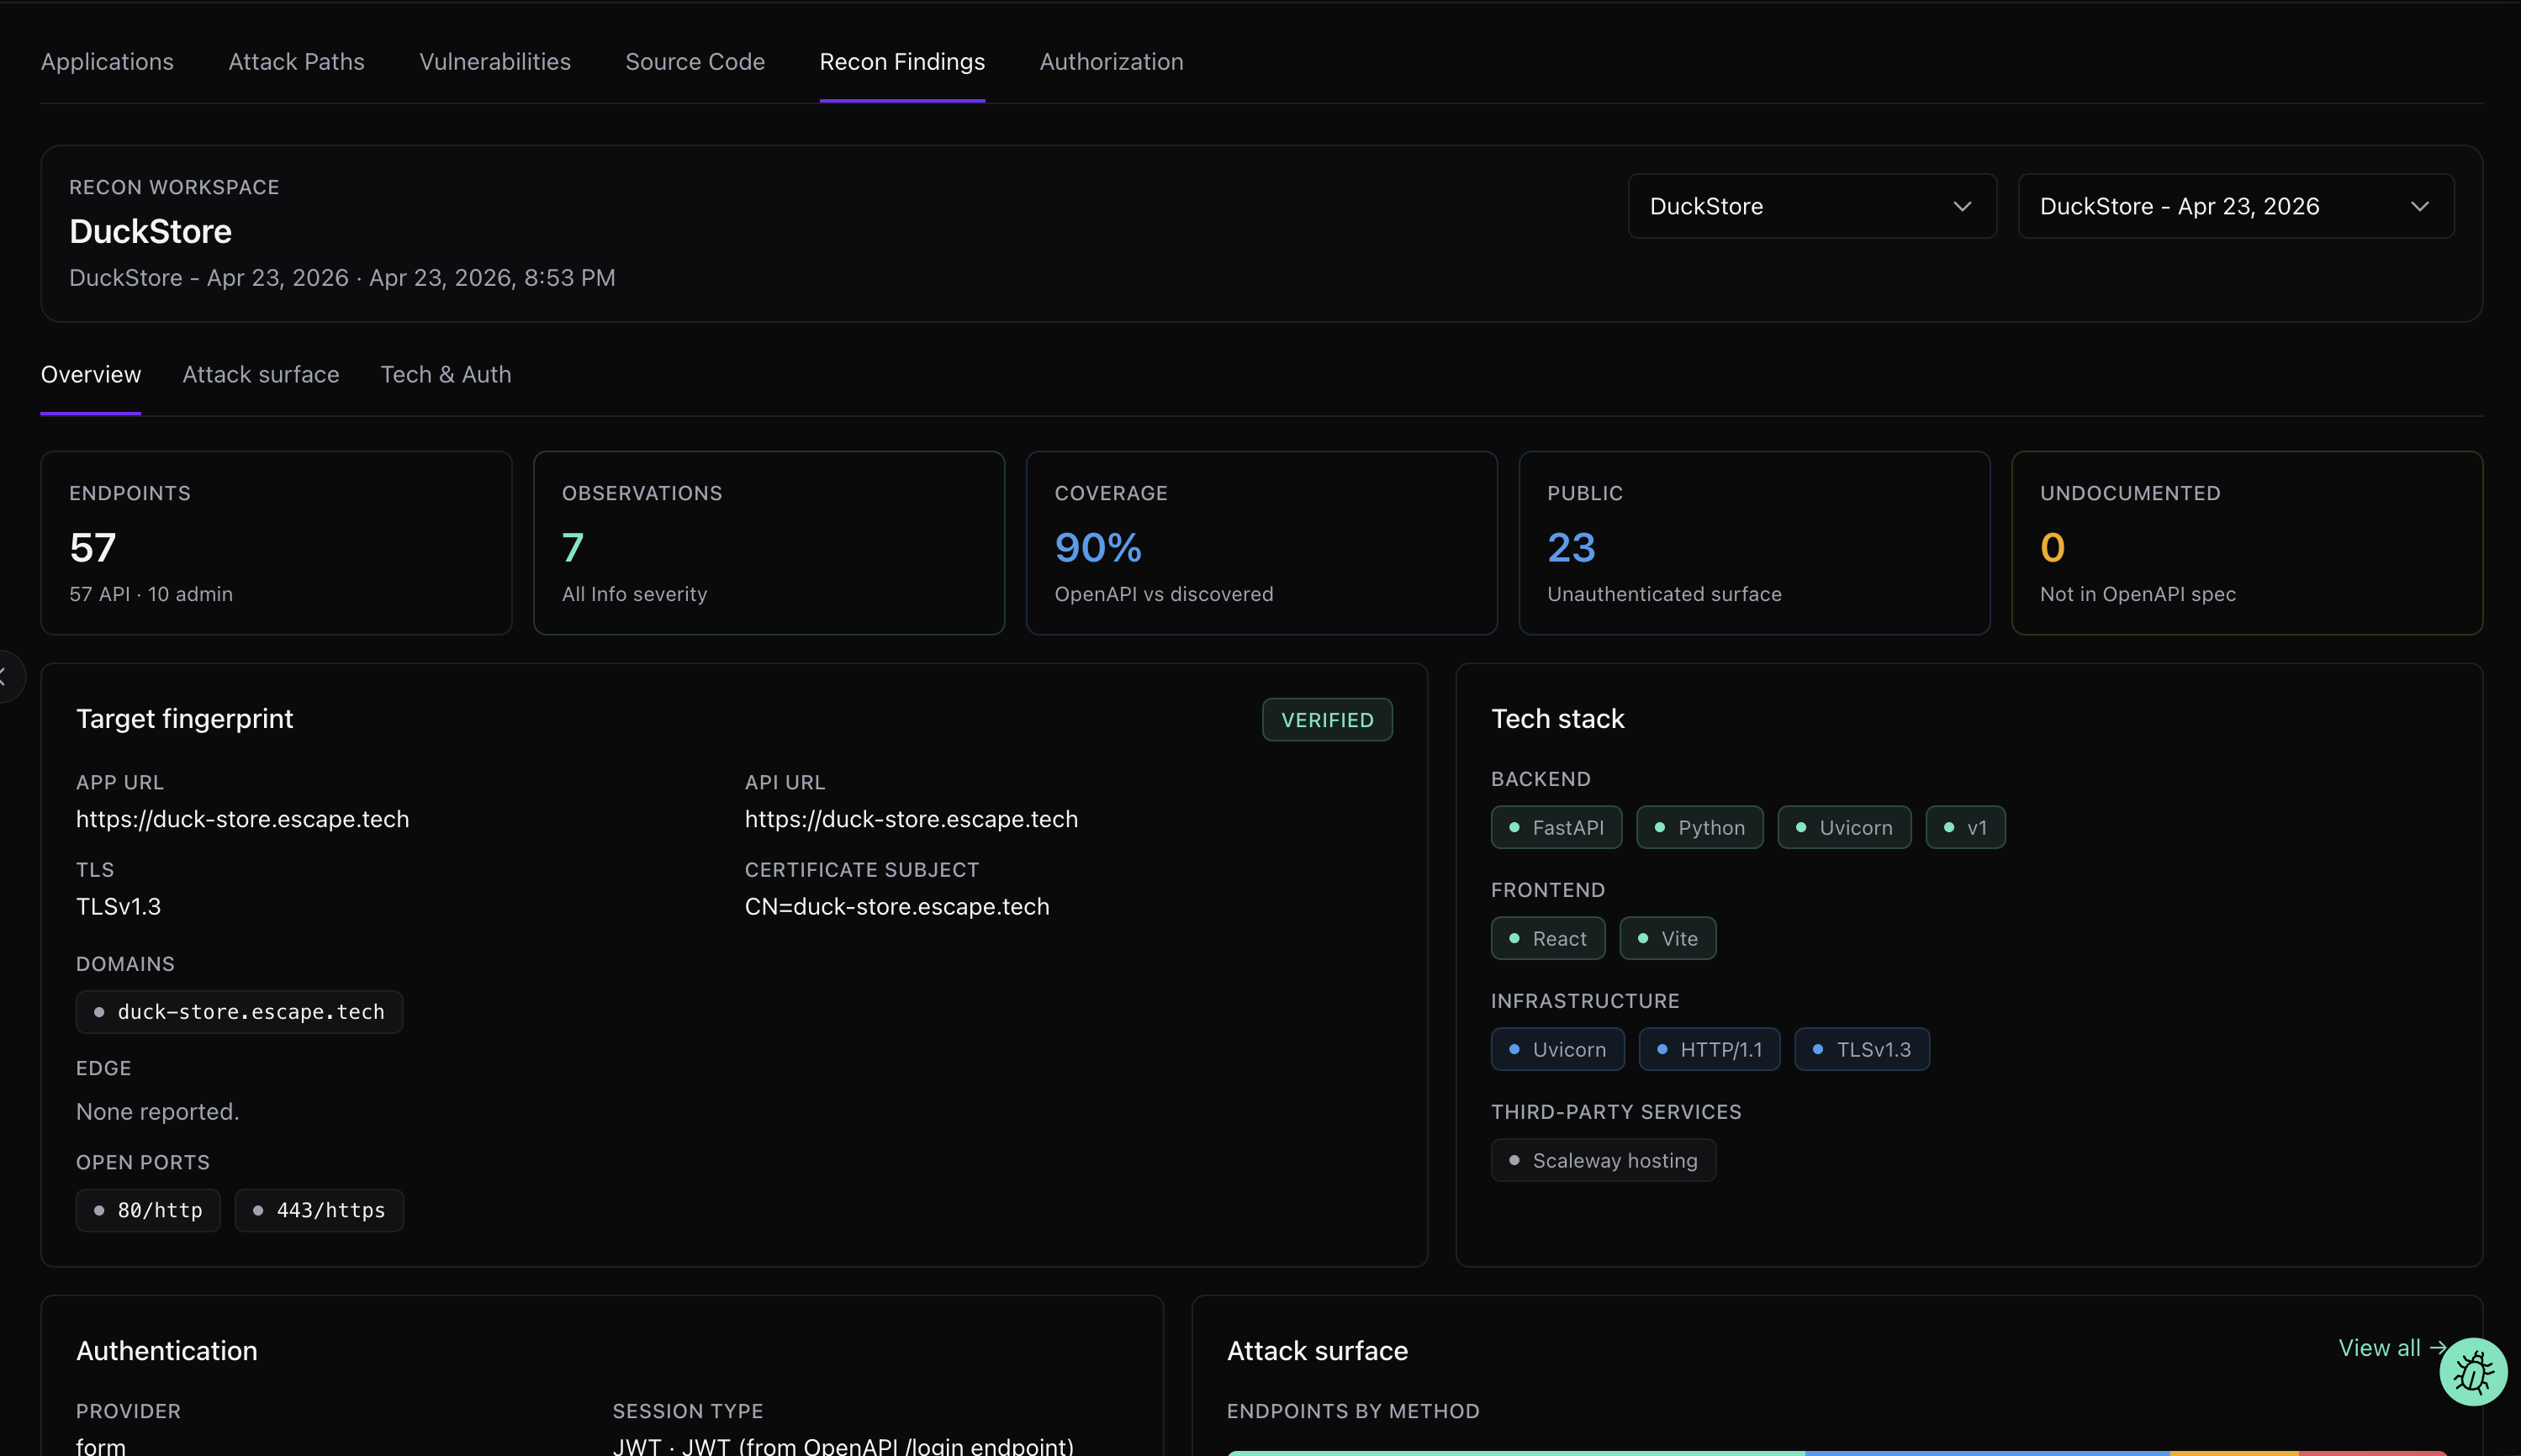
Use the workspace to understand the shape of the exposed surface before reviewing individual recon findings.
#Recommended triage flow
Use this flow for most assessments:
- Open Applications and choose the target.
- Review Critical and High vulnerabilities first.
- Open Authorization and inspect both findings and the matrix.
- Review Attack Paths to understand chained risk.
- Review Source Code if the assessment included repository access.
- Review Recon Findings for exposed-surface issues.
- Validate or reject findings with comments.
- Create tickets for remediation work.
- Mark fixed items as Ready to retest where supported.
- Close items only when the review decision is clear.
For large assessments, do not try to close everything in one pass. Start with verified Critical and High findings, then review Potential findings and lower-severity patterns.
#What to avoid
Avoid these review mistakes:
- Do not treat every Potential finding as confirmed.
- Do not close a finding without explaining why.
- Do not use Risk accepted when the issue is actually false.
- Do not use False positive when the issue is real but temporarily accepted.
- Do not create duplicate tickets for grouped findings unless each instance needs separate remediation.
- Do not ignore attack paths just because the individual findings look lower severity.
- Do not assume a
200response in the authorization matrix means a vulnerability without checking the response context. - Do not put secrets in comments, testing notes, or tickets created from findings.
The goal of the Findings area is to make every security decision traceable: what Tahr found, what evidence supports it, what your team decided, and what should happen next.
If a ticket status looks stale, open the finding or ticket row and choose Refresh ticket status. Check the integration connection and the external issue directly. If the status still does not sync, record the visible message and use Integrations for next steps.